Hello friends! I know I haven’t been very active on this blog and there is a good reason for that. Between my daughter’s food allergy treatment program which has us flying to California every 3 months and me still writing my dissertation, it’s hard to find time to write here. One thing that I do make time for is trying to live more sustainably which I share on my instagram page. That journey has led me down many paths and projects and I’m excited to be sharing this one with you. I started Low Waste Eid three years ago as a way to showcase and encourage a slower, more conscientious approach to celebrating Eid; an approach that is part of the ethos of our faith. Each year I am awed by the creativity and thoughtfulness of the contributors and this year is no exception. As you will come to see, it is perfectly possible to decorate and gift in a socially responsible way. All you need is a bit of imagination and resourcefulness. I am looking forward to writing more consistently about my low waste journey when life gets a little less chaotic but in the meantime, you can download the ebook guide full of low waste gift ideas and decor below.
If you enjoyed this guide, please share it with your family and friends and please show these wonderful contributors your support by following them on instagram and engaging with their content.
Eid is just around the corner and we are back with another volume of Low Waste Eid. This is something I really enjoy putting together because I truly believe it’s important to rethink our holiday traditions in light of the climate crisis. Foil balloons, wrapping paper, and shiny toys for Eid are all nice on the surface but what happens when we are done with these things. Where do they go? Out of sight, out of mind is not an ethically justifiable position. Change takes time and while perfection is not possible, we must start somewhere. I hope this guide will be a source of inspiration to take that step. I hope you’ll see that Eid can be just as festive and special when we lessen our impact by making or upcycling gifts and decor. If you decide to make something from the guide or are inspired to create something from what you have on hand, please share and use the hashtag #lowwasteeid. I’ll be sharing your creations on my instagram as we get closer to Eid.
If you enjoyed this guide, please share it with your family and friends and please show these wonderful contributors your support by following them on instagram and engaging with their content.
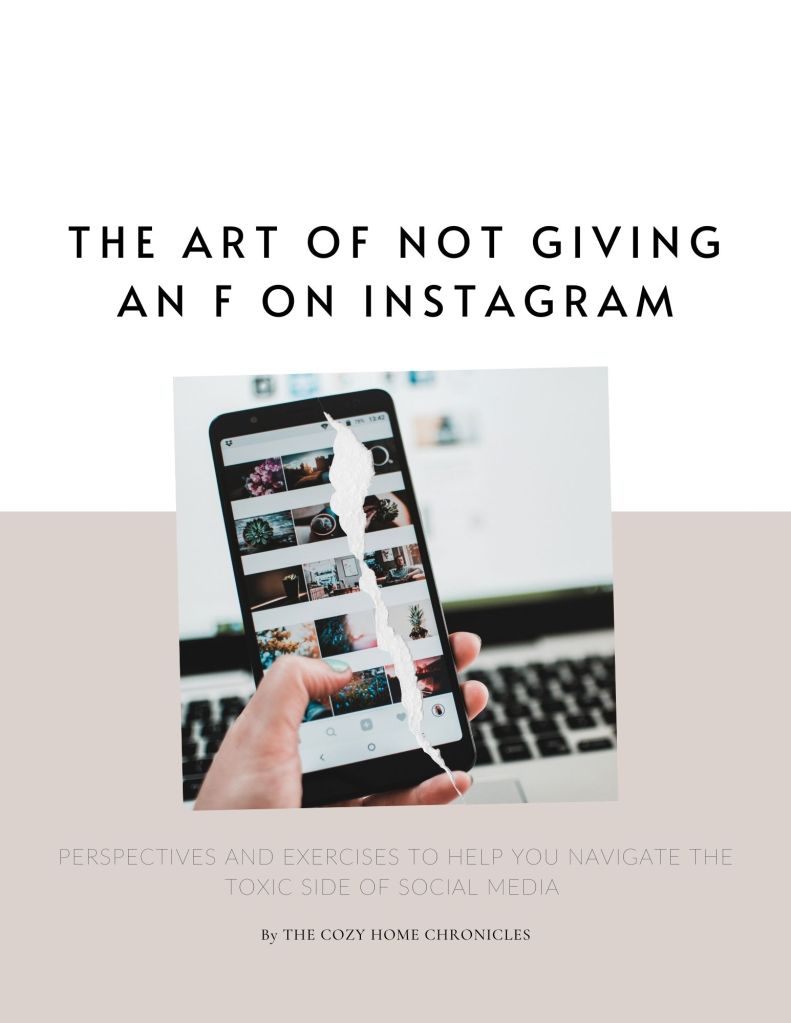
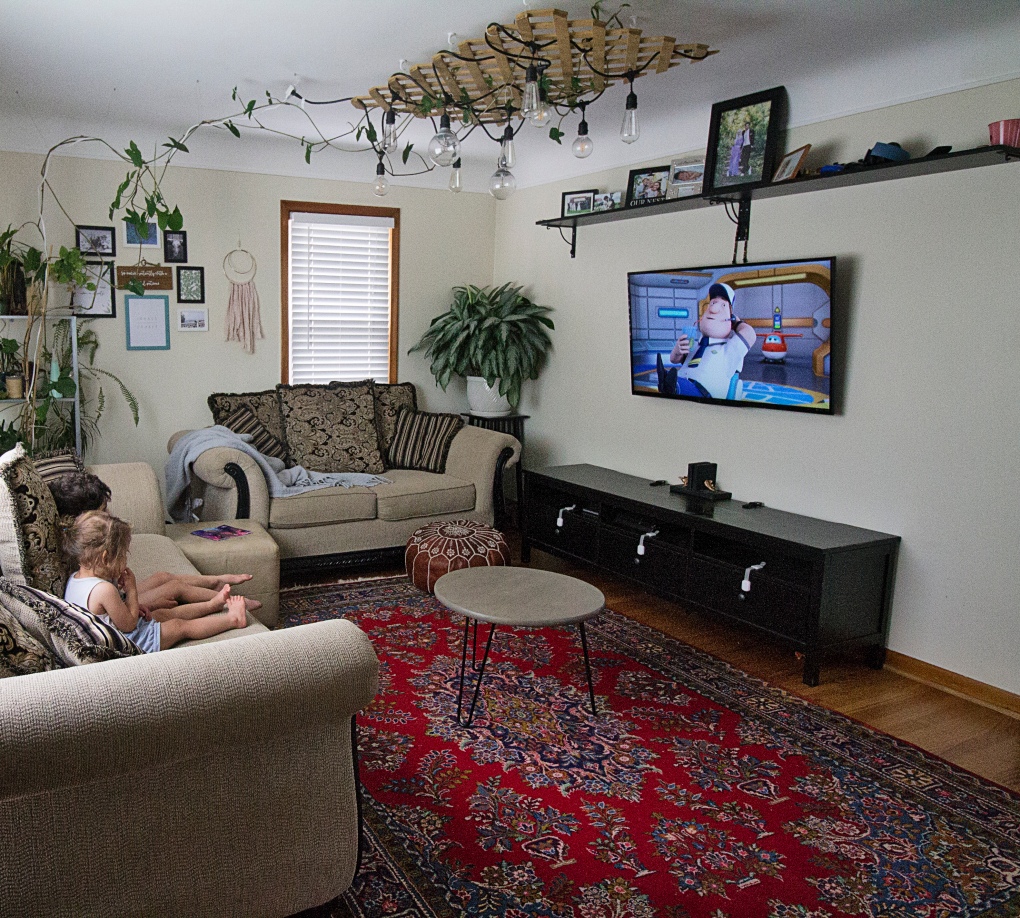
It’s been almost a year since we’ve updated this blog and a lot has been going on behind the scenes. Our youngest (baby #3) was diagnosed with multiple food allergies and to say it’s been a stressful journey is an understatement. Never mind that we are in the midst of a pandemic homeschooling a kindergartner while I try desperately to finish writing my dissertation. As much as I love writing and blogging, I’ve had to recognize that it’s just not possible in this season of life. To stay connected and keep a creative outlet for my own sanity, I transitioned to mostly posting on Instagram. It’s been interesting to say the least. As an anthropologist-in-training, I found myself fascinated by the behaviors and beliefs embedded in Instagram culture. But I also found myself mortified.
Even with a strong sense of confidence and contentment, it’s easy to get sucked into feeling negatively about yourself. As I begun to share posts highlighting some of these behaviors and assumptions, many people reached out sharing how Instagram made them feel. Some described that it felt like being in high school all over again; the cliques, the pressure to fit in, the bullying, etc. I began to reflect on this microcosm of reality and how toxic it is set up to be. For example, success is measured by metrics such as follower count, likes, and comments. Bloggers with high follower counts are given preferential consideration for paid work in the form of brand deals and partnerships where they in turn market said products through perfectly curated feeds all while promoting particular (and often quite problematic) narratives of beauty, health, relationships, and success. I soon noticed new bloggers employing a number of deceptive tactics to bump up their stats all the while spewing nonsense about authenticity and community. These experiences, along with multiple conversations I’ve had, inspired this workbook as a way to sift through the toxicity and the rat race that is influencer culture. This isn’t to say Instagram is all bad. I have made many wonderful friends on Instagram (friends I have never met in person but feel like I’ve known all my life) and I have found communities in the sustainability and social justice niches that inspire me to learn more and do better. I think one can find the good on social media platforms like Instagram but I also think it’s much easier to do once you’re aware of how to avoid the poison. There’s no magic solution but I hope this workbook will be a great starting point for you if you’ve ever struggled to stay afloat amidst illusions of the perfect LIEfstyle.
If you found this post and the workbook helpful, it would make me so happy if you shared it with your friends. I’d also love to hear any feedback in the comments below.
Hello friends! It’s been a minute since I’ve written a post on this blog. I’ll spare you all the boring details but since last Ramadan, we’ve added a third baby to our family, Sufi graduated with his MBA, and we flipped another house. I’m still trying to finish my dissertation while juggling life with three kids during a pandemic. As you can see we have our hands full! But as many of you know, blogging is my creative outlet and absolutely necessary for my mental health so I’ve made some time to do something I enjoy while creating a resource for you to help you make Eid 2020 special as sustainably as possible.
Low Waste Eid is a compilation of beautiful and thoughtful gifts from a diverse group of talented Muslim bloggers. The emphasis is on minimizing waste and getting creative by using what you have around your home. These days, it’s easy to get caught up in the consumerist impulse even when it comes to Muslim holidays but given the devastating effects materialism has on the environment, human rights, and our spiritual health (among many other things) it’s time we rethink how we consume. Even if you purchase the majority of your gifts, I hope you’ll attempt to make one of these low-waste gifts from our guide. Every journey begins with one step and there’s never a better time than now to take a step towards living more sustainably.
If you enjoyed this ebook, please share it with your family and friends and please show these wonderful contributors your support by following them on instagram and engaging with their content.
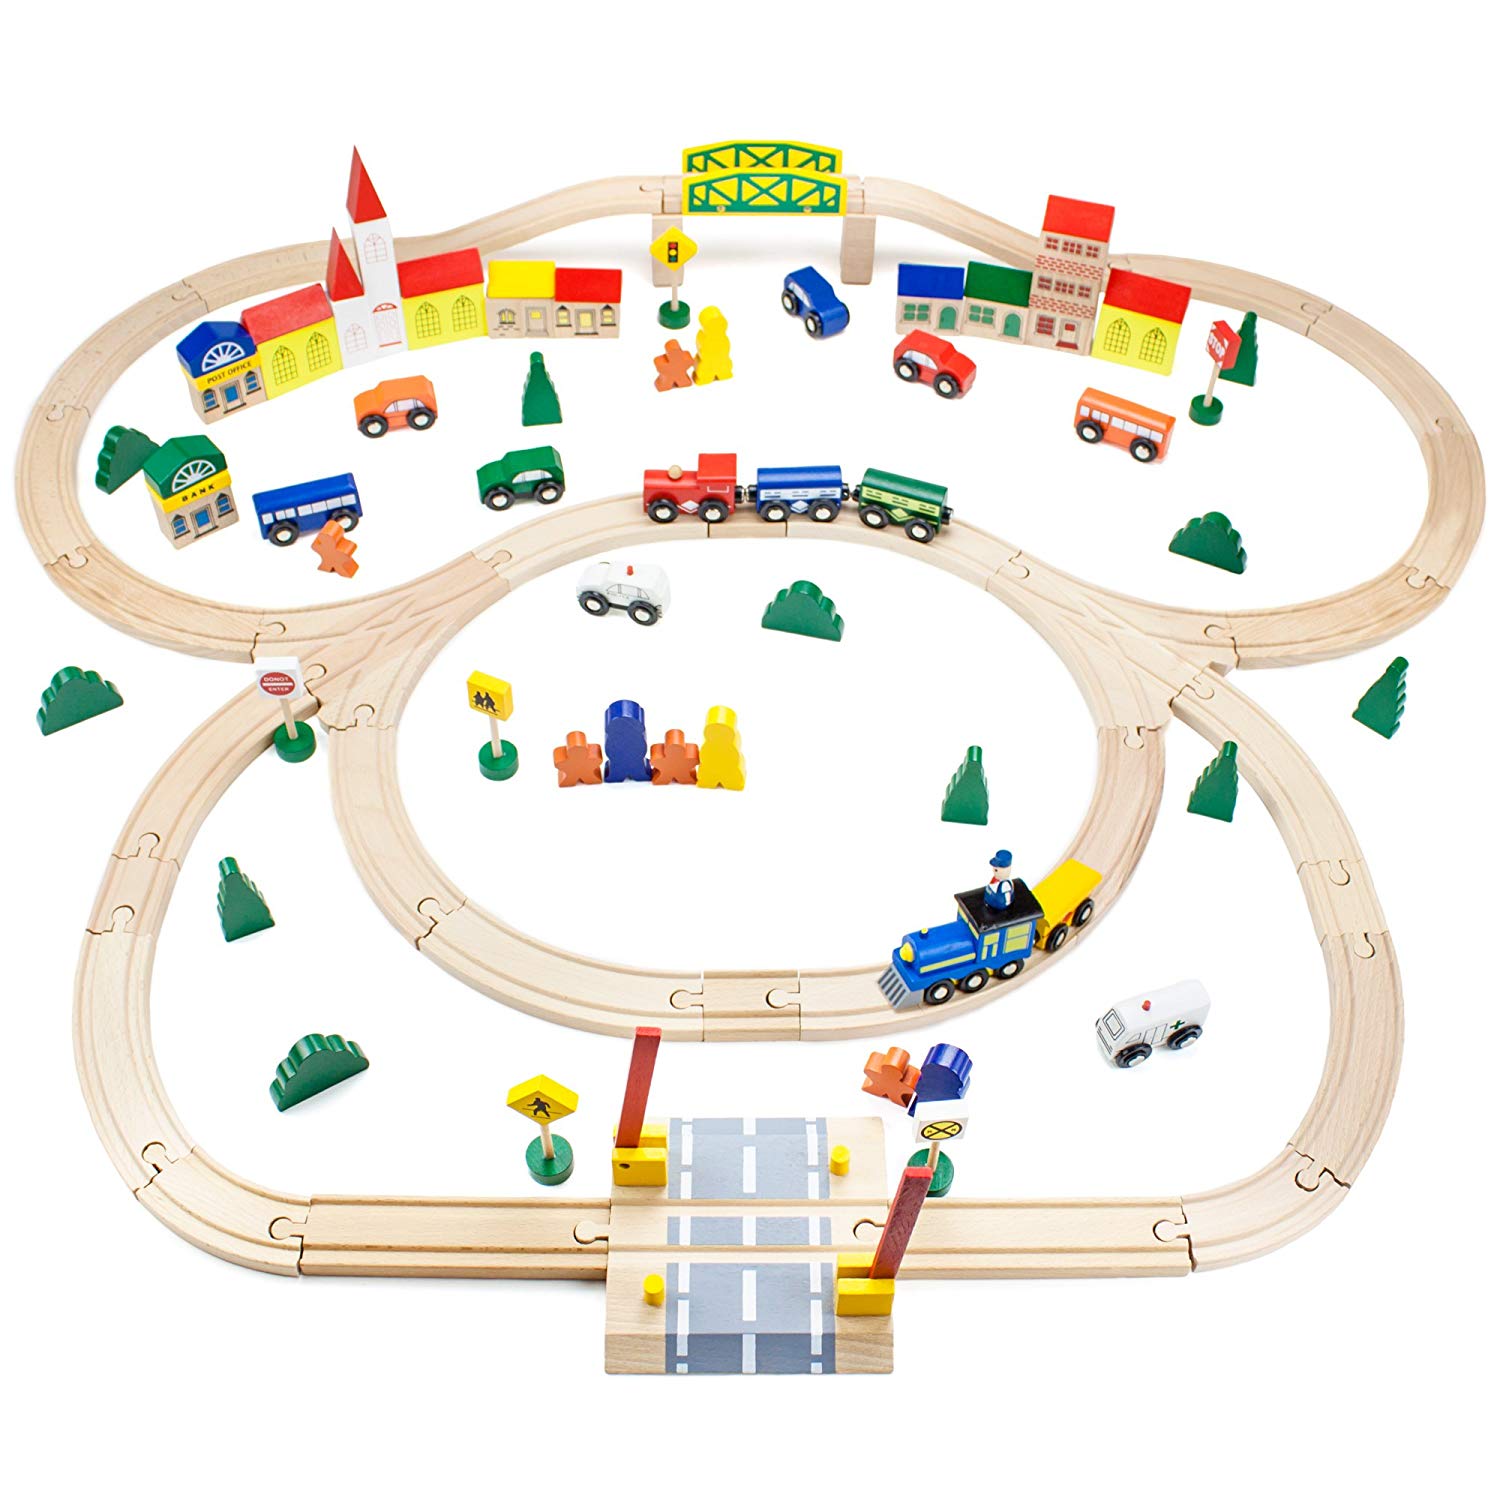
Ramadan is more than halfway over and like us, many of you are probably thinking ahead to Eid (early Eid Mubarak!). While many people traditionally give Eid money to children, it seems more and more people are opting for physical gifts. Often these gifts can be a source of stress for parents as the accumulation of toys is daunting to deal with (speaking from experience here). On top of that, many toys are made cheaply to satisfy short term interests and end up being wasteful in the long run. What to do? That’s where this gift guide comes in!
The list and links you will find in this guide are for toys that are either eco-friendly (made from wood or recycled plastics), sustainably and ethically made, or for long term educational use. These are toys we have either purchased for Eid previously or are considering for Eid this year. I’ve tried to include diverse options and price points so I hope you’ll find something for you. After the list of toys, you will find sources for some fun DIY gift options as well as printable Eid envelopes if you’re going to go the cash route. I am also including a list of ideas for fun experiences you can do with your family on Eid. It should go without saying that Eid is not about gifting but rather a time of celebration with family so please don’t let this post make you feel overwhelmed. Lastly, I would like to point out that buying second-hand is the more sustainable option for our environment but I understand that it’s frowned upon in certain cultures as “cheap.” These toys are for those looking to purchase new toys but want more mindful, socially responsible options; they are definitely not the latest and greatest toy trends of 2019.
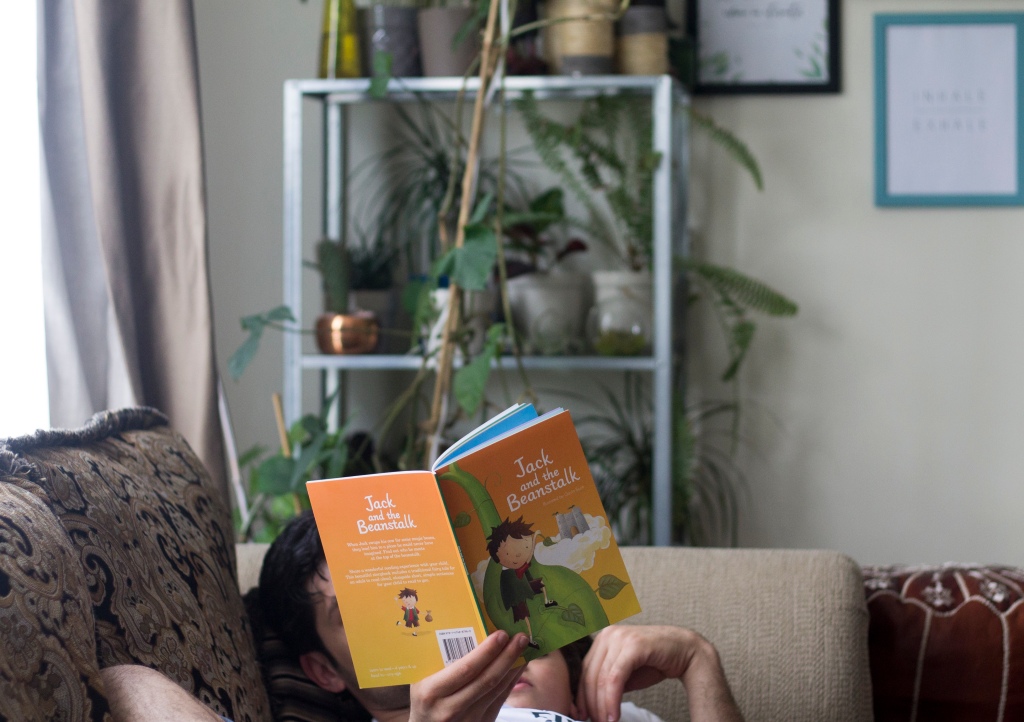
Books are one of my favorite gift options for children because they open up a whole new world and encourage parent-child bonding time. Gifting books is extra special when you know the child’s interests and nothing is better than seeing a child’s face light up as they flip through a good book. Here are some wonderful book options:
2. Opinel Le Petit Chef– This knife and peeler equipment set for children aged 7-11 is an excellent gift for your favorite kitchen helper and offers the perfect opportunity to bond over meal prep as well as teach cooking safety early on.
3. Kiddie Woods Doctor Kit-This doctor’s kit is beautifully made and perfect for imaginative play. We bought this for our kids for Eid last year and they still love role playing doctor together. Needless to say it was a huge hit!
4. Kid’s Beginner Microscope– If you have a curious, budding scientist on your hands, this microscope is perfect for introducing STEM and encouraging exploration and learning.
5. PlanToys Assorted Fruits and Vegetables– These are the perfect addition to a play kitchen set or for a child that enjoys playing chef. I love this company because of their focus on sustainability and using reclaimed rubber woods. They have a large and wonderful selection of wooden toys for babies and toddlers and you can browse them all here.
6. Tegu Magnetic Blocks-Magnetic blocks are a great toy for encouraging creative play and supporting cognitive development. I love that Tegu blocks are made from durable solid wood and that the company cares about social impact by prioritizing “long term employee growth and development.”
7. ALEX Pretend Tin Tea Set-What child doesn’t love a good tea party? The set pictured is made of tin and I included it because it’s durable and withstands the clumsiness of toddlers but if you’re gifting an older, more responsible child then this porcelain set is a gorgeous and affordable option.
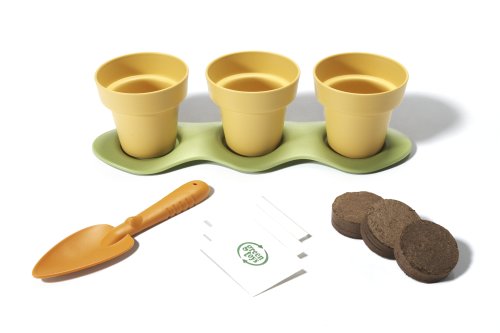
8. Green Toys Indoor Gardening Set– These planters with seeds make an excellent gift for the nature-loving child in your life. I love Green Toys because they are made from recycled plastics and they also have a huge selection of toys for children of all ages. You can browse them here.
9. Wishbone Design Studio 3-in-1 Bike-This is the priciest gift on this list but if you’ve been on the lookout for a toddler bike then this is a wonderful option. It’s made from sustainably-harvested wood, converts from a baby walker to a balance bike, and won Best Green Toy in 2011.
10. Cuddle + Kind Handknit Dolls– You can’t go wrong with a classic doll especially when it’s handmade from 100% cotton using sustainable, fair trade practices. My favorite part about this company is that it’s family-owned and the purchase of each doll provides 10 meals to children in need.
11. National Geographic Fossil Dig Kit– Another great STEM gift that is the perfect balance of learning and fun. I’m probably getting this for my son because he LOVES to “dig” for dinosaur bones in the yard and I love the hands-on learning it will offer. Not a dinosaur enthusiast? No worries! National Geographic has plenty of other hands-on learning kits here.
12. Sarah’s Play Silks– These play silks are not only beautiful but perfect for all sorts of open-ended play. I love this company because it’s family-owned, specializes in Waldorf inspired toys, and uses natural materials such as wood and silk.
13. HABA Bonita Garden– This beautifully painted stacking peg toy is perfect for younger toddlers and fosters creativity, fine motor skills, and hand-eye coordination. I love HABA because their wooden toys are made to last and are colored with non-toxic, water-based stains. The German company also has a diverse selection of other wooden toys and puzzles that you can browse through here.
Do-It-Yourself Gift Ideas
These are some simple, fun DIY gifts you can make together with your kids. I am considering making one of these to have on hand for young Eid visitors or to send as Eid favors for my children’s classes.
Giving the traditional Eid money is easier because it takes the stress out of gift giving and gives the parents the option to spend or invest as they see fit (college fund, much needed summer clothes, etc.) . If you go that route, we have you covered with some free and purchasable Eid envelope options.
While we do usually get one simple gift for the kids, we believe the best gift (and most sustainable gift) is spending quality time together so we’re taking the guesswork out of your Eid planning by sharing some fun things you can do during these special days.
A trip to the zoo
A movie outing
A picnic, BBQ, or kite flying at the park
Strawberry picking (or whatever fruit is in season)
Mini-golf
Bowling
A family bike ride
A visit to a local museum
Go Paddle-boating or canoeing
Go out for ice cream
Take family pictures
We hope you’ve found this comprehensive gift guide helpful. If you do, we would greatly appreciate you sharing this post with family and friends across your favorite social media channels. If you have any questions or suggestions, feel free to leave them in the comments below and as always….
The month of Ramadan begins in just a few days and aside from decorating which I’ve written about in the past (see here and here), I’ve been trying to find ways to get the kids more involved in the spirit of Ramadan. Both of our children are at an age where they understand certain concepts such as “helping” and “being nice” so I wanted to take this month as an opportunity to practice mindfulness of their actions and reflect on the impact those actions can have on themselves (feeling good), on others ( the social impact of a helping hand), and on the environment (consequences of consumption and the destruction of nature). I’ve come across similar good deed countdowns for Christmas and Ramadan but found that many of them were geared towards older children so I tried making a list that was appropriate for children aged 2+. Obviously they won’t be able to do all of these on their own but that’s kind of the point; it’s a family activity.
Feel free to switch up the order of the cards and even alter the activity to fit your lifestyle and/or child’s level of understanding. I think you’ll get the most mileage out of these activities when you use them to spark conversation on why we do what we do (making beds=the importance of cleanliness, visiting a sick family member=caring for others in need, planting flowers=the earth as a trust we should care for, etc.) You get the point. If you do have a Ramadan advent calendar or are considering making one, just know that the document I’ve included can be adjusted during the printing process to fit the size of your calendar. Simply click on “layout” and select how many pages you’d like to print on a page. For my calendar with 3×3 inch pockets, I printed 16 pages on 1 page so that I could cut them out as cards about 2.5 x 2.5 inches in size. The only thing I would suggest is that you print them on sturdy card stock so that you can use them year after year.
I think that about covers everything. If you found this post and the printables helpful, we would love it if you would share with your friends and/or provide feedback in the comments below. And if you do participate in our 30 days of Mindful Deeds, we would love it if you would share on your instagram stories or feed and tag us @thecozyhomechronicles. We will also be sharing in the hopes of inspiring others to try these activities because it really does take a village and together we can hopefully raise a kinder, more mindful generation.
Last week we went to Walt Disney World for what will likely be our last vacation as a family of four before baby #3 arrives early this summer. Although we’ve vacationed with Disney on a cruise last year, this was our first experience with the parks and it was nothing short of magical. Now that we’ve recovered from the miles of walking and have settled back into a mostly screen-free, sugar-free routine with the kids, I thought it would be perfect to break down our 5-day trip and answer some of the frequently asked questions we received from those following along on Instagram. Planning a Disney trip can be overwhelming because there are so many attractions, dining options, and resorts to choose from so we hope that by sharing our itinerary and tips, we can make this process less intimidating and stressful for you.
Our Stay
With resort options ranging from $100/night to $1,000/night (even more), choosing where to stay can really make or break a vacation budget. We stayed at the All-Star Movies Resort which had a 4.3 rating on Google and was on the lower end of the range for Disney resorts. It wasn’t anything fancy but it did the job and was definitely family friendly with a large food court, two swimming pools, a playground, jogging trail, and arcade. The kids enjoyed the themed statues from Toy Story and 101 Dalmations and we loved that there was on-site laundry so that we were able to return home with clean clothes in our luggage.
The best part about staying at a Disney resort is that there is no need to rent a car (and car seat)s or worry about transportation. A Disney shuttle picks you up from the airport and drops you back to the airport at the end of your stay. On top of that, there are round the clock shuttles from the resort to all of the Disney parks. Not only does this translate into savings but the peace of mind that comes from not having to worry about strapping toddlers into a car, GPSing to the parks, and parking is priceless. We can’t stress that enough.
Attractions In this next section, I’m sharing all the rides and shows we experienced at each of the parks. With me being pregnant and having two kids aged 2.5 and 3.5 meant we were limited with what rides we could go on so everything listed is friendly for all ages. A few weeks before our trip, we went through the map of each park and checked off potential rides and shows we would hit. Traveling with toddlers means you have to be very flexible and work around their needs so our itinerary served more as a guide rather than a strict schedule but we highly suggest you do the same before you travel as it takes much of the guesswork out of what comes next.
Disney’s Magic Kingdom The Magic Carpets of Aladdin Jungle Cruise Peter Pan’s Flight Dumbo the Flying Elephant Mickey’s PhilharMagic Show Mad Tea Party Princess Fairytale Hall Buzz Lightyear’s Space Ranger Spin Monsters, Inc. Laugh Floor Disney Festival of Fantasy Parade Happily Ever After Fireworks
Hollywood Studios Disney Junior Dance Party Alien Swirling Saucers (must be 32″) Star Wars Launch Bay Muppet Vision 3D Beauty and the Beast-Live on Stage Star Wars: Path of the Jedi
Disney’s Animal Kingdom Na’vi River Journey Festival of the Lion King Kiliminjaro Safaris UP! A Great Bird Adventure Maharajah Jungle Trek Rivers of Light The Boneyard Finding Nemo-The Musical
While these lists may seem small, our days were completely booked once you include ride wait times, bathroom breaks, nap time, and grabbing a bite to eat. We definitely felt Hollywood Studios had the least to offer and we were a bit disappointed with Toy Story Land after all the hype so we left in the afternoon and did not return. Instead we spent the evening at the resort pool and we are so glad we did! It was a nice way to wind down with the kiddos after two days of walking around the parks.
My Disney Experience Disney has a free mobile app that we highly recommend you download. It is an invaluable tool for managing every aspect of your vacation from checking wait times on rides to securing FastPass+ and even ordering food. Mobile ordering was a lifesaver for us when the lines were long and the kids were fussy and wanted to eat. The app also had a map of each park with detailed information about rides and restaurant menus along with the option to map directions to the next attraction on our schedule.
FastPass+ This deserves it’s own section just to emphasize how important it is that you reserve your FastPasses as far in advance as possible. With your purchase of Disney park passes, you get to reserve 3 FastPasses per person per day as early as 30 days in advance (60 days if you’re staying at a Disney Resort). This allows you to skip the stand-by line wait time for your selected attraction as long as you arrive within the designated arrival window time. Although it was our first time attending the parks and we weren’t sure what was worth reserving, we did a pretty decent job with our selections. Here are the attractions we highly recommend securing a FastPass+ for after witnessing their very long wait times: Kiliminjaro Safaris and Festival of the Lion King at Animal Kingdom, Disney Junior Dance Party at Hollywood Studios, and Jungle Cruise, Peter Pan’s Flight, and Buzz Lightyear’s Space Ranger Spin at Magic Kingdom.
Food We tried to be as pragmatic and realistic as possible when it came to planning meals with kids. While we are major foodies and would have loved to experience some of Disney’s fancier restaurants, it was just not logistically possible to dress up mid-day and sit down with the kids for a long period of time. Before our trip, I scoured through the menus at each park and narrowed down a list of restaurants that were mostly quick service and had vegetarian/seafood options to accommodate our food restrictions (halal). To be fair, Disney does offer you the option of reserving table dinning ahead of time and selecting a halal (or kosher) meat option but let’s face it we all need to eat less meat and sticking to a dinning reservation was just not realistic for us.
Park snack food is not the healthiest and the cost can add up quickly so the smartest thing we did was Amazon Prime groceries from Whole Foods to our resort room on the first day. We ordered grapes, strawberries, bananas, tangerines, and baby carrots along with milk, cereal, bagels, and cream cheese. We had also packed with us non-perishable snacks like granola, puffs, fruit pouches, apple sauce, date bars, and “healthy” vegan fruit snacks. All of these ensured we had a nourishing breakfast and snacks for the kids as well as incentives for waiting in line patiently. Of course we still had to eat lunch and dinner outside so I’m including a list below of what we enjoyed and recommend at each of the parks. Although our kids ate mostly what we ate, my sister’s children were a little pickier and stuck with pizza so I’ve also included those places where we stopped to get a slice for the kids.
Magic Kingdom Aloha Isle: Dole Whip soft serve and floats Columbia Harbour House: Grilled salmon with rice and veggies, tuna sandwiches, fried shrimp and fish, and Harbour salad (minus the bacon)
Hollywood Studios Fairfax Fare: Vegetarian Chili Rice Bowls Catalina Eddie’s: Cheese pizza with milk and yogurt Hollywood Scoops: Ice cream sundae, apple crisp a la mode, hand-scooped ice cream
Animal Kingdom Pizzafari: Cheese pizza, milk, and Lion King cupcakes Harambe Market: Corn on the cob, Roasted vegetable bowl, Frozen flamingo drink Yak & Yeti Restaurant: Ahi Tuna nachos (substituted shrimp for tuna), coconut shrimp, fried wontons, mango pie, Shanghai lemonade
Although we mostly ate breakfast in our room (courtesy of our Amazon Prime order), we did have breakfast at the resort on the first morning where the kids enjoyed a Mickey waffle while the adults had omelets with potatoes. We also had dinner at the resort one of the nights and opted for the build-your-own pasta which had vegan, vegetarian, and seafood options. Lastly, a Disney experience wouldn’t be complete without a Mickey pretzel and Mickey bars for the kids but the good news is you can find them at many stands throughout the parks.
Tips and Suggestions
Pack Reusable Water Bottles: Aside from the obvious environmental reasons to do this, plastic bottled water at the parks is expensive. It’s so much easier to have water on hand especially when thirst hits. Every morning, we would fill all three of our canteens at the resort food court with ice and cold water and would restock at water fountains around the park throughout the day.
Take your own cutlery and straws: As a family that strives to reduce our negative environmental impact, I was really disheartened with the amount of waste that is produced at these parks. Thankfully, I remembered to pack my stainless steel straws and two sets of cutlery which meant I could refuse the single-use straws and utensils. It’s not a significant waste reducer but it’s better than nothing.
Don’t waste FastPass+ on shows: With the exception of The Festival of the Lion King, we regretted wasting FastPass+ on the other shows because the stand-by lines weren’t long at all. Plus, with toddlers, we didn’t mind sitting in the back because it was easier to sneak out when we were hit with the dreaded “I need to go potty.” Next time we would reserve FastPass+ for rides and take our chances on the shows since they have several viewings throughout the day.
Consider doing two parks and spending one day to recoup at the resort: This advice really depends on what you want out of a vacation and while we loved everything we did; we did feel a little exhausted at the end of it because we pushed ourselves to hit as much as possible. Looking back and knowing what we know now, we would probably skip on Hollywood Studios and spend a day just relaxing at the resort.
Pack Lightweight Ponchos & Stroller Rain Covers: It’s a given that you should check the weather forecast a few days before your trip and while we did, there were some unexpected showers that we wish we were prepared for. The rain came and went and it wasn’t hard to find shelter but our stroller did get stuck in the rain and I wish we had the foresight to come a little extra prepared. It doesn’t hurt.
Don’t forget sunscreen, sun hats, and sunglasses: This maybe more relevant if you’re traveling in the spring or summer but either way it’s important to bring sun protection especially if you’re spending the whole day at the park. We could definitely see the effects of the sun beating down on the kids and we were grateful we had sunscreen, protective gear, and plenty of water to keep them safe.
Travel with family or friends: Traveling with toddlers isn’t as bad as people make it out to be but it was super fun and helpful to have my sister and her family with us. Her kids are fairly close in age to ours and it was nice to have an extra pair of hands and eyes to rely on when the need arose. If my kids were acting up, a gentle reminder from their aunt went a long way and vice versa.
I think we’ve covered a lot of ground in this post so I’ll wrap it up here. We hope that you’ll find our recommendations and reviews helpful for planning your very own Disney World vacation. If you have specific questions, feel free to leave them in the comments below and if you’ve planned a similar trip and have advice for other readers, we would love to hear from you as well. If you found this post informative, we would appreciate it if you would like it and share it with others. And as always,
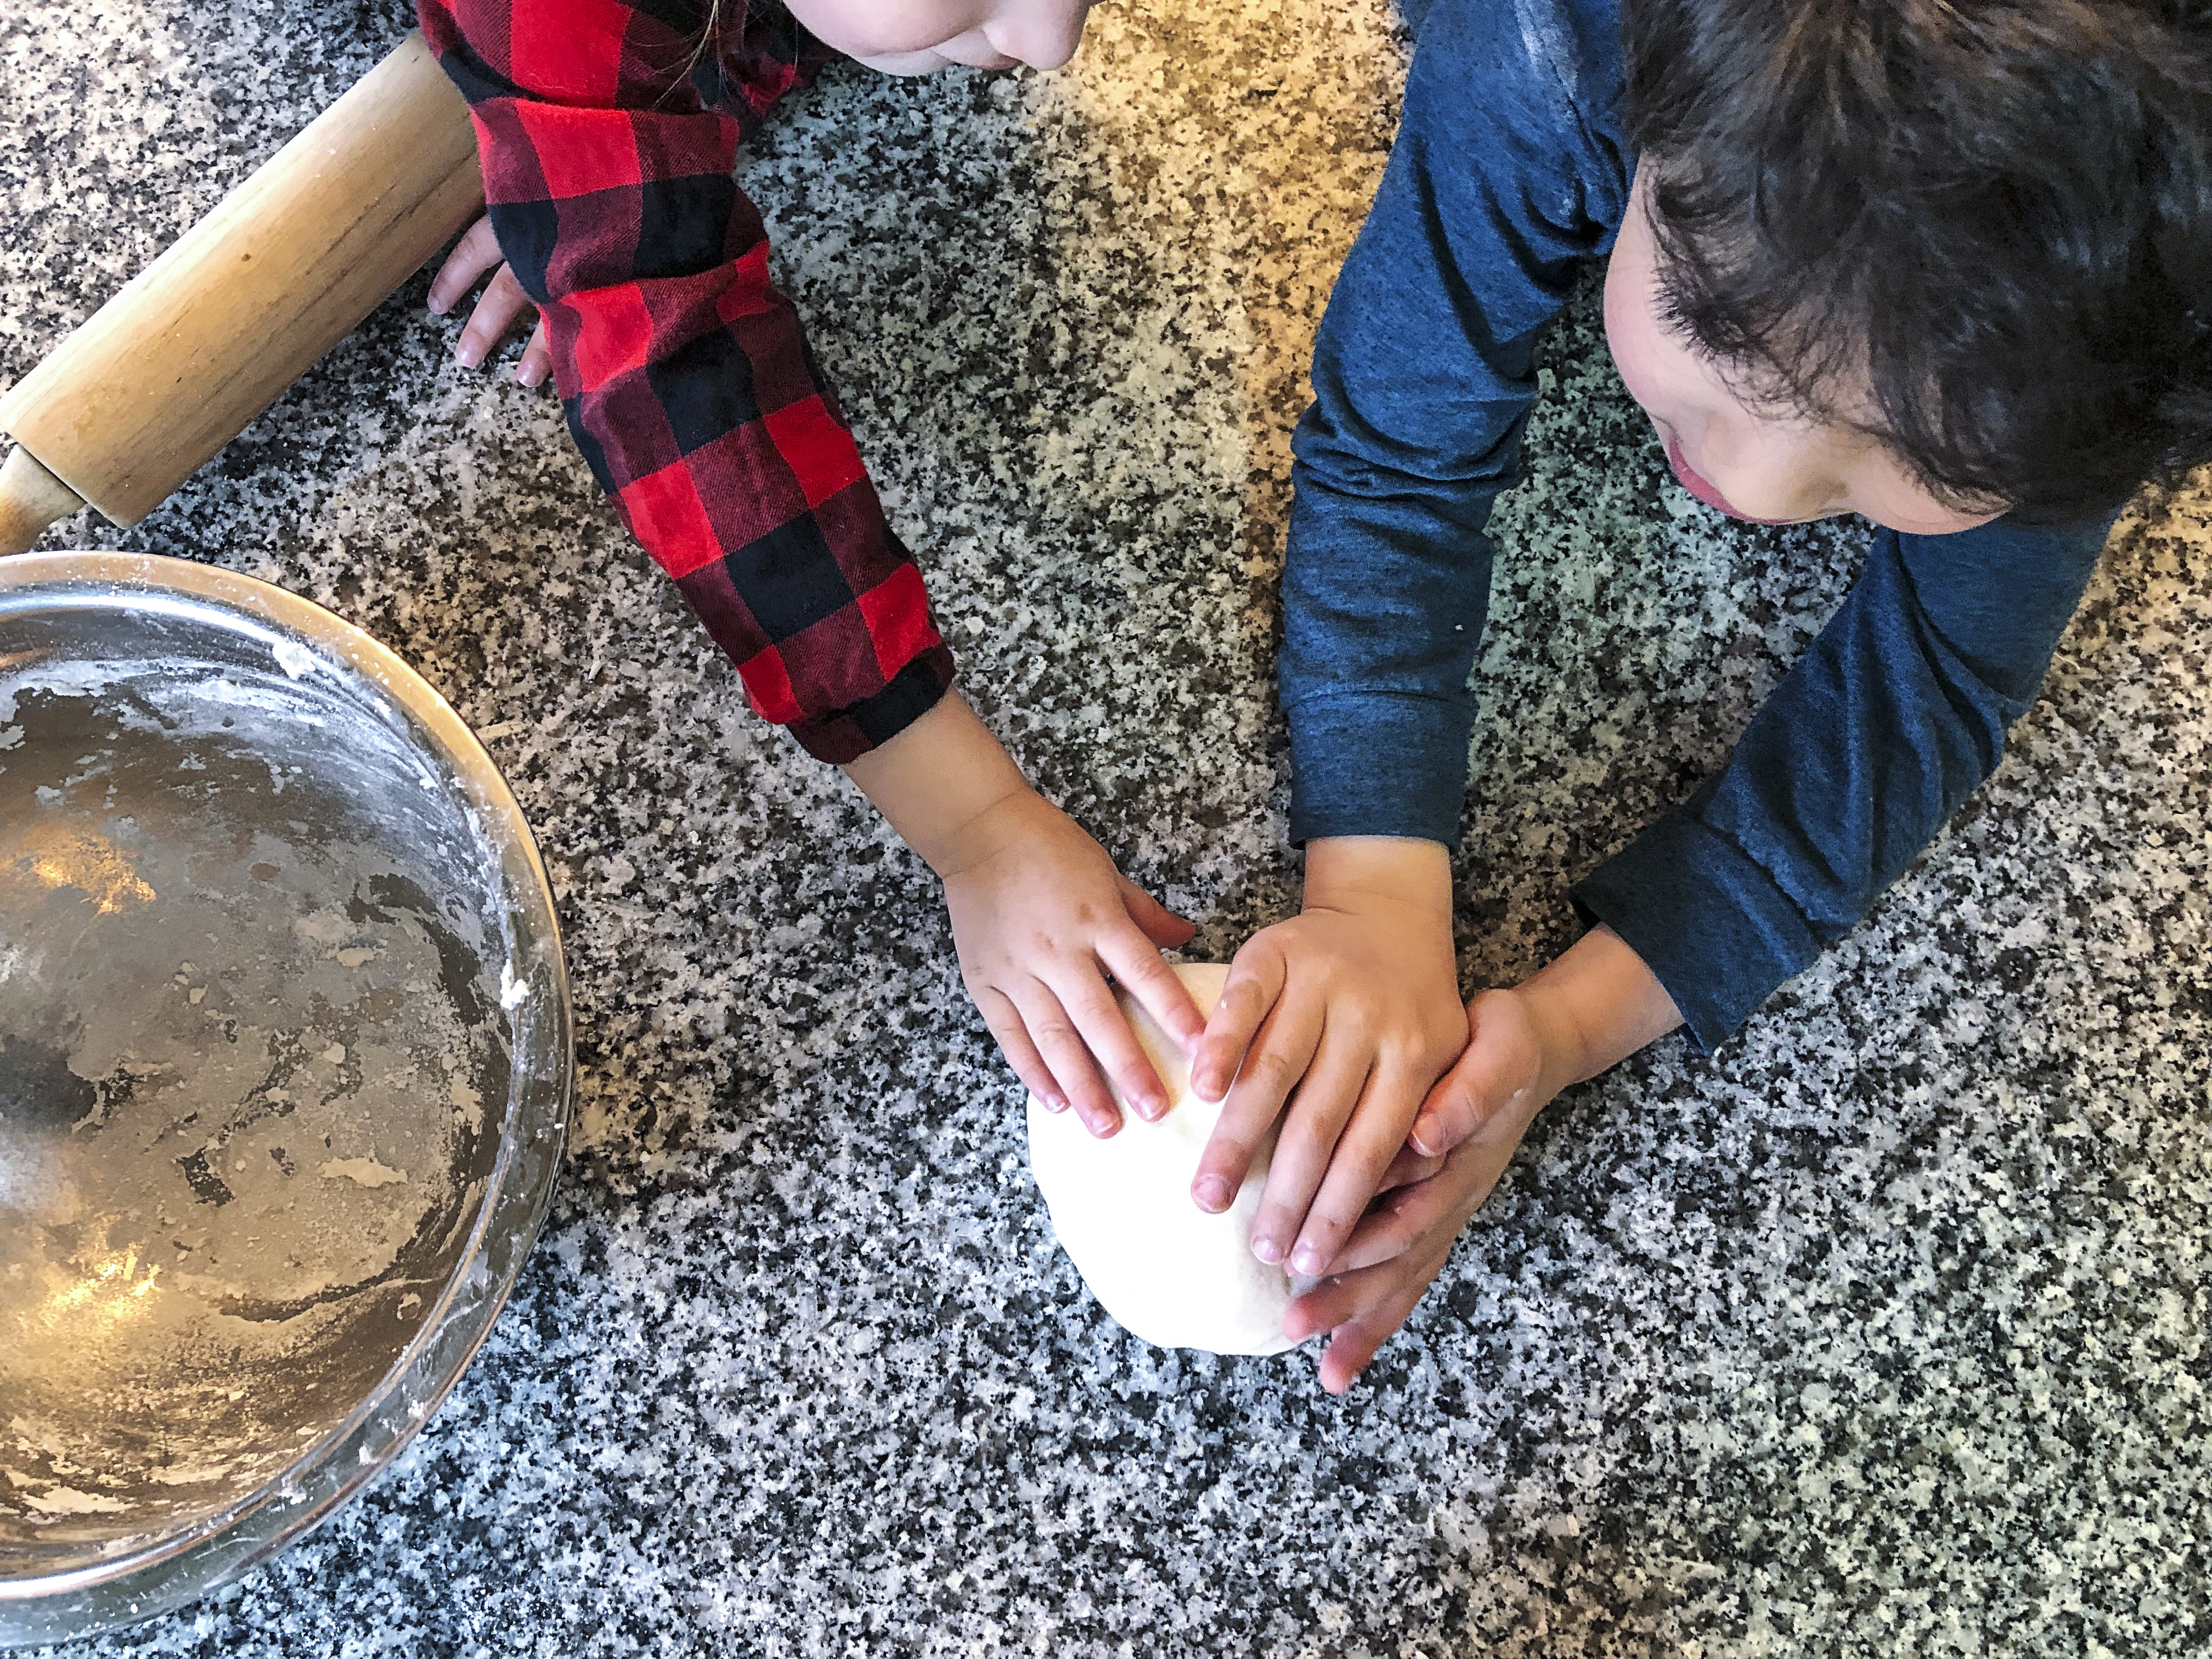
The month of Ramadan is just around the corner and this year is a busy time for us as we are expecting baby #3 in July. As you may already know, decorating the home for Ramadan is something we do every year and this year is no exception. We are, however, trying to be more conscious of our waste so I’m really focusing on using what we have and making what we don’t. That’s why I’m super excited to share this DIY Ramadan craft project featuring With a Spin’s cookie cutters. This project makes use of everyday ingredients in your pantry, can be customized to your style, and the finished product can be used year after year. Now that’s what I call a win-win-win. While, I love neutral minimalist tones, the kids wanted vibrant colors so that’s what we went with. The decorating possibilities are truly endless. Let’s make some salt dough ornaments!
Ingredients 2 cups all-purpose flour 1 cup salt 1 cup warm water
Mix warm water into flour and salt mixture to form a dough. Knead for 10 minutes until smooth.
Roll out dough about 1/4-1/2 inch thick and cut out desired shapes. Use a toothpick or skewer to punch a hole near the top of the shape for the string.
Place shapes on a baking sheet and bake for 5 hours at 200 F.
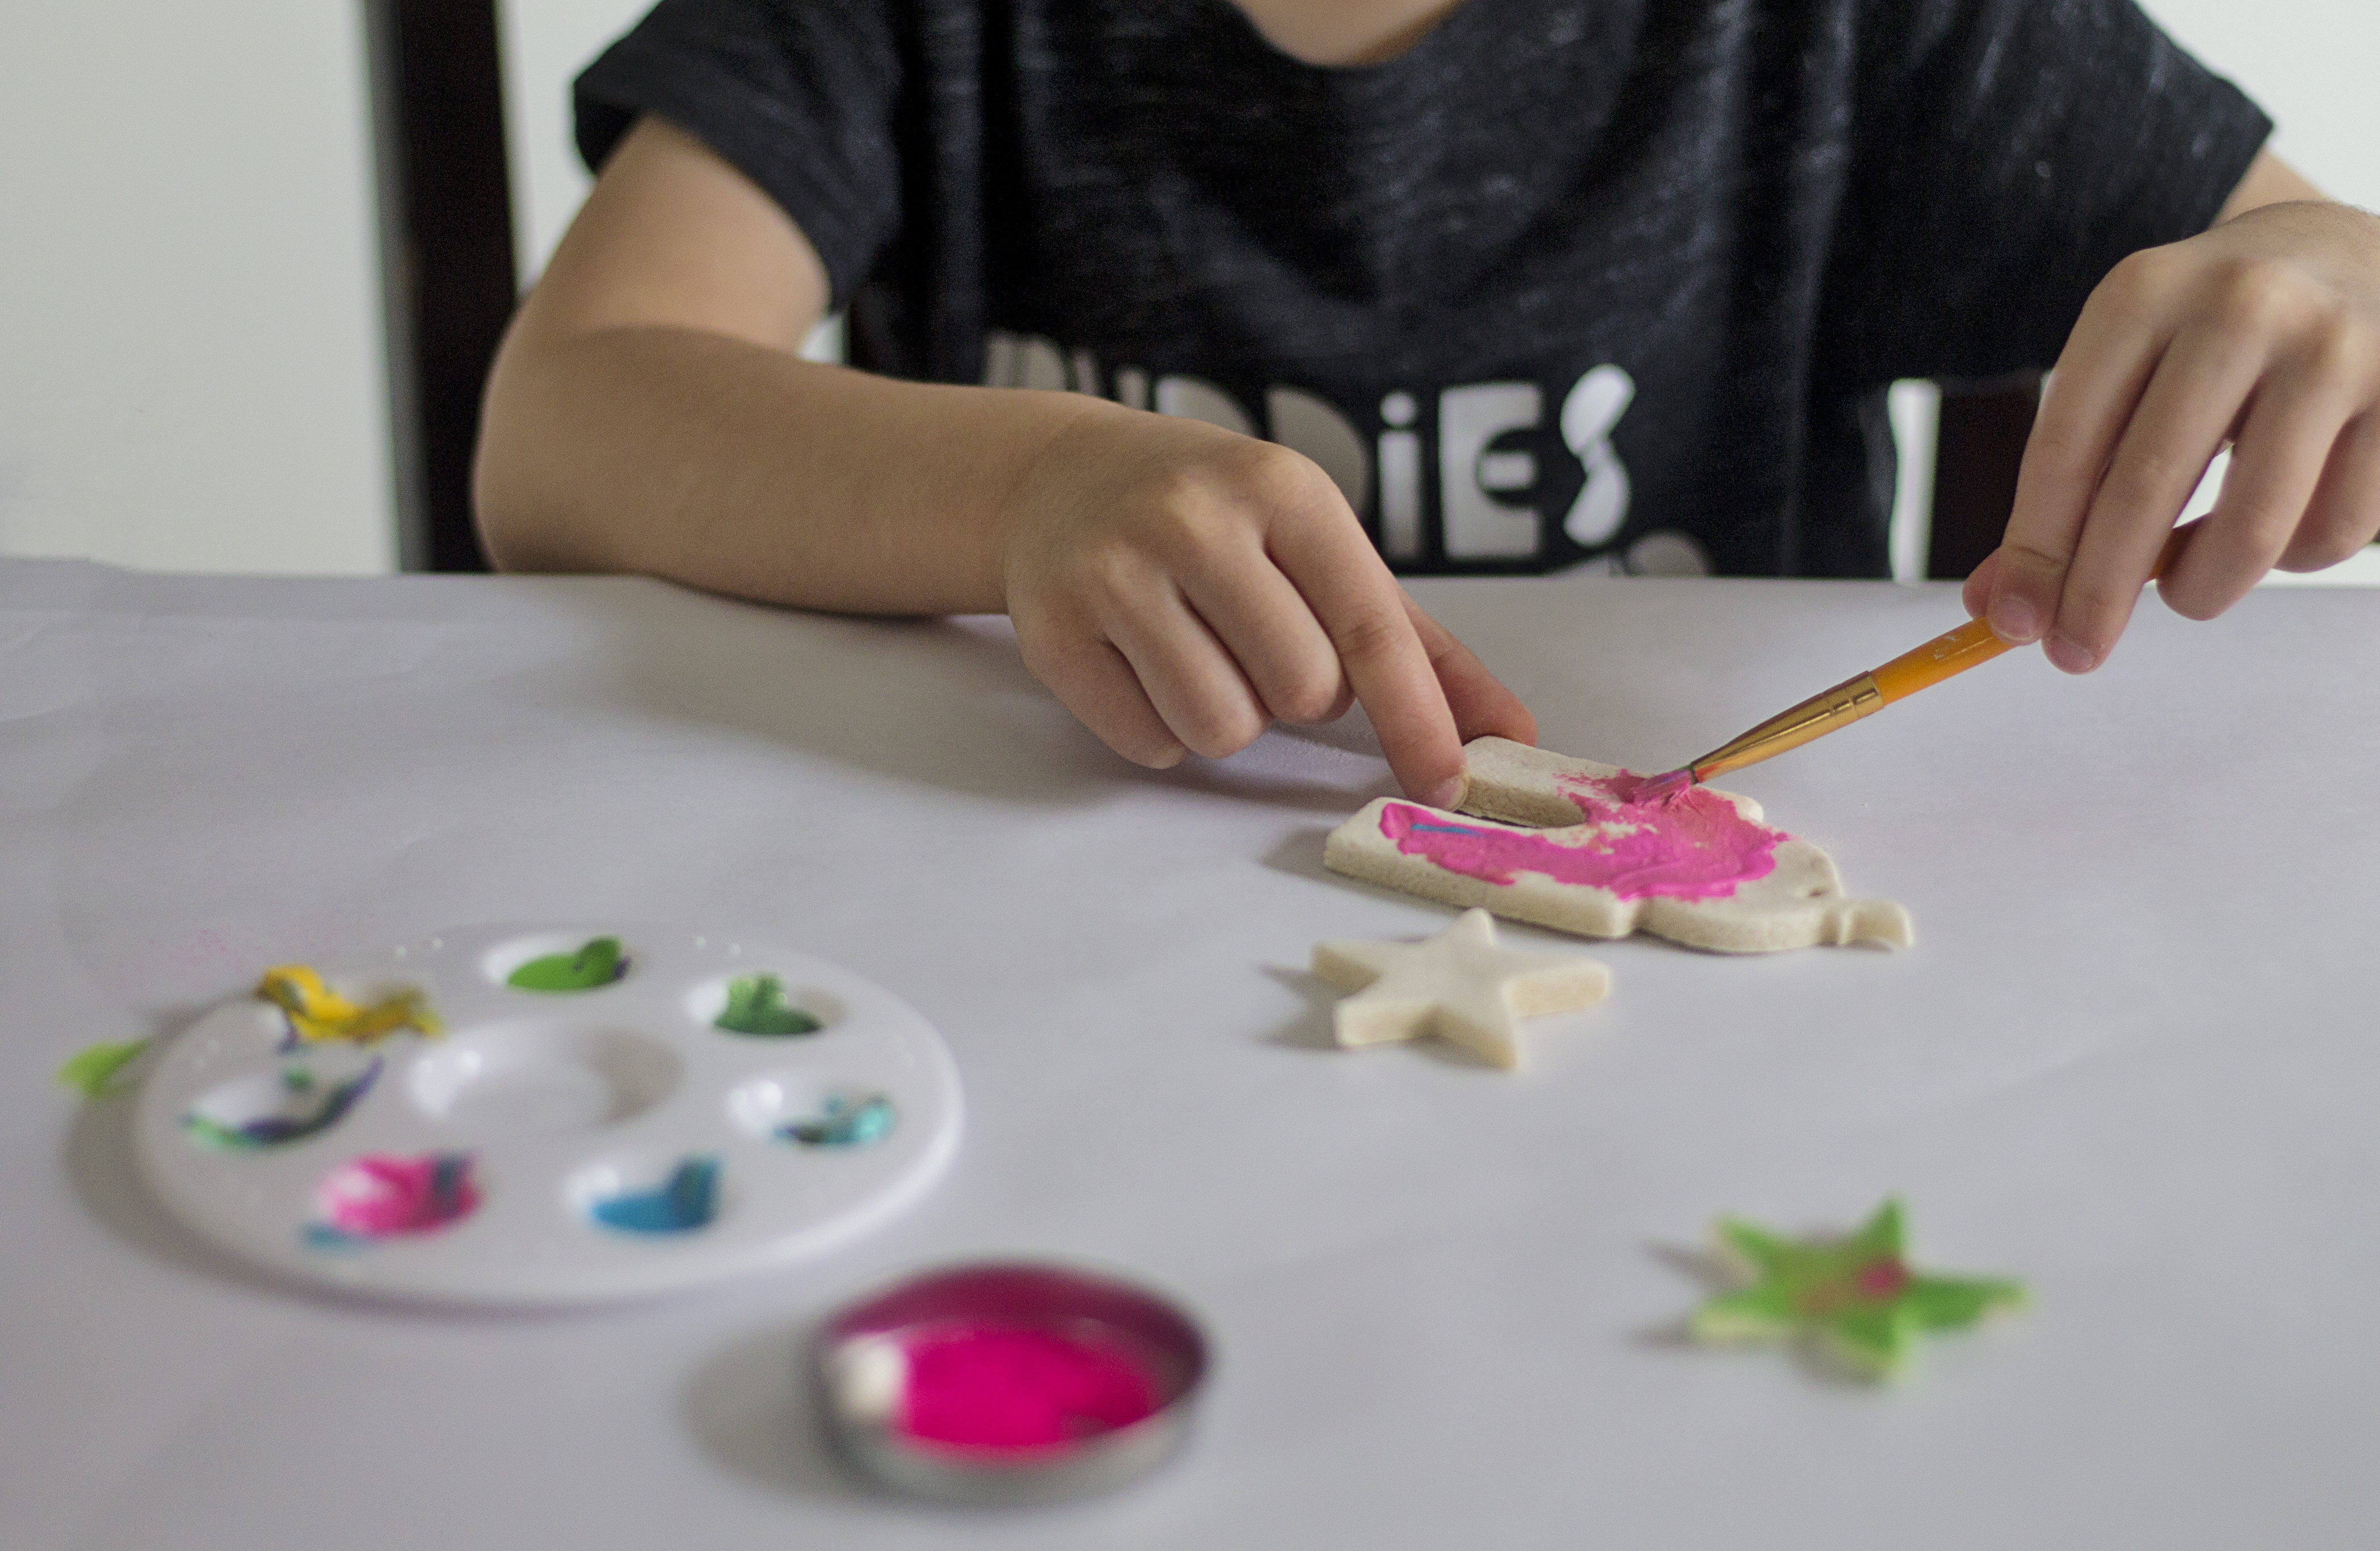
Let cool overnight and paint with acrylic or craft paint.
Thread with string to make individual ornaments for hanging or string several together to make a festive garland.
That’s it! This is such a simple and fun craft to make with the kids and a wonderful way to get them involved in the Ramadan spirit. If you liked this craft and found it inspiring, we would love if you shared it. If you make this DIY, be sure to share a picture of your creation and tag us on Instagram @thecozyhomechronicles.
For more related content, you can find us on Instagram where we share more of our day-to-day and Pinterest where we share our ideas and inspiration. If you have any thoughts or suggestions about this DIY project, feel free to leave a comment below. And as always…
With such a large and diverse selection of toys out there, choosing toys for growing toddlers can be such a daunting task. We are huge fans of toys that nurture creativity and imagination through free play so when a reader asked us to share our favorite toys for our children, we thought it would be perfect for a post. I chose these specific toys because I find that they engage with important cognitive, physical, and social skills including but not limited to:
simple reasoning
spatial awareness
symbolic thinking
problem solving
pattern recognition
visual discrimination
depth perception
cause and effect
manipulation
muscle control, balance, and coordination
working memory
curiosity
self-expression
learning
Keep in mind that our kids are 2 and 3.5 years old so be sure to check the minimum age requirement on a toy before you make a purchase. Although we included links where to find these on Amazon, we recommend to check yard sales, local toy shops, and thrift stores because you never know what you might find! Many of the toys we have such as wooden blocks, cookware, and train sets we purchased from IKEA for a very reasonable price so if you live near one check there first.
This was one of our children’s first toys and a huge hit even to this day. We build everything from trains and animals to houses and zoos. When the kids were younger, we also used playtime with blocks as an opportunity to explore concepts like colors and numbers.
This is a more recent investment as we wanted to expose our kids to more STEM activities. Not only do children learn about the physical properties of magnets through discovery, but the possibilities in connecting and constructing are endless.
Although we don’t have these at home, we do play with these often at the local museum where we have a membership. It’s another excellent building activity and I love it because it engages with a variety of cognitive skills.
We highly recommend having a set of puzzles in your toy arsenal. There are so many kinds and they’re an excellent way to teach concepts through exploratory play; everything from animals to shapes, colors, and letters.
This may seem similar to the MegaBloks but these are made of wood and have a variety of different shapes. Building with them requires a different kind of skill set and I love how nicely they go with a wooden train building set.
The kids love to take out the animals and let their imaginations run wild. The thing I love about these is you can incorporate them into activities with other toys such as building blocks or play-dough. Our kids get really engaged in activity time when we give them play-dough and animal/people figures.
Play dough is a staple in our household and for good reason. Shaping and manipulating dough engages a variety of fine motor skills and symbolic thinking as children use their imagination to transform the dough into something more complex. Our kids enjoy cutting out shapes, rolling out pizza, and sculpting their own unique “masterpieces.”
We recently invested in a play kitchen but even without one the kids enjoyed playing with kitchen tools for the longest time. Add some play food into the mix and the kids will have a blast preparing all sorts of tasty pretend meals for you.
Instead of a chalkboard, we DIYed a chalkboard wall but the concept is the same. Chalkboards offer hours of unlimited doodling fun. The best part? Unlike paper it’s reusable and the clean up is super simple.
Believe it or not, building a working train track requires important problem solving skills. Although these will take time to learn, building a train track is so much fun. Add in animal/toy figures, blocks, or play dough and you can create complex cityscapes for even more fun and developmental learning.
There you have it! Ten of our favorite toys that foster creative and imaginative play. If you’re a parent of a toddler (or toddlers), we would love it if you shared some of your favorite toys in the comments below. And as always, if you found this post helpful please like and share.
Hello friends! As you may have noticed, it’s been a while since we posted anything on here and that’s because life has been super hectic with both of us in graduate school. That doesn’t mean we haven’t been up to exciting things and now that the stress of last semester is behind us, we really wanted to start blogging again. We just miss it. So without boring you any further, I thought we would dive right in with a new recipe. This soup is a delicious Lebanese staple, nutritious, and very easy to make. You can certainly make it on the stove top if you wish but this almost hands-off version made in the Instant Pot delivers the same flavor while you can run around and check things off your to-do list. Anytime you can have a healthy homemade meal without having to be in the kitchen while it cooks is a win-win in my book.
Ingredients:
2 cups rinsed red lentils
1 medium onion, diced
3 medium carrots diced
3 celery stalks, diced
2 garlic cloves, minced
1 tablespoon ground cumin
1/2 teaspoon white pepper
1 teaspoon kosher salt (more to taste)
8 cups water/vegetable stock
1/4 cup fresh lemon juice (more for serving)
parsley for garnish
olive oil
Directions:
In the instant pot, drizzle a bit of olive oil and put on “Sauté” mode for 10 minutes. Sauté the diced onions, carrots, celery, and minced garlic.
Add in the rinsed red lentils, cumin, salt, pepper, and water/vegetable stock.
Turn the Instant Pot on “Soup” mode for 30 minutes. Once it beeps and the valve is released stir the soup, season to your liking with fresh lemon juice and additional salt if necessary.
Puree the soup using an immersion blender until creamy and smooth.
Ladle into bowls, drizzle with quality olive oil, and garnish with parsley. Serve with a side of fresh crusty bread or .
If you try this recipe and like it, we would love it if you would share or leave a comment below. For more related content, you can find us on Instagram where we share more of our day-to-day and Pinterest where we share our ideas and inspiration. And as always…
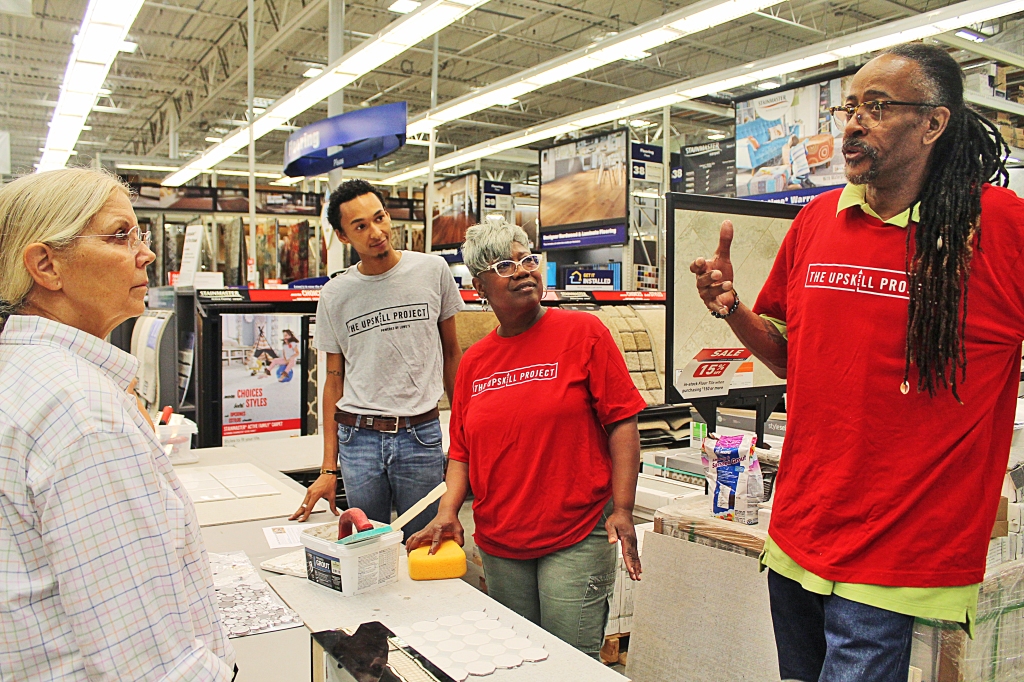
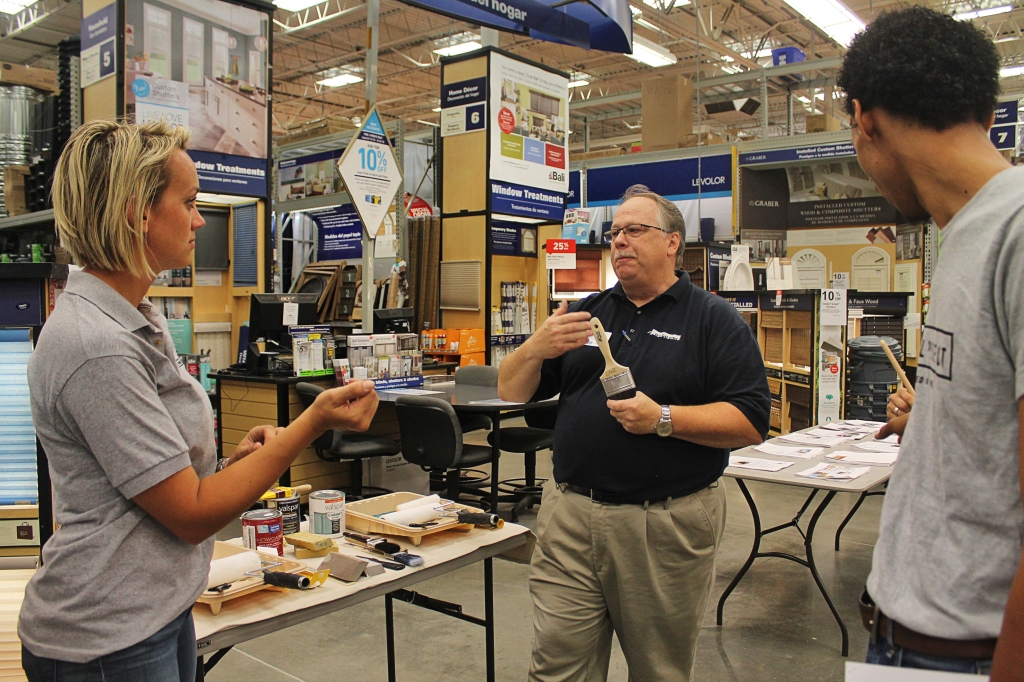
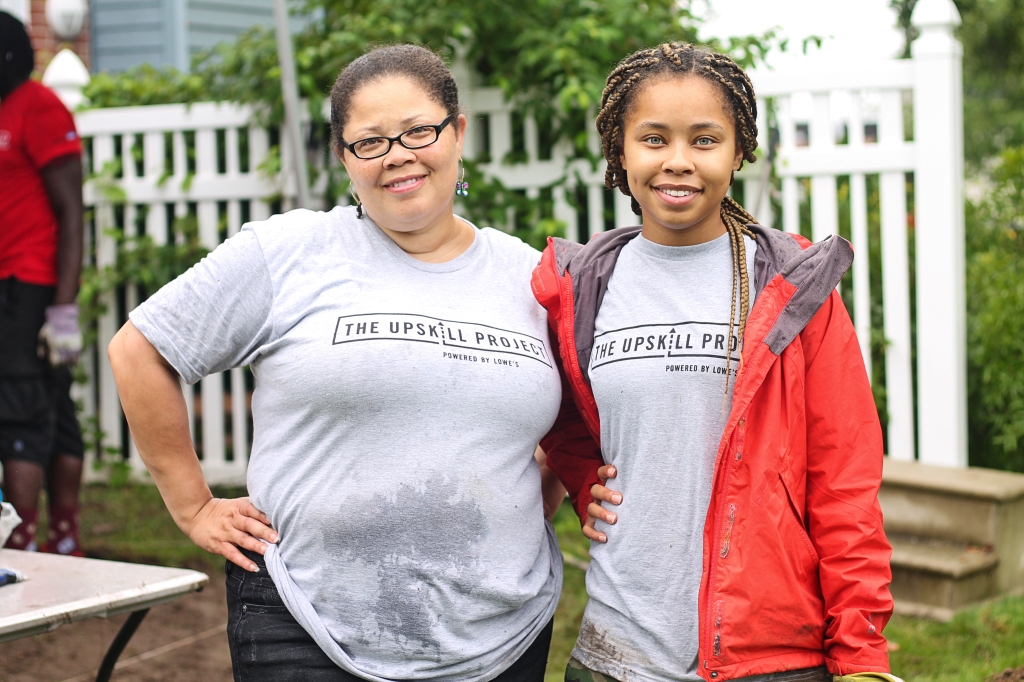
Three weekends ago, I had the privilege of attending and documenting The UpSkill Project Community Workshop which was held at the Warren, Michigan Lowe’s on a stormy Saturday. It was my 30th birthday weekend and I could think of no better way to celebrate than to be doing what I love…DIYing of course!
The workshop was set up to be a hands on learning experience for homeowners wishing to pick up basic home improvement skills and I can’t express enough what an amazing opportunity this was. I love that Lowe’s is inspiring and educating homeowners through this platform! I learned so much from the Lowe’s experts that day and I’m so excited to share some of that with you in this post. Shall we dive right in?
Drywall
Drywall dings and dents are a common household issue with a very simple solution. Lowe’s has this nifty drywall repair kit that comes complete with spackling, a putty knife, and a sander. All you need to do is gently spread the spackle over the hole until it’s covered. This particular spackle is made to go on pink and turn white when it’s dry so you know when it’s time to sand. For larger holes, you will need to place the self-adhesive mesh patch over the hole before covering with the spackle. Once you’ve sanded the surface until it’s smooth, you can go ahead and paint over the patch up. It’s that easy!
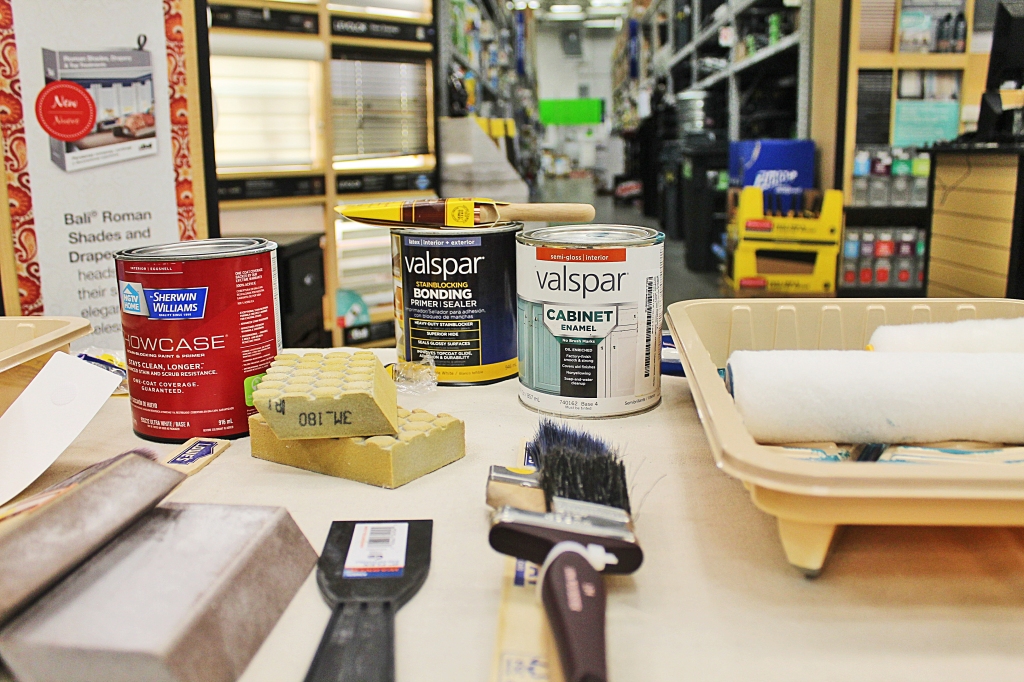
Painting
Painting is something we’ve done quite a bit of for our home renovation projects but it wasn’t until this workshop that I realized I was doing it all wrong. Prior to this workshop, I would paint the wall with a roller first and then use a brush to finish the corners and edges. I learned from Ray that it should be the other way around: paint your corners and edges first then go over with the roller. Oops. I definitely see this method resulting in a much more professional-looking paint job. It looks like I might have to revisit some of my old paint jobs!
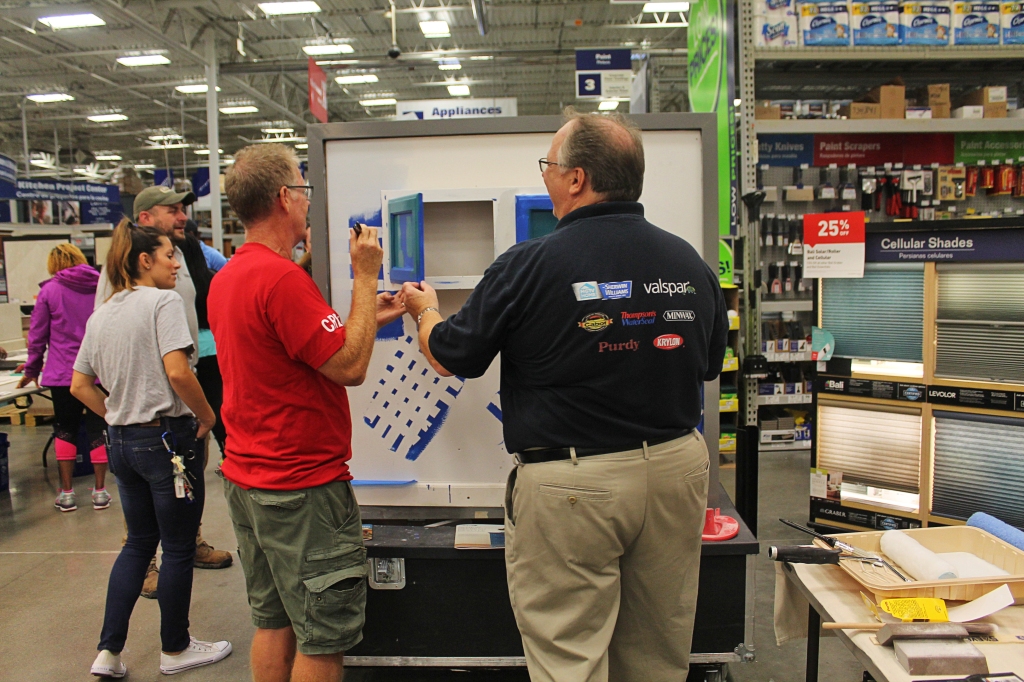
The other important thing I learned is that the quality of the brush really matters! Ray, who is a passionate paint manufacturer, said he would actually advise sacrificing the quality of paint over the quality of the brush. He went on to show us the difference between the two brush’s bristles and let participants see for themselves as they got to paint a kitchen cabinet.
Let me tell you, the Purdy brush we got to test out was amazing! All those times I was frustrated with my paint job and I thought it was just me. Now I know it was the cheap brush I was using and I can’t wait to implement these simple tips for my next paint job!
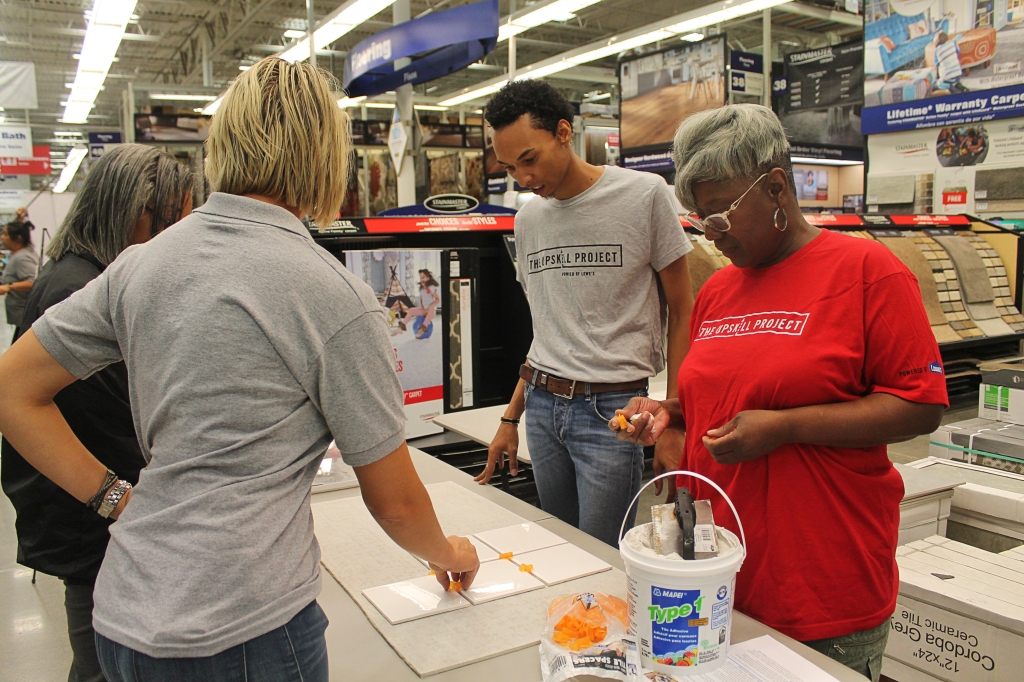
Tiling
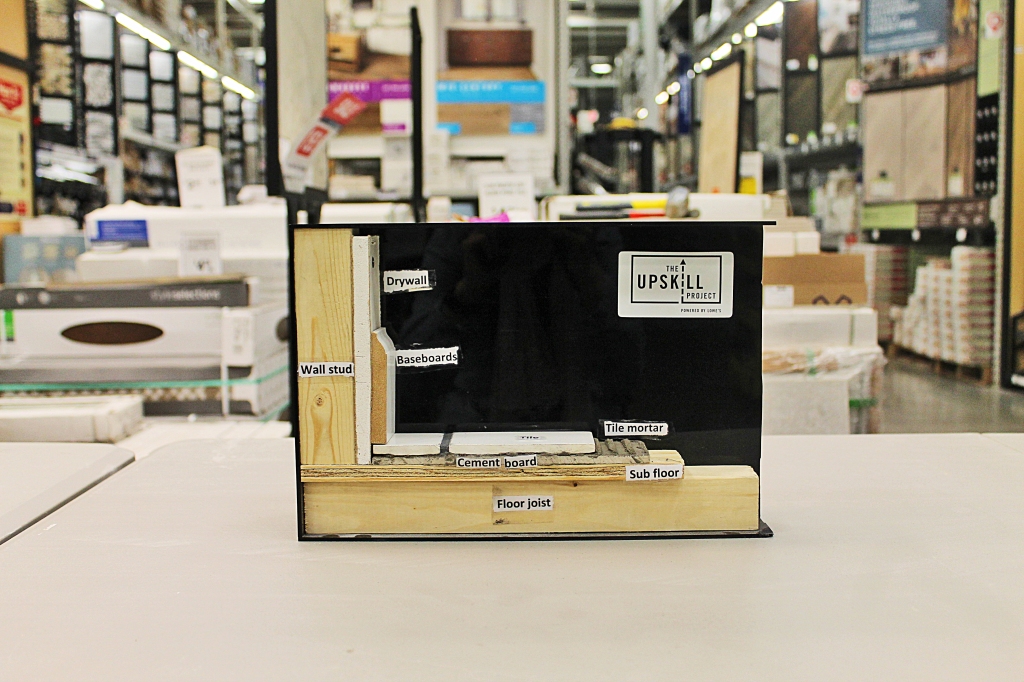
Tiling is another skill we are familiar with as we have renovated our basement, kitchen, and bathroom in the past. Of course, that doesn’t mean we did everything perfectly so I’m sharing some of the useful reminders I learned. One of the cool resources Lowe’s had on display was this cross-section of the wall and tile. Many of the participants didn’t know that you couldn’t just tile over existing tile so Andrew, one of The UpSkill Project teachers, explained what subflooring was and the importance of the cement board under the tile. I learned about something called self-leveling concrete which you can pour to create a smooth, even surface for tiling. I wish I had known about this when we were tiling our basement!
Participants were able to practice laying tile spacers, backsplash tile, tile adhesive, and grout.
The Lowe’s experts recommended a pre-mixed grout for an even finish and stressed the importance of wiping the tiles consistently with a grouting sponge to prevent a hazy film from forming. The pre-mixed grout is something I wish I had used in our bathroom because of the variability in grout color that can result from small changes in water content.
Plumbing
Plumbing was probably one of the more intimidating skills for participants, me included. I’ve always let my husband handle that part of our renovation projects. After this, however, I think I’m pretty confident I can swap out a vanity and sink. You’ll just have to remember to disconnect the water supply lines prior to starting and to keep a bucket under the sink during the P-trap removal. If you don’t, let’s just say you’ll find yourself in a very messy situation.
Aside from learning these four skills, Lowe’s had a table set up with lots of useful pamphlets covering everything from tool buying guides to DIY laminate floor installation. You better believe I walked out of that workshop with a stack of pamphlets. I also really enjoyed meeting the other UpSkillers and watching them bond over sharing their DIY projects with each other.
To be honest, I had been in a creative slump up to this point but after this workshop I was so inspired to find a new DIY project to tackle! What about you guys? If you’re getting ready to take on a new home project, we would love to hear about it in the comments below. If you have specific questions about any of the skills I discussed, you can also leave them in the comments below and we will point you in the right direction. You can always go into your neighborhood Lowe’s and ask a Red Vest associate for help as well. As always, if you loved this post and found it helpful, we would appreciate it if you would like it and share it.
This post is sponsored by Lowes. The thoughts and opinions are my own.
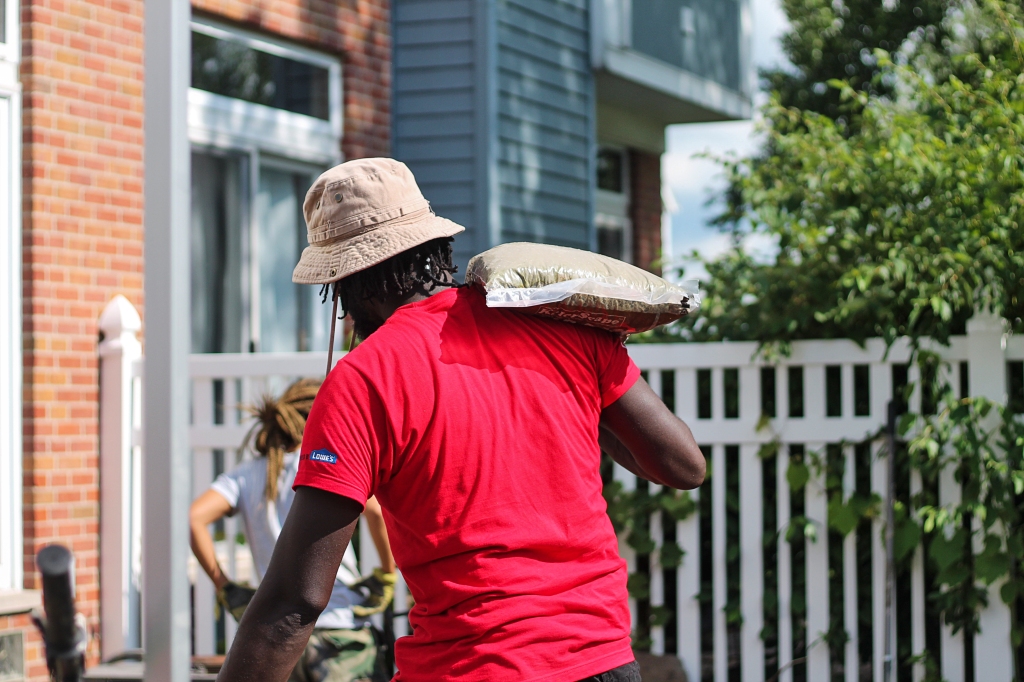
Back in May, I wrote about The UpSkill Project Contest where homeowners could submit a short video describing a DIY project they needed help with. Five local residents would receive $2000 in Lowe’s credit to purchase supplies along with a team of experts to help get the project done in just two days!
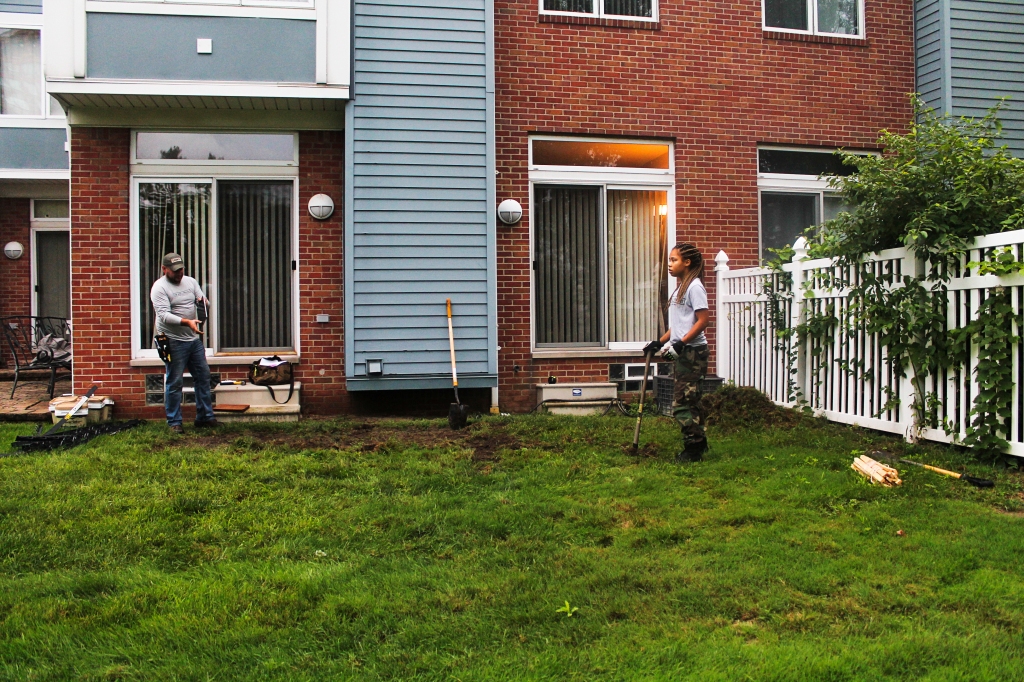
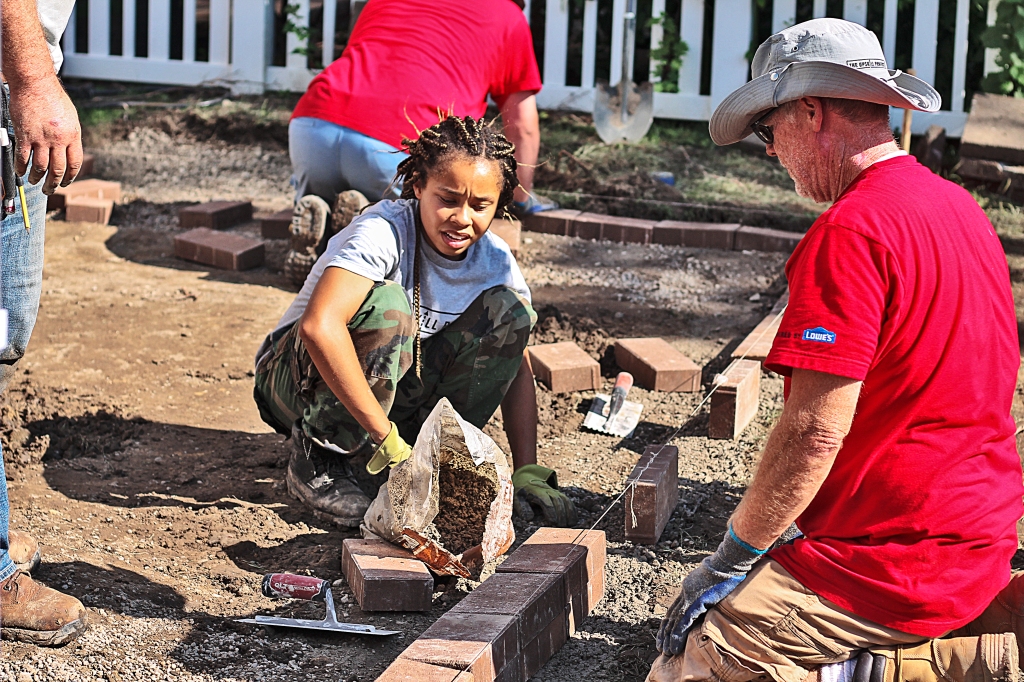
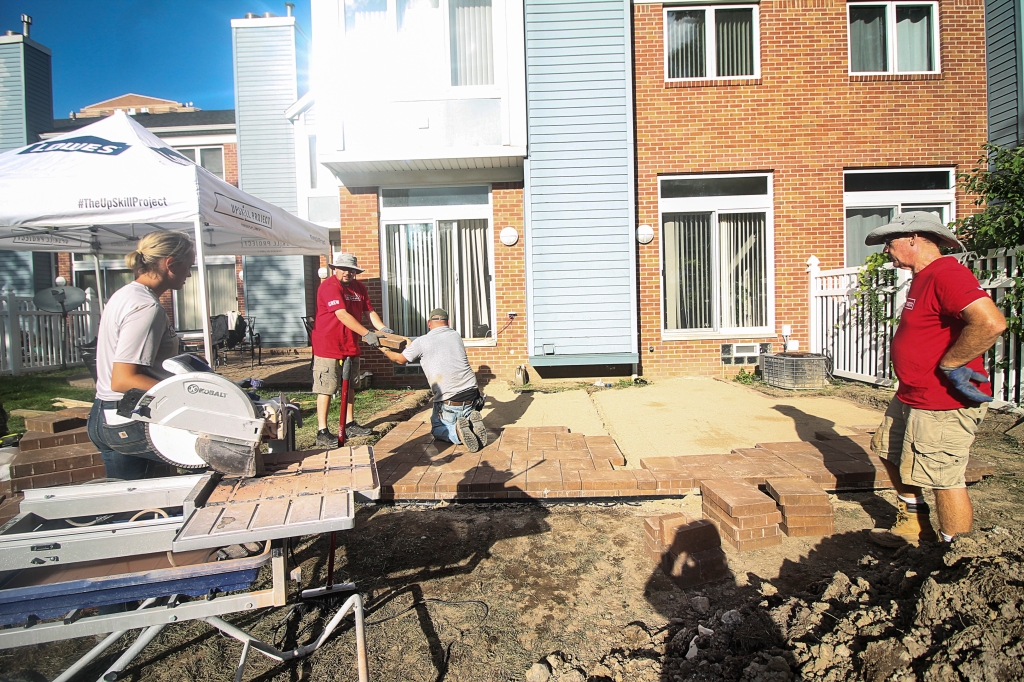
This summer, I got to partner with Lowe’s to document one of the resident’s project transformations. And not just any project…a paved brick patio! You all know how much we love gardening and the outdoors so being able to learn how to do build a patio from the ground up and share it with you was a dream come true.
Meet Hattie and her mother, Dr. Tyra.
Hattie was actually called to help her aunt record her UpSkill Project Contest entry when her aunt convinced her to submit one herself at the last minute. Knowing that her mother had been wanting a patio for the last two years, but would never justify spending on herself when she could help others, Hattie felt her mother deserved a space to entertain and have friends and family over. You can imagine just how excited her mother was when she found out she was finally going to get that patio. Dr. Tyra LOVES cooking and entertaining; so much so that she cooked the team a dream breakfast on the second morning of the project.
We all love a good before and after, so here’s what the space looked like prior to the start of any work. Nothing fancy, just an empty patch of grass.
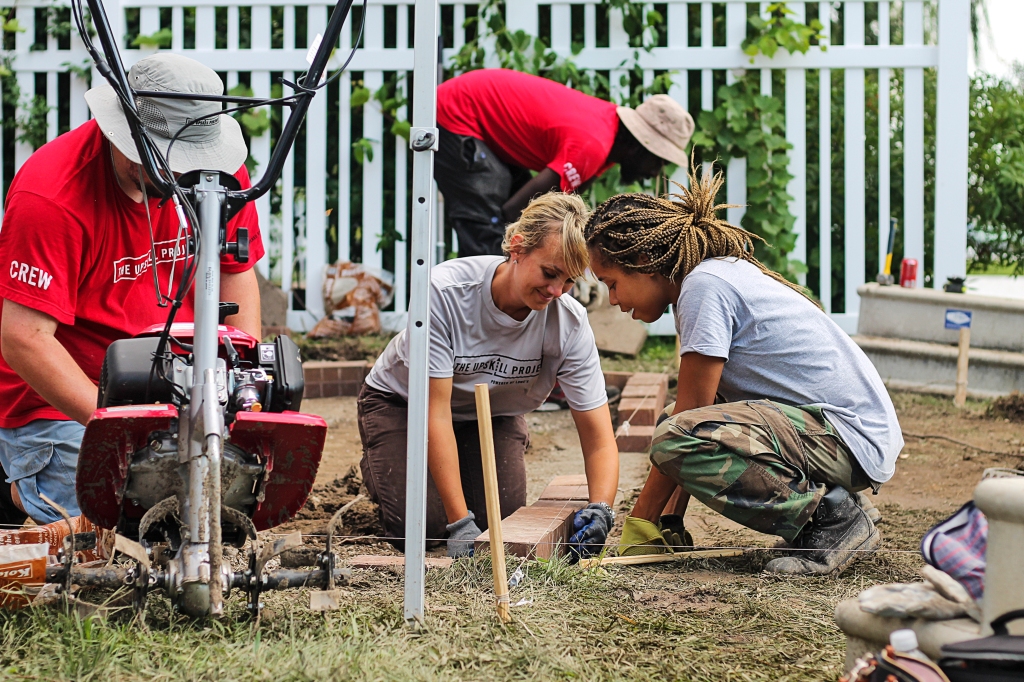
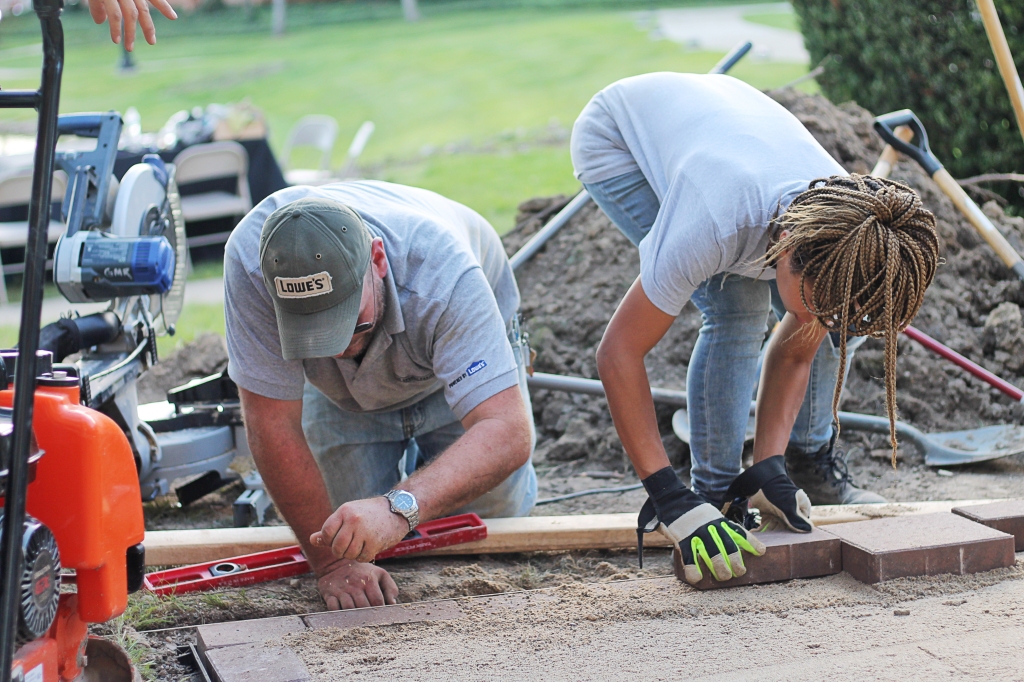
Leading the team through the patio building was Andrew who is a carpenter by trade and has his Bachelor of Fine Arts in Sculpture. How cool is that?! The Red Vests Eric, John, and Zach were from a local Lowe’s in the Gardening and Outdoor Department. Everyone worked so well together and by the end of the project I felt like I was in the company of friends.
Of course it wasn’t all fun and games so today I’m sharing some of the important things I learned about building a paved patio:
You can’t just wing it!
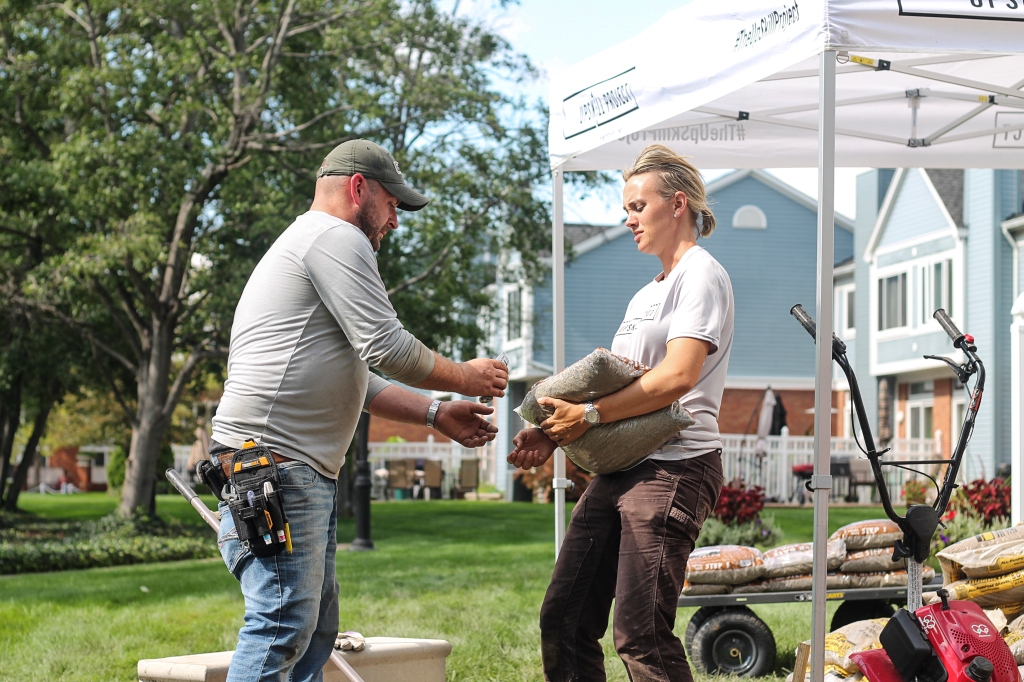
The first and most important step when it comes to building a patio is design and planning. Settling on a design (how large the area should be, what shape, what kind of pavers, etc.) will dictate how much materials you’ll need which in turn will determine your cost. The materials are quite heavy so you’ll want to have everything calculated in advance to prevent any running back and forth to the store picking up heavy materials.
Touch things once.
This very valuable advice was given to me by one of the Red Vests, Eric, when he saw that the materials were delivered to the front of the garage instead of to the backyard. To save yourself time and energy, have your patio materials close to your work site so you’re not having to haul things more than you need to. This also includes clean up. It’s important to have your tools for removal and your method of disposal arranged prior to starting your project so the process runs smoothly and you don’t have to move debris twice.
If you see rain in the forecast, abort the mission.
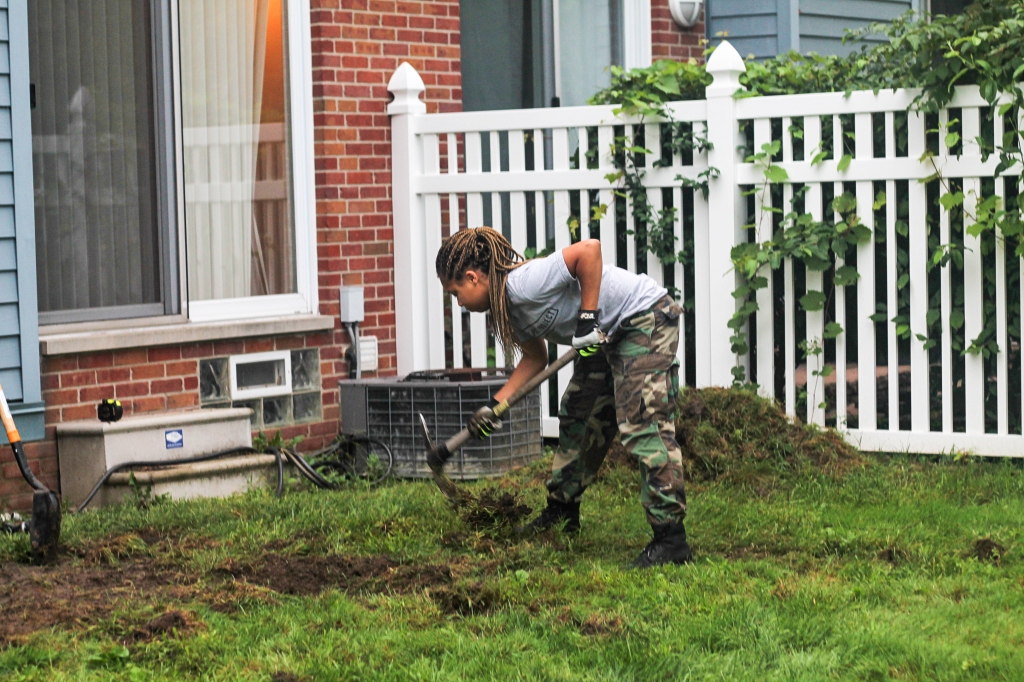
Or simply wait until the weather clears up. A wet ground can really interfere with the compacting process which is super important for a level and solid patio. The rain on the first day of this project threw us a serious curveball and delayed the completion of the patio. There is a silver lining to the rain, however, if you’re not in a hurry to finish your project. A wet ground makes it much easier to pull out the grass so if it’s raining you can still begin the sod removal phase of your project. Just be sure to let the ground dry sufficiently before moving on.
Assemble a team.
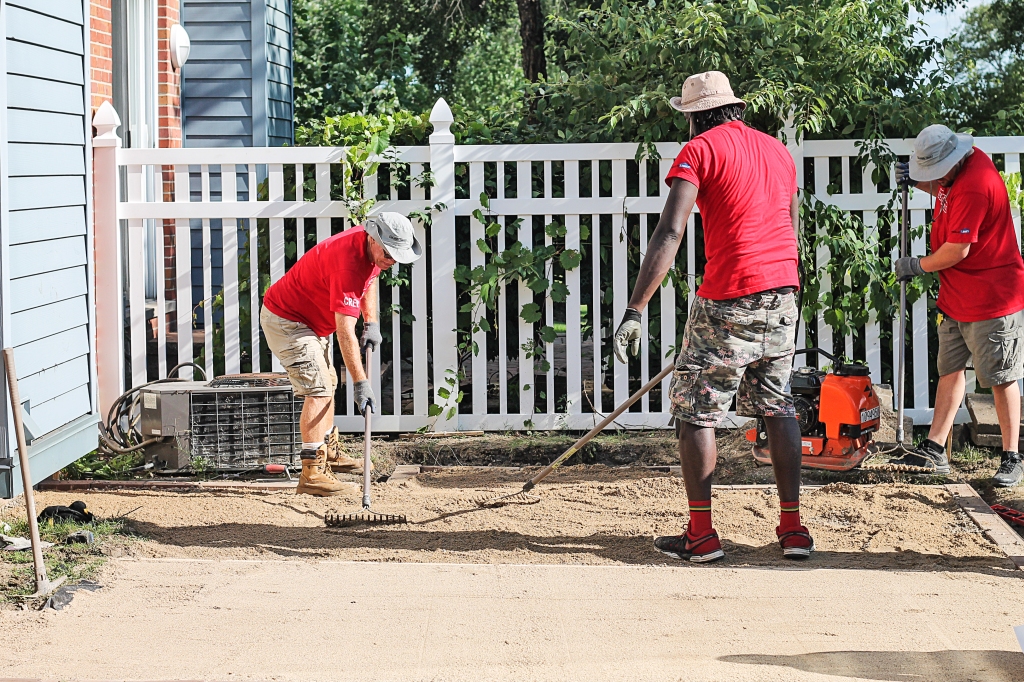
There’s nothing overly technical about building a paved patio but you should know that it is very labor intensive. From stripping the sod to pouring and compacting gravel to laying the pavers, each step requires quite a bit of upper body strength. If you want to build a patio in the shortest amount of time without burning out quickly, you’ll definitely want a team of 3-5 members to help spread out the workload.
Compact, Compact, Compact.
I can’t stress enough how important it is to begin with a sturdy and level foundation. To achieve this, you will need to compact several times at each of the following stages:
After you’ve dug out the grass for your patio
After you’ve poured Paver Base Step 1
After you’ve poured Paver Base Step 2
Start by building a retaining wall
The first pavers you’ll want to lay are the outside ones along the perimeter. More importantly, you’ll want to secure the wall with glue and recess framing to prevent the bricks from extending outward as you continue to compact the gravel and sand. The retaining wall is two brick pavers high and must take into account sloping to prevent water from collecting in your patio. Once the wall is built, you can begin setting the pavers down working toward the middle of the patio area from one end to the other.
Don’t forget the landscape fabric.
This is pretty self explanatory. If you don’t want weeds bursting through your patio then this is a crucial step that you’ll want to do once the earth is level just before you begin to pour paver base step 1.
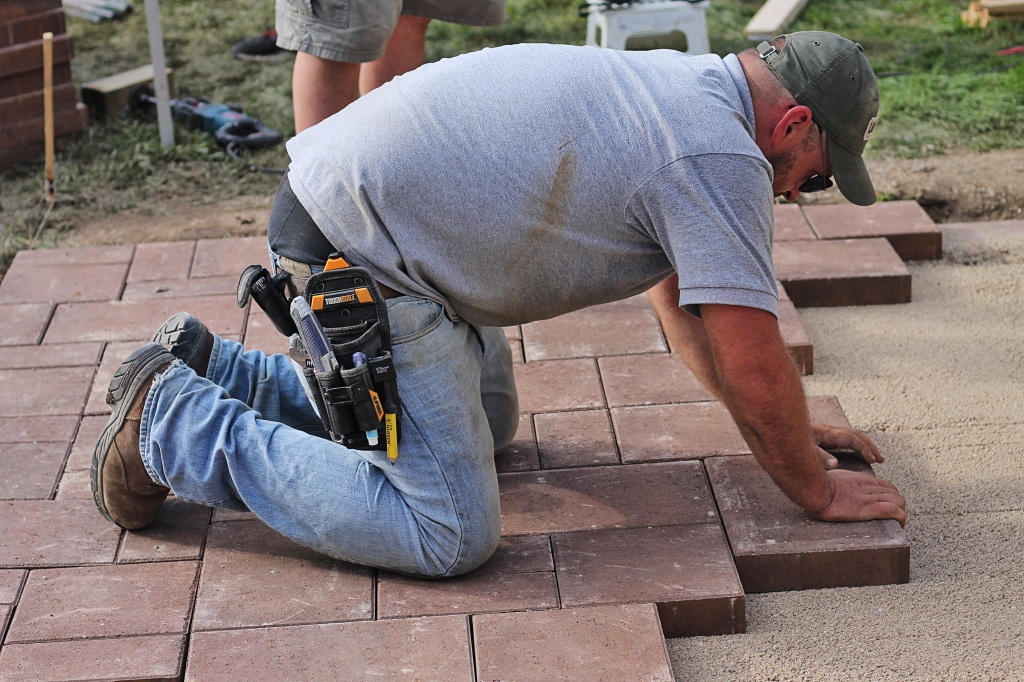
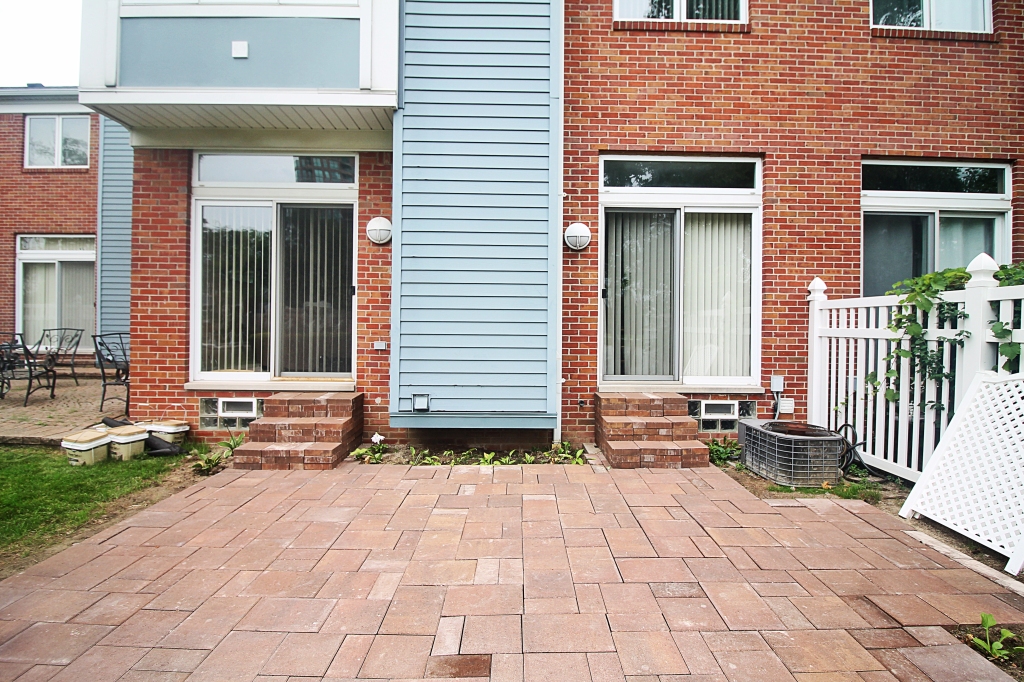
Once you begin to install the pavers, it’s pretty much smooth sailing from there. All you have to do is make sure to tap the pavers with a rubber mallet and periodically check to make sure they are all level. You also want to leave a space about 1/4 of an inch wide between the pavers for the polymeric sand to be poured. Once you’ve filled all the cracks with polymeric sand, you’ll mist the patio to harden the sand and join the pavers together. Once it’s dry, you can finally furnish and enjoy your patio!
Now that doesn’t sound so bad, does it?! If you’re thinking of doing a paved patio yourself, here are the materials and tools you’ll need to get the job done.
If you want to see behind the scene footage from the project Do Days, you can check out our Instagram story in the highlights entitled “DIY Patio.” If you loved reading about how to build a patio then you’ll definitely want to check back for our upcoming post on the UpSkill Workshop where I’ll share lots of helpful home DIY skills that I learned. And if you found this post helpful, we’d appreciate it if you would like it and share.
This post is sponsored by Lowes. The thoughts and opinions are my own.
Before we had our first child, we were super determined to delay screen time and technology use for as long as possible, forever even (okay realistically I was aiming for 4-5 years of age). I had seen first hand the negative effects of children having access to phones and tablets at a young age and I wanted nothing to do with it. And while we were mostly successful, we did come to have a change of heart…which is at the heart of this post. This post is not about the positive or negative effects of technology on children because there is plenty of literature already out there that you can read on this subject. Instead, this post wants to inspire dialogue about finding a balance, if there can be such a thing.
Our son did not watch any TV for the first two years of his life (save the time he was on a nebulizer for an asthmatic cough and the only way he would sit down was with some baby songs chromecasted onto the television). I thought I would wait even longer until I came across the following article in The Atlantic entitled Parents: Reject Technology Shame. I’ve linked the full article for you to read yourself but the main gist is that there are three types of parents: 1) digital limiters, 2) digital enablers, and 3) digital mentors. What stood out as most alarming in the article was this:
“In a survey that asked parents about where their kids get into trouble online, I found that among school-aged kids, children of limiters who are most likely to engage in problematic behavior: They’re twice as likely as the children of mentors to access porn, or to post rude or hostile comments online; they’re also three times as likely to go online and impersonate a classmate, peer, or adult.”
Reading it I thought, “well of course I want to be a mentor!” I mean, if technology is already a big part of our lives then doesn’t it make more sense to teach children how to use it responsibly rather than just saying no and letting them get into trouble on their own later on? For us it seemed like a no-brainer. Of course that didn’t mean we opened the floodgates on screen time and technology use. Also, while the article was inspiring in opening the conversation on digital mentorship, it didn’t offer much in the way of guidelines. A digital mentor was defined generally as those who “take an active role in guiding their kids onto the Internet.” But internet is only one side of digital media use. And what does an “active guiding role” look like? I thought long and hard about this question and so I came up with 3 ways we can be a digital mentor to young children when it comes to screen-time.
Set parameters by being a good role model. Being a digital mentor doesn’t mean there aren’t ANY limits. Reflect on your own values and how technology fits in with them and you’ll likely arrive at the conclusion that technology has its time, place, and benefits. Now define what those are. Think that phones or tablets don’t belong on the dinner table? Make sure they’re not in sight when dinner time rolls around. Do you want screen-time/technology use to be an educational and wholesome experience? Choose programming that reflect those values. We find it helpful to think about how we use our technology in front our children and what they will learn from that.
Be present and engaged. When I think of mentorship, I think of a guiding presence. Often times when parents allow screen time or technology use, it is as a reprieve so that the children can be preoccupied as adults get their stuff done. It doesn’t have to be that way. Try to plan screen time and technology use so that you are physically present and able to reinforce what they are learning and get them to reflect on what they are experiencing. The research shows that it’s far more effective than just having your child sit and watch/play on their own.
Opt for Ad-Free programming. If there’s anything that digital mentorship is all about, it’s about embracing technology to put yourself in the driver’s seat. If we are going to be totally honest then advertisements and commercials are major obstacles to that control. For that reason, try to stick to applications and programs that are free of advertisements as not only are many of them questionably appropriate but they instill an insatiable consumerist impulse at such a young age which is totally unnecessary.
Living in a digital age presents many challenges and we are working to be better digital mentors each and every day. There’s no such thing as perfect and how we interact with technology will continue to evolve. These are just three simple ideas for how we approach technology use that we hope you’ll find helpful if you’re apprehensive about introducing technology and screen time to young children. How do you feel about technology and screen-time? If you have any ideas on how to be a good digital mentor, please share in the comments below. And as always, if you found this post helpful please follow us and share
We never planned on flipping a home, it kind of just happened. The short story is that we helped a family member buy a home that they ended up realizing was not right for them. We know, that can be quite a costly mistake. Luckily, the home was in excellent condition and the housing market was doing great so we sat down with our realtor who suggested we fix 5 simple things to get the home sold as soon as possible. And it worked! It really worked! Within a month, we had the home listed and shortly after had secured a buyer. So today we are sharing the simple things we did to get the ball rolling and how much it cost us. It’s probably important we note that we are not realtors or contractors, just a couple of avid DIYers with a tad bit of crazy in us 🙂
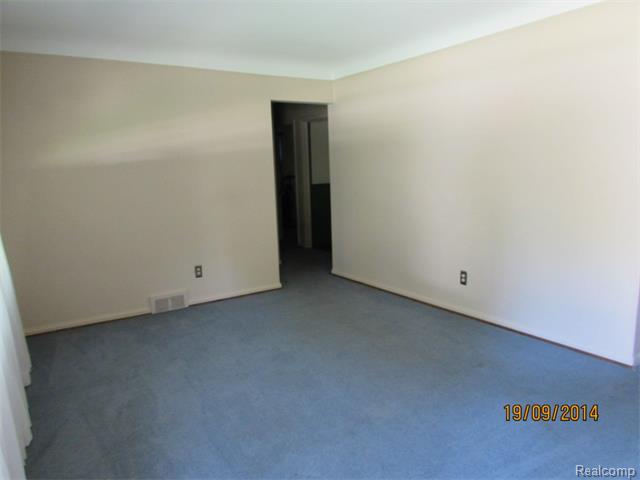
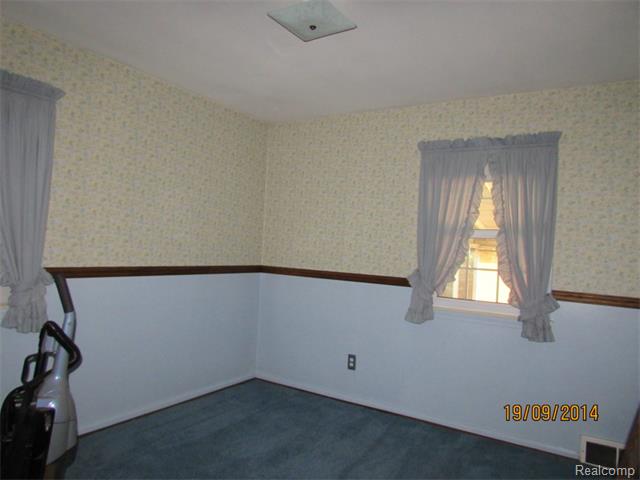
Here are the pictures of the home from the original listing prior to us doing anything:
These are the five things that were recommended we change:
Remove carpet and wallpaper
Add a fresh coat of paint
Finish hardwood floors
Landscaping
Professional cleaning
We also went a little above and beyond by adding a few items for styling purposes. These included a kitchen towel and plant in the kitchen, a welcome mat outside the front door, and a towel, soap dispenser, and some decorative items in the bathroom.
We didn’t do much DIYing here because of time constraints with our school so instead we hired people to take care of most of the labor. Below is a breakdown of each job and the cost associated with it:
City Inspection: $300 – The city inspection consists of all matters related to city code and regulation. They come in and make sure everything is up to standard and request that you update what is not so you can get a COO (Certificate of Occupancy) which you need if you are selling the house.
Painter: $1800 – We requested a handful of quotes and went with the mid-range contractor that had between 5-10 years of experience. Most of the cost was for removing the old wallpaper from the entire main floor. The patching up and painting wasn’t as bad as we initially thought.
Flooring Company: $ 1700 – This cost was a deal compared to the other quotes we got. The flooring contractor removed the old carpet and refinished the hardwood floors in approximately a week’s time. Be aware that the cost could be higher if you have flooring problems or need wooden trim and/or shoehorn installed.
Electrician: $250 – We needed an electrician to remove and replace all the 3-prong outlets to 2-prong because they were not grounded. Another minor thing he did was make sure that all of our wiring was up to code in the garage and outside the house.
Professional Cleaning: $150 – To sell the house and truly bring out the beauty of the space we hired a local cleaning company to polish up the home just before it hit the market for showings.
TLC: $100 – After we got all of the above done we decided to caulk to make sure corners, windows and all doors were sealed and correctly adjusted to their frames.
Landscaping and Decor: $150 – You can’t go wrong with mulch, flowers and lava stones to make the landscape pop. We also purchased a nice outdoor welcome mat and indoor mat for potential buyers to feel a sense of home.
TOTAL: $4,450
We really wish we had the time to do these updates ourselves, but it would have been too overwhelming and would have taken us much longer. If we did do some of the things ourselves such as the painting and cleaning then we would have saved quite a bit of money, although we did recoup the costs with the sale of the home. The important thing to note is that it doesn’t take much to get a home move-in ready even if there’s a kitchen or bathroom that could use some updating. If you have a similar project you’re diving into or are considering becoming a house flipper, now you know what it takes to get a home with good bones flipped and sold in no time at all. Now for the part you’ve all been waiting for…….the reveal:
Have you ever flipped a home or considered flipping a home? Let us know in the comments below. We can’t wait to share our next exciting project with you so if you don’t want to miss out be sure to follow us here and on instagram for the latest and greatest.
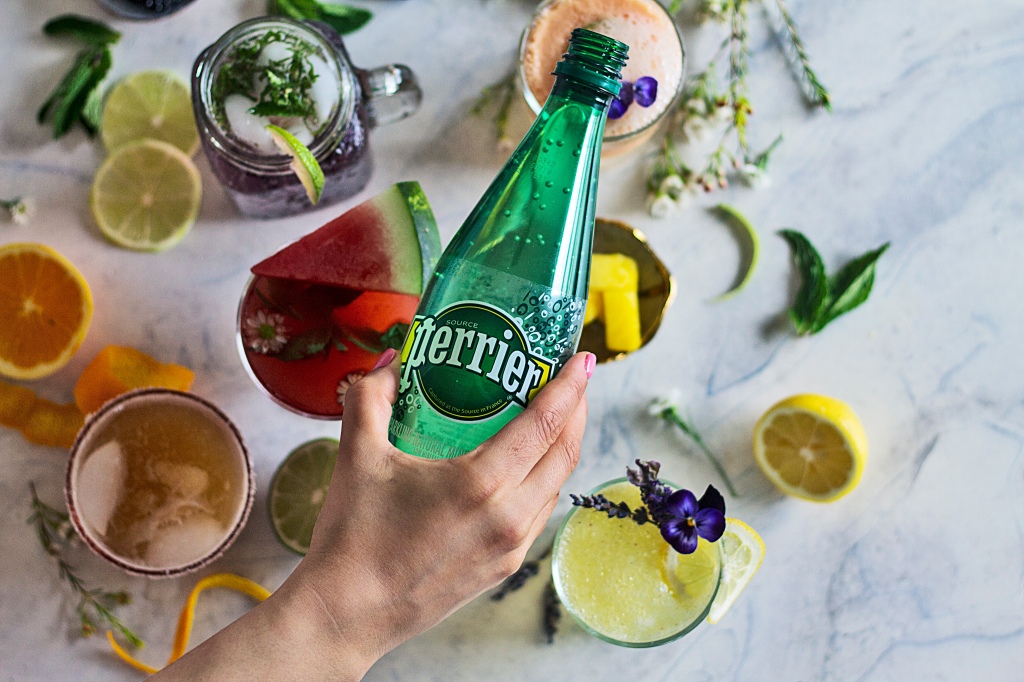
The month of Ramadan is officially here and I am so excited to share something that I’ve been working on with my friend Amanda from Amanda’s Plate. We both know all too well how tough it can be to fast during the heat of the summer months so we got together to shoot some of our favorite drinks for an often overlooked aspect of fasting: staying hydrated. The importance of getting in plenty of fluids cannot be overstated but let’s face it, sometimes that’s hard to do. Chugging water can feel like a chore and store-bought drinks filled with artificial flavors, colors and excessive sugars are just not a health-conscious option. To make it fun and easy to stay hydrated, we’ve created five refreshingly delicious and simple to make Ramadan mocktails (obviously non-alcoholic) that are sure to impress your iftar guests and quench your thirst as the days get hotter. Behold, our Rocktails (Ramadan+Mocktails)!
The wonderful thing about these drinks is that you can customize them to your taste (substitute your favorite fruit and herbs) and dietary preferences (even less sugar). The best part, however, is getting creative with the presentation.
Using your blender, combine watermelon, basil, lime and sugar (if using). Blend until smooth. You may wish to strain the drink but that is optional. Garnish with fresh basil and lime wedge. Enjoy!
In a small saucepan, combine granulated sugar with one cup of water and lavender. Bring to a low boil and reduce heat. Stir until sugar has completely dissolved about 8 minutes. Remove from heat and allow to cool. Strain out the lavender and pour the simple syrup into a pitcher. Stir in the fresh lemon juice and sparkling water. Garnish with lavender sprig and lemon wedge. Enjoy!
At the bottom of a glass, mash the blackberries and honey with a fork. Layer with ice cubes and pour over the sparkling lime water. Garnish with lime wedges, blackberries, and mint. Enjoy!
½ cup wet seedless tamarind paste (approximately ½ a block)
½ cup sugar
3 cups water
In a small pot, bring the water, sugar, and tamarind paste to a boil. Mash the mixture with a fork and let simmer until well dissolved (about 10 minutes) then let cool and strain the syrup into a mason jar for storage. To make one serving, combine 1-2 tablespoons of tamarind simple syrup (more if you like it sweeter), sweet lemon, and sparkling water in a sugar-rimmed glass. Serve over ice. Enjoy!
Let’s see what fun and refreshing concoctions you come up with! If you make any of these drinks or create your own, use the hashtag #ramadanmocktails and tag us @Amandasplate and @Thecozyhomechronicles. We will also be sharing more healthy and nourishing food and drink ideas on our page so be sure to follow along!
This probably should have been the first post on our blog but I figured it’s never too late to share our rather interesting DIY home backstory. You see, the idea of renovating our home ourselves never even crossed our mind. I mean don’t get me wrong, we are pretty handy and creative (heck, we DIYed our wedding) but we just assumed that home repairs were way out of our league. So like every clueless new homeowner, we called contractors to help us with the very basics and then some. Things went pretty smoothly until one day the contractor working on our basement announced that he had a family emergency overseas that he needed to attend to. I think he saw the panic in our eyes because he calmly responded, “Look, I first learned this trade by watching others in a very short amount of time. You don’t have to be a genius to do this line of work, anyone can do this.” He then spent the next few days before his departure demonstrating and explaining how to put up studs, mud drywall, and lay tile. He even left us with his tools! Those simple words of encouragement and instruction were enough to spark something within us. Although, it took us some time to finish our basement, the internal transformation happened immediately.
That’s how we got a taste for home DIYing. Every year since, we have tackled a major home project and we even started this blog as a way to share our home journey because we are passionate about DIYing and home life. When we experienced the joy of confidently working together on our home, we wanted to share that with YOU because we truly believe that ANYONE can do these things. We are living proof. Just take a look at the pictures of our home from our first showing compared to what it is today. Doesn’t it make your DIY senses tingle?
That’s why we are super excited to share that we are partnering with Lowe’s for The Upskill Project contest running in Detroit from May 7th-21st. So if you have a home project that you’ve been wanting to undertake but are reluctant because of the costs or because your skills leave much to be desired, then this contest is for you! Lowe’s is offering up to five lucky people the chance to win a $2,000 Lowe’s gift card for their project along with expert help to guide and teach the skills needed to complete your project. We know from experience just how crucial a little bit of guidance is and that is why this movement resonates with us so much. It’s all about empowering homeowners and giving them the skills, confidence, and inspiration they need to tackle any home project.
To enter, all you need to do is submit a video answering the following questions:
What is your project?
What skills do you need to complete your project?
What would having those skills mean to you?
Simple enough, right?! We’ll be there to help and document one winner’s project progress along the way. And if you’re not a lucky winner, you’ll still have the opportunity to learn the skills you need at a free workshop hosted at a local Lowe’s on August 25th. This workshop is an invaluable opportunity to learn important homeowner skills such as painting, tiling, plumbing, and general tool use. Did I mention we will also be there too? So mark your calendars and get ready for a date with your new DIY BFFs.
If you’re not in the Detroit area and want to enter the contest, don’t fret because The UpSkill Project is coming to a number of cities across the country throughout the year. You can click here and scroll down for a full list.
All right, what are you waiting for?! Want to enter this contest? Start brainstorming and share this contest with your friends! We want to see what cool projects you have envisioned for your home! Maybe you want to build a rain garden? Or renovate your peach 1950’s bathroom? Whatever it is, may the odds be ever in your favor.
Disclaimer: NO PURCH NECESSARY. Homeowners and renters (with property owner’s permission) in eligible ZIPs only. Rules/Entry details here: http://bit.ly/2Gvud8k. Ends 5/21/18.
This post is sponsored by Lowes. The thoughts and opinions are my own.
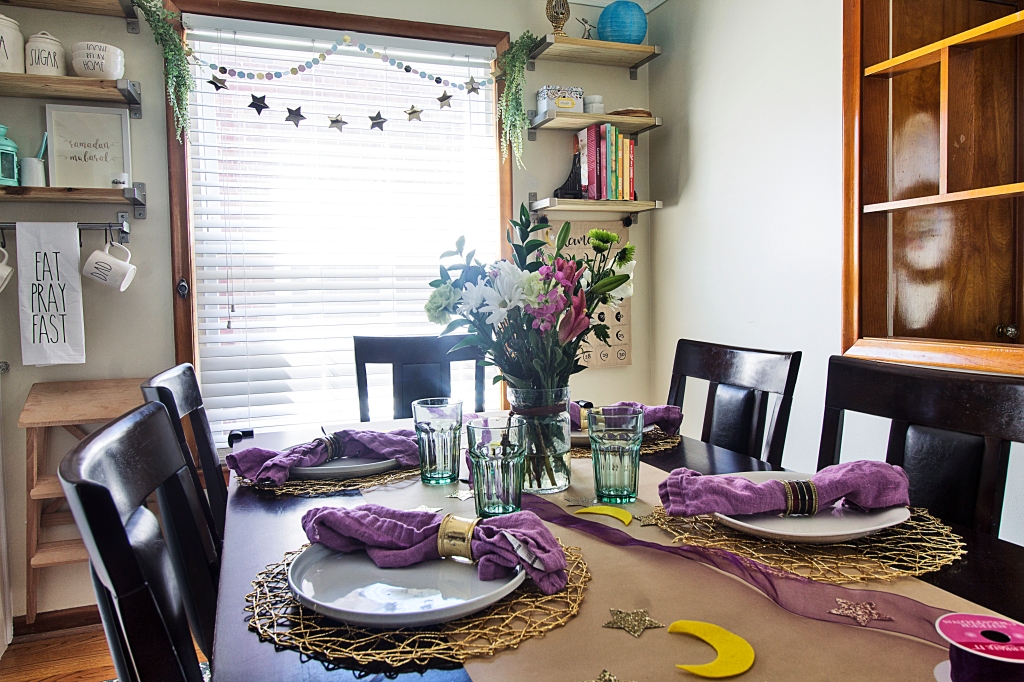
Hello lovely readers! If you are coming here from Mint Candy Designs, hello and welcome to our blog. It’s always wonderful to have new faces around here 🙂 With Ramadan just around the corner, we are excited to share with you some simple ways to decorate your home and make the spirit of Ramadan manifest in your heart and home. Last year, we shared different ways to add festive and colorful touches to the dining table, where you gather to break bread after a long day of fasting. This year, we teamed up with some talented home bloggers to bring you creative DIYs that you can do to welcome this beautiful month into your home.
“There’s hidden sweetness in the stomach’s emptiness.”-Rumi
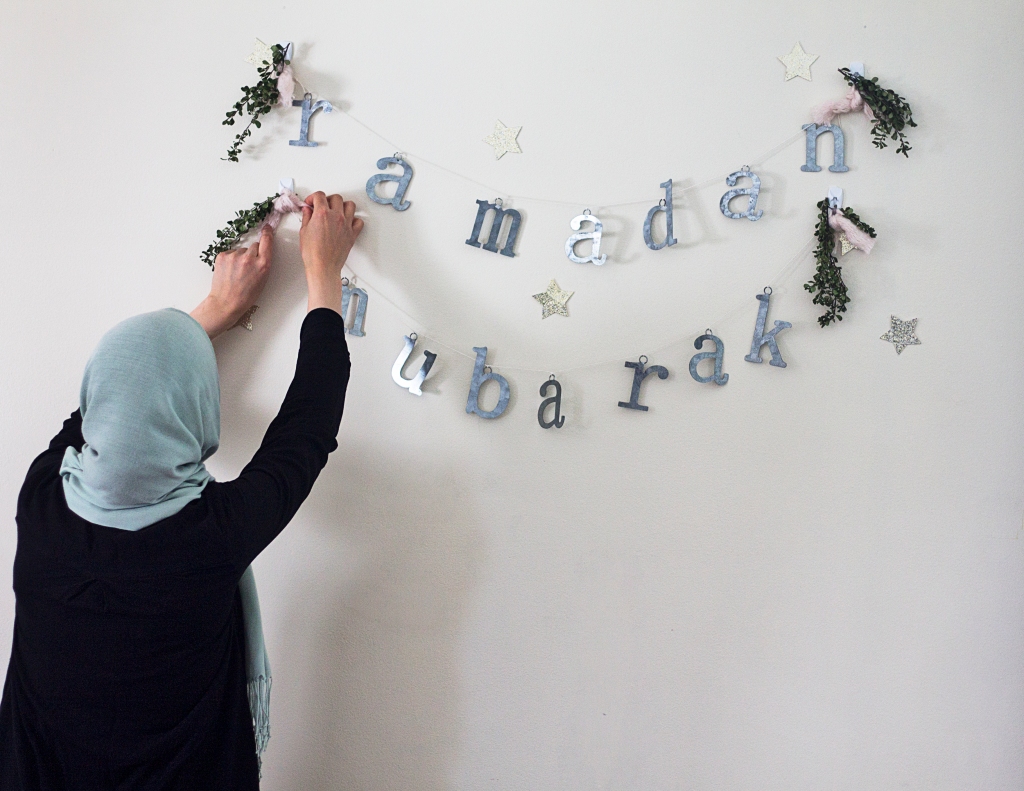
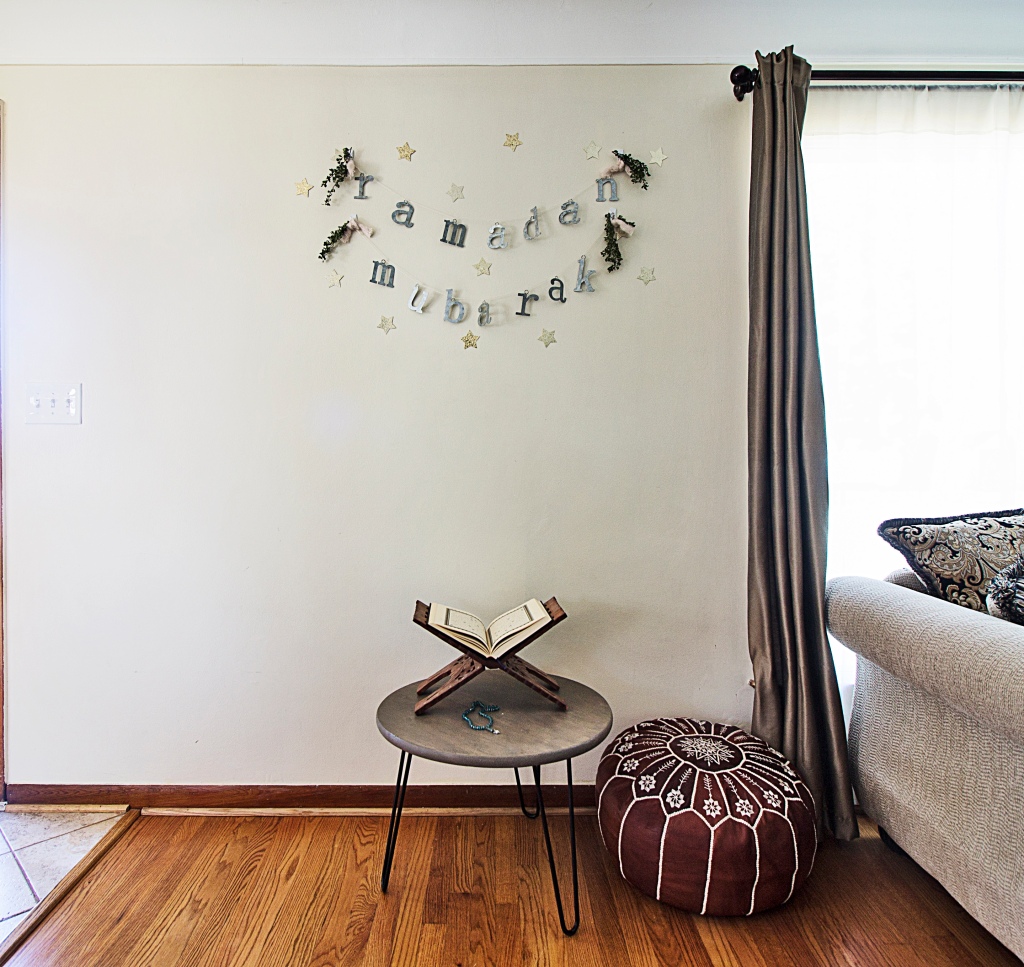
The feature of this post is a minimalist Ramadan banner and backdrop that I created near the front entrance of our home. I think it’s a beautiful welcoming statement for family and iftar guests and it makes the perfect backdrop for any family photos. It’s also super easy to make!
For the Ramadan banner, here’s what you’ll need:
galvanized letters
natural cord
scissors
measuring tape
You can actually use any type of materials for the letters. I chose galvanized tin because they were on clearance at Jo-Anns and I wanted something more sustainable and long-lasting. I was tempted to spray paint the letters gold but in the end decided I liked the rustic, industrial look. To make the sign, all you need to do is arrange your letters spelling RAMADAN MUBARAK. Measure equal spaces between each letter (I did 5 inches) and secure each letter to the cord with a double knot. When you’re finished, create a loop at each end of the cord so you can hang the banner easily on a hook.
To complete the backdrop simply cut out stars from glittered card stock and stick them to the wall using washi tape. You can also tie ribbon or yarn to cover up the command hooks and add a touch of green with any stems of your choice (eucalyptus, myrtle, grevillea, huckleberry).
I also spruced up the dining area by hanging up garland and faux greenery. On our open shelving I created a simple display with a lantern and a gold foil Ramadan Mubarak print.
I hung up our Ramadan advent calendar from Handmade Beginnings where I’ll put something fun for the kiddos throughout the month. For the table I pulled out the turquoise glasses and purple linens I purchased from IKEA on clearance last year. Unfortunately they no longer offer those specific products (or if they do the colors are different) so I’ll link what alternatives they have below. For the napkins, my source link takes you to a conscious minimalist cotton napkin from H&M.
The only new things I purchased for this look were the gold placemats, the craft paper for the table-runner, and the glitter card stock to make the stars for the embellishments. I got the idea for the craft paper table runner from a Pinterest tablescape for Thanksgiving. I think it’s a nice screen-free way to keep children occupied with coloring and you can even write down your own reflections throughout the month. For an extra pop of color, never underestimate the power of fresh flowers. If you’re blessed with a beautiful flower garden then make it a family tradition and go flower picking right before iftar. If not, a local market or a Trader Joe’s would be a good option for gorgeous and reasonably-priced florals.
What did you think of the final result? Would you make this Ramadan banner? If you’re looking for more Ramadan decor inspiration then you’ll definitely want to head on over to my friend at Nimistyle and see her DIY Doily Table Runner and Gratitude Wall. Also don’t forget to check out the rest of the lovely DIYs in the Blog Hop linked below!
Last but not least, my friend Amanda and I put together our first Ramadan Ebook. It’s an idea that we’ve been sitting on for a while but this year we took a leap and tried to make it a reality. It’s nothing fancy but it’s a helpful resource filled with meal ideas and recipe links, decor tips, a checklist to help get you organized and even a few simple, mindful challenges for you to try. The best part is it’s available for free download right here:
Before the pandemic, my children were attending a play-based early learning center a few times a week while I worked on my dissertation. When the lockdown hit in March of 2020 and their school closed, I felt compelled to recreate the structure they enjoyed so much in their classroom. The teacher kindly sent us their schedule and at first I attempted to stick to the timing of each activity. But with a third baby calling the shots, it became clear that a strict schedule couldn’t work for us. I wanted structure and the kids needed it too but it needed to be built around something other than time. I thought about activities we do everyday that were an integral part of our life: sharing meals, reading together, playing outside, resting, etc. and I centered our rhythm around those. It worked for us, it really worked. The kids picked up on it over time and it made life easier for all of us. Fast forward a few months later when I was deciding between homeschooling or virtual school, I realized there was just no way I could have my kids sit in front of a computer screen for 4 hours a day. It just wasn’t fair to them. Kids need time to play, explore, and move. I dived straight into homeschooling and never looked back.
And then I was confronted with how I would structure our homeschool days. After some deep reflection, research, and a bit of unlearning, I realized that homeschool did not have to look like traditional schooling. We didn’t need to sit down 6 hours hopping from reading to math to science every 30 minutes. Rather than adhering to a strict schedule for our homeschool days, we adapted the rhythm to give our children both the structure and flexibility they deserve. It did not happen overnight but over time they have internalized this natural flow to our daily and weekly routines (another post). Today I’m sharing a poster I designed that captures what our homeschool rhythm looks like. Feel free to implement this for your family or use this poster as a guide to build your own daily rhythm. You can download it below for free and print it to hang in your home.
P.S. If you found this post and the poster helpful, it would make me so happy if you shared it with your friends. I’d also love to hear any feedback in the comments below.


")


")


