
Spring is finally in the air here in Michigan and we are getting closer and closer to planting season, one of our favorite times of the year. Gardening for us is just so fun and fulfilling because it connects us to the beauty of nurturing and growth. If this is the year you decided to try your hand at gardening then starting with a raised bed might be the way to go. A custom raised vegetable/fruit/herb garden is not only easy to make but it takes a lot of the hassle out of gardening in terms of weeding and messes. It also makes for a beautiful backyard feature and less back-bending and back-breaking work.
You can go about this project a couple different ways but the instructions I have provided in this post are for store-bought wood from your local Home Depot or Lowe’s. For our garden beds, we upcyled wood panels that we had stored in our garage from our early basement renovation and we personally recommend this route if you have unused wood just lying around. There is something extra rewarding about repurposing items and reducing waste and what better time to do that than during the environmentally conscience activity of gardening. Of course you can always buy a raised garden bed but where’s the fun in that? Not to mention, a store-bought garden bed can run anywhere from $100-$250 depending on the size and material. If you buy the wood yourself, you can have a similar garden bed for half the price and if you go the upcycling route it will cost you nearly nothing.

Costco – $107.50 / one

Home Depot – $99.19 / one

Lowe’s – $118.00 / one
Now that we have you convinced (hopefully) to build your own garden bed, here’s what you’ll need:
Supplies for an 8ft x 8ft garden bed
8 2in x 6in x 8ft ($60)
2 2in x 2in x 8ft ($7.50)
1 Weed Blocker ($9.97)
1 box Wood Screws ($6.58)
Patience ($0.00)
Green Thumb (Priceless)
Note: I did not include the amount and price of soil in the supply list because that will really depend on the size of your bed. If you are unsure, this soil calculator is super helpful!
Tools
Staple Gun
Post Hole Digger
Miter Saw or Hand Saw
Power Drill
Directions
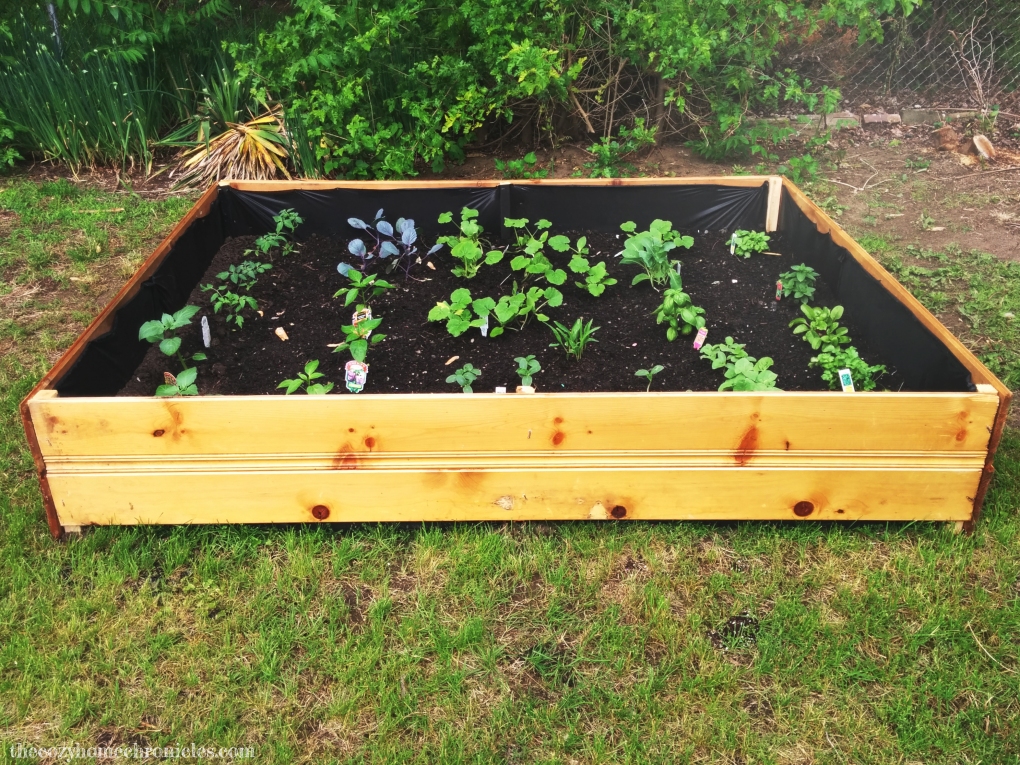
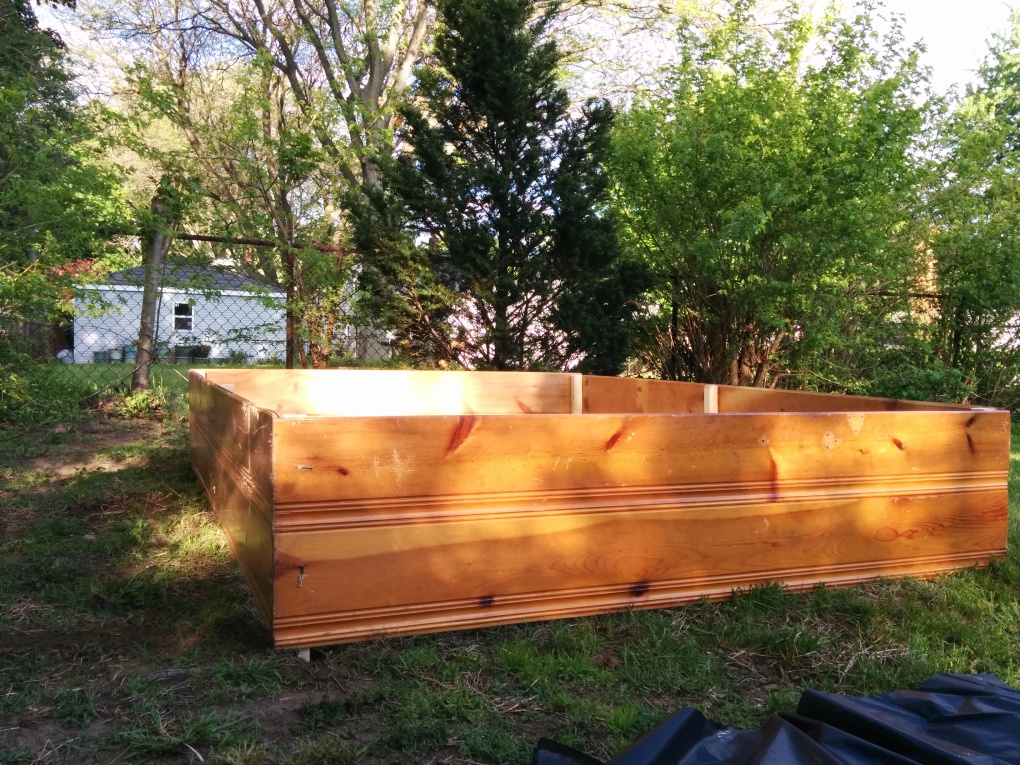
- Design the layout of your raised garden bed based on the shape and dimensions you want. Our wood panels were 6 ft long so our garden bed ended up being 6ft x 6ft.
- If you chose a rectangular design and want to make cuts to the 2x6x8’s (or any other wood you are using), now would be the time to do so using a miter or hand saw. If you want a square 8ft x 8ft layout then just leave them as is. These pieces will be the side panels of your garden bed.
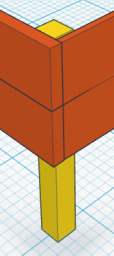
- Cut your 2x2x8s so that you end up with a total of six 2ft pieces (you’ll have some wood leftover). These will be the legs of your garden bed. You may notice that the garden legs are longer than the side panels and that is intended. The extra foot of leg is for planting the garden bed firmly in the ground.
- Next, you will attach the side panels of your garden bed to the legs.The first thing you want to do is lay out two 2x6x8 pieces horizontally and parallel to each other so that there are no gaps between them. At equal intervals, starting precisely from the corner, attach the garden bed legs (2x2x2) to the sides using your drill. You will need 6 screws to do this: 1 in each of the two panels for each of the three legs.
- Repeat step 4 using two more 2x6x8s and the remaining 3 legs.
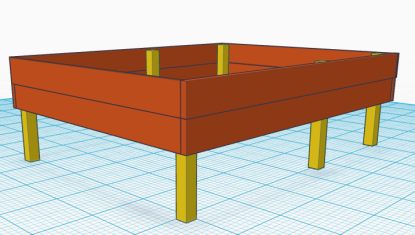
- Now you can complete the garden bed by connecting the remaining panels perpendicular to the side panels with the legs to form your square or rectangle. Make sure that the legs are on the inside of the garden bed. Once you have put together all the boards, your garden bed should look like the final image in the 3D model below.
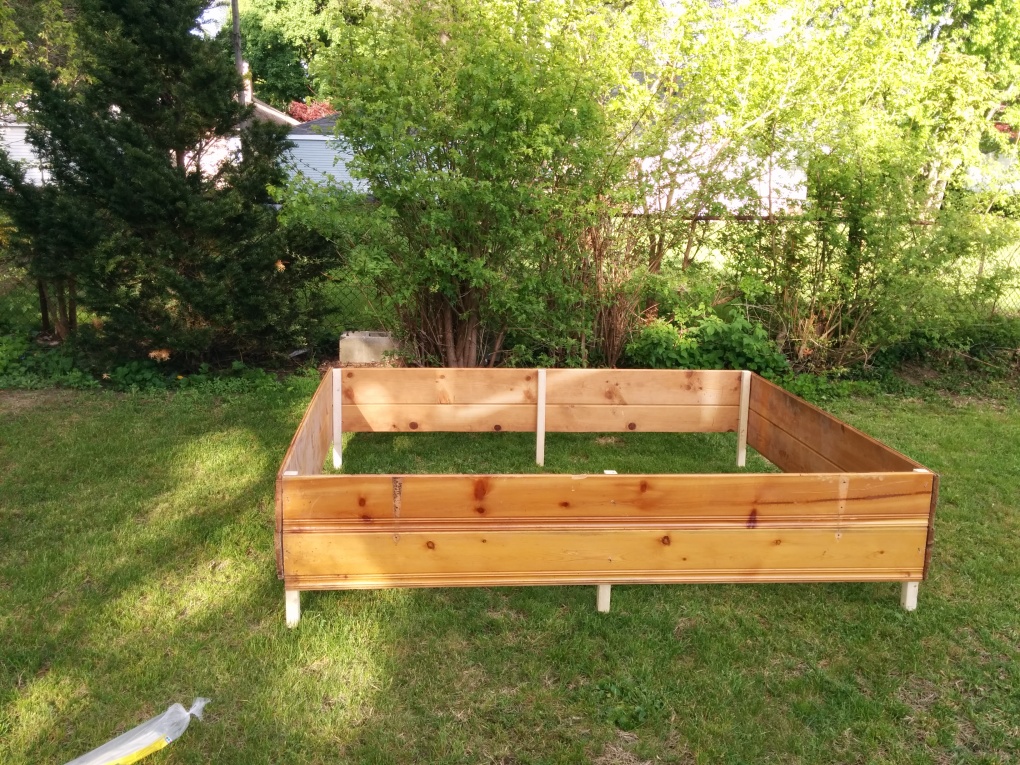
- Use the post hole digger and dig 6 holes for your legs, making sure you measure the distances accurately between the legs so you won’t have to struggle putting them into the ground.
- Now you can go ahead and place the garden bed legs into their corresponding holes.
- This is an optional step but one we found helped drastically reduce the weeds. Lay the weed blocker down at the bottom of the garden bed and use a staple gun to fasten it to the sides of the bed. Do the same thing across all sides of the garden bed making sure to cover the entire surface area.
- Fill your garden bed with the soil mixture of your choice and you are all set to plant whatever your heart desires 🙂
And for the visual learner…


Now sit back and enjoy the harvest to come.


If you liked this post please follow us and share!
![]()

Pingback: Build your Own Garden Fence
Pingback: National DIY Day Celebration – The Cozy Home Chronicles
Pingback: Taking the Necessary Steps in Becoming a DIY Home Gardener
Pingback: Top 20 Wooden Raised Garden Bed Ideas | ToolShelf.co.uk