Bathroom Renovation: Design Inspiration

Happy Tuesday friends 😊  Today we are sharing two design boards and some inspiration for an exciting renovation we have planned…our main floor bathroom. This is a project we have wanted to do for quite some time but it was pretty low on our priorities because of time and budget. Now that we have finished our basement and renovated our kitchen, we figured it was a good year to do it (our painted tub is also starting to chip away). We also wanted our renovation to coincide with The One Room Challenge although right now we are not so sure because we can’t really start our project unless we have settled on a design. And that has been quite hard to do!

Here are just some of our dilemmas:

  1. Black, steel, or chrome faucet fixtures?
  2. Floating shelves or cabinets?
  3. Colorful or white/gray mosaic tile?

We know what you’re thinking! That may seem like everything but we promise there are some things we do know for certain that we want.

  1. White subway tile.
  2. A narrow vanity.
  3. An accent wall in the shower.

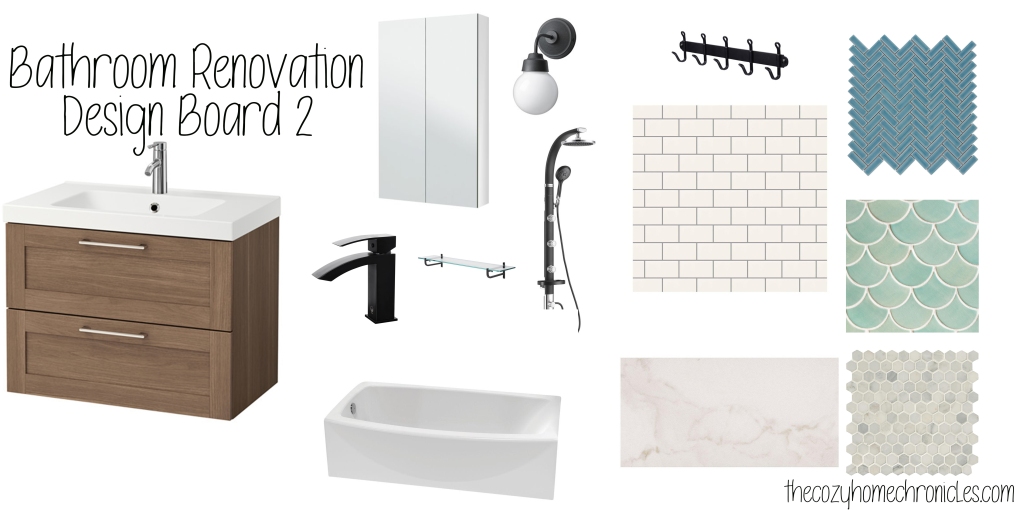
With that in mind, here are two design boards that we came up with based on what we like. They do look very similar but there are some major differences with regards to floor tile, vanity color, fixtures, and mosaic tile choices. The reason there are three tile choices because even with two boards we couldn’t narrow things down. Heck, we even have a Pinterest board dedicated to all the mosaic tiles we like. If there was no such thing as a budget then we would hands down go with Moroccan fish tile. Unfortunately what we were quoted for a small area was almost more than our entire bathroom renovation budget (boo). The real question now for us is whether we should go with a white/gray stone tile or a bright pop of color like emerald or mint green. We are leaning toward a splash of color even though white herringbone and hexagon patterns are beautiful. Home Depot carries gorgeous arabesque tile that are very reasonably priced (decisions, decisions).

Before we get to our boards, here are some bathrooms that we saved in our bathroom inspiration Pinterest board that have really stood out and helped us realize what features and looks we like. Now only if we can settle on something.

A Pop of Color or Pattern in the Shower

Black, White, and Wood All Over

tumblr_mw5rdhP7pS1qkgnf7o1_500

Source: Little Lulu

Small and White, Clean and Bright

20142_coba20a_01_PE379441

Source: IKEA

20172_coba09a_01_PH138884

Source: IKEA

Simple and Rustic

b0754fc708c8e4f9e4e44000dd8b8166.jpg

Source: Housley

All right. Without further ado here are our boards.

Bathroom Renovation D1

Bathroom Renovation D2

Our finished bathroom will probably pull features and inspiration from both boards and some of our favorite bathrooms but until we can be decisive and settle on a final look, there won’t be a finished bathroom. What do you guys think? Which board was your favorite? We would love to hear your thoughts and opinions in the comments below.

If you liked this post please follow us and share!

Instagram


DIY Framed Chalkboard Wall

Our son is getting to the age where he can almost color without trying to eat his markers and crayons (the keyword there is almost), however, he still attempts to scribble on the wall any chance he gets. Despite getting him a small IKEA table for all of his creative pursuits, he seems not to want to be confined to paper so we figured if coloring on the walls is what he wants then coloring on the walls he shall get. We have always been admirers of chalkboards…the rustic kind that you see in old schoolhouses in black and white movies. We figured a chalkboard would not only be nice for doodling and writing the dinner menu on but also as a fun educational medium to teach letters, words, and concepts.

IMG_9985

We did toy around with the idea of painting an entire wall, which has become popular these days, but in the end we decided a 6ft x 3ft area was plenty of space for all of us to use. Plus since we chose to put it in the hallway, adjacent to the kitchen, we wanted to preserve some wall space just in case we wanted to add wall art or organizers for a command center in the future. The awesome thing about making your own chalkboard wall is that for $10 of chalkboard paint, you can get a little over 100 sq. ft of coverage. That’s a steal when you consider that chalkboards the size of small picture frames are going for that and much more. The other really nice thing is that you can frame the painted area to achieve that authentic chalkboard look and you can do so using any type of wood you like in any stain you want. We went with an inexpensive white moulding from Home Depot that we nailed directly to the wall. We’ve come across DIY framed chalkboards that involve painting another medium and then hanging it up. Not only is a large chalkboard heavy and impractical to hang but it would be dangerous if you have little ones in your life. Just something to think about if you are not sure how you feel about painting a wall with chalkboard paint.

The only thing you need to be mindful of is if you have kids in the house then you will want to time your painting after their bedtime so the paint can dry without handprints all over it. Other than that, this chalkboard wall is super easy to put together and loads of fun. Our son loves scribbling on it, I love practicing my handlettering, and of course baba loves leaving silly doodles for us to wake up to. Yes, we are not ashamed to admit it… this chalkboard was as much for us as it was for our son.

Supplies
Chalkboard Paint ($9.67)
Wood Moulding
Trim Nails

Tools
Paint Roller
Paint Tray
Paint Tray Liner
Blue Painters Tape
Hammer

Chalk options
Chalkboard Wall Safe Markers ($12.95)
Regular Chalk from IKEA  ($0.99)

Note: If you end up taking on this project using similar dimensions to our chalkboard then know that you will have leftover paint. Don’t you fret though, we will probably come up with another DIY project to make use of it.

IMG_9973.jpg

Directions
1. Measure the area you want to paint and outline the area with pencil.
2. Apply the painter’s tape over your outline, pressing down firmly as you go so you don’t have any air pockets where the paint can seep through.
3. Mix the paint using a paint stick and pour 1/4 of the paint in the paint tray.
4. Gently dip your paint roller in and start painting your designated area in a “W” pattern. Make sure you don’t use too much paint on your roller as it will start dripping and take away from the smooth surface of the board.
5. Let dry for 4 hours before applying a second coat.
6. After the final coat is painted, let it set for 3 days (per instructions on the paint container) before writing on it.
7. Test your new board with the writing medium of your choice: old-fashioned chalk or chalkboard marker.

IMG_2460

IMG_2465

IMG_3138

IMG_9929

IMG_9954

IMG_9988 copy


Have you been wanting to put up a chalkboard wall? If so, what’s been stopping you?

If you liked this post please follow us and share!

Instagram


DIY Spring Succulent Wreath

img_0143
Can you believe it’s March already?! I mean just last year we were gearing up to begin our kitchen renovation and now here we are off on new adventures and projects. Spring is certainly in the air here in Michigan as we have had several days of 55 degree weather in the last few weeks. We are now preparing to usher spring into our home and what better way than to spruce up our entrance. I was recently at Jo-Ann Fabrics getting ideas for some upcoming projects and I came across several pretty spring wreaths covered in moss, crawling vines, foliage, and succulents. These wreaths screamed Lord of the Rings (big fans here if you hadn’t figured that out already) but the price…they ranged from $30-$60! I knew I could make one for much less and that’s exactly what I did (with a lot more succulents too). This is such an easy and fun project and it really made the door stand out with a pop of earthy green. This wreath is also the perfect project to make with children and can even be turned into a learning activity. Our son, who is almost two years old, had so much fun picking up the succulents and moving them around as I tried to settle on the final design.

In other news, we are super excited to share that were chosen to be ambassadors for National DIY Day which is coming up on April 2nd. Aside from this post, we will have some more fun DIYs coming your way in the spirit of celebrating creativity and crafting. We will also be hosting a local event in the Metro Detroit area, building raised garden beds for a community garden (stay tuned for more info). And speaking of DIYing for a good cause… As National DIY DAY ambassadors we are proud to support AdoptAClassroom.org and their mission to give teachers a hand by providing much-needed classroom materials so that their students can learn and succeed. National DIY DAY and The Cozy Home Chronicles are committed to supporting classrooms and providing tools for students and teachers to enhance the creative learning experience.

You can support AdoptAClassroom.org by Texting a Donation Today! Text the word “Give” to (678) 582-8594 and you will be prompted through a secure system to make a donation of your choice!

Alrightie, let’s make that wreath!

Supplies
18′ Grapevine Wreath ($4.99)
Succulent Mat ($4.99)
Moss rocks ($3.49)
Greenery of your choice ($4.99-$9.99)
Hot glue gun & glue sticks

Total Cost: $23.45 + tax

I purchased my supplies from Michaels over the course of a few weeks and used my coupons to put my wreath at well under $20. From the greenery I purchased, I had enough leftover to make another wreath if I just purchase more succulents and a grapevine wreath. So for the price of a store-bought wreath, you can basically make two or even three wreaths.

img_0132

img_0151

Directions:

  1. Collect your succulents, moss rocks, and greenery and start placing them on your grapevine wreath until you are happy with the arrangement. You might have to move things around several times to get the desired look.
  2. Once you have settled on your design, you will need to glue each piece in place using a generous amount of hot glue, embedding the stem deep into the vine, and holding down for 20-25 seconds until firmly in place.
  3. Once all the pieces have been glued down and any excess strands of glue have been removed, you can hang your wreath on a hook or door wreath hanger.

IMG_3495

IMG_0160

IMG_0166

Share your spring stories with us below and If you liked this post please follow us and share!

Instagram


Lebanese Lentil and Rice Pilaf (Mdardara)

img_0090

We know we haven’t posted in a while but we have been a bit busy working on some fun DIY projects around the house as well as an exciting project that we will be announcing next week. Although our lives are busy, we wholeheartedly believe in eating healthy homemade meals. It might seem difficult to strive for but there are plenty of healthy and simple meal options that one can make in a pinch. That’s why today I’m sharing one of our favorite vegetarian meal options that we enjoy almost every other week. I didn’t like this meal much when I was a child but it grew on me to the point that I now crave it as an adult. It’s a pilaf made of rice, onions, and lentils topped with more crispy caramelized onions and served with yogurt, crunchy radishes, and a side salad. It is both nutritious and delicious.

img_0099

To be honest though, there is one downside to making this dish. ONIONS. Your house will smell like onions, you will smell like onions, your car will smell like onions. The smell of onions will permeate your life for days. But I can promise you that it will all be totally worth it! I look back now and laugh but I remember in my early undergraduate days when I’d be getting ready to leave the house for my evening class and my father would start cooking this meal. I would try to race through the kitchen and out the side door but to no avail. That split second in the kitchen was enough to have me reeking. It’s funny to think that now, as a mom, I will be responsible for ensuring my family has their fair share of embarrassing, onion-filled moments. The circle of life. How beautiful 😉

img_0067

Lebanese Lentil and Rice Pilaf (Mdardara)

  • Difficulty: Easy
  • Print

Ingredients
1 cup brown lentils
1 cup white rice
2 medium yellow onions, diced
3 large yellow onions, cut into half rings (optional)
4-5 cups of water*
1 tablespoon extra virgin olive oil
1/4 cup vegetable oil
1 teaspoon salt
1/4 teaspoon black pepper

*Note: I use 2 cups of water to parboil the lentils and 3 cups to cook the onions, lentils, and rice together. Even on the lowest setting our stove gets very hot and cooks very fast. You may find you only need 2 cups of water rather than 3.

Directions

  1. Rinse your lentils under cold water and remove any small debris.
  2. In a small pot, parboil your lentils in 2 cups of water for 10-12 minutes. Drain and set aside for step 5.
  3. Meanwhile in a larger pot, begin caramelizing your finely diced onions in olive oil. This will take time so be patient. Keep the fire on low and stir every so often until you have beautiful golden brown (but not burnt) onions.
  4. Add the remaining 3 cups of water to the onions and bring to a boil. Stir well, reduce the heat, and let simmer for 2 minutes.
  5. Pour the rice, lentils, salt, and pepper into your onion mixture. Stir well, cover, and cook until all the water has been absorbed (about 15-20 minutes).
  6. While your rice and lentils are cooking, heat the vegetable oil in a saucepan and fry your onion rings in batches until crispy and golden brown. Let drain on a paper towel until ready to serve. This part of the recipe is a bit unhealthy and you can skip it though it won’t be the same. Or you can slow caramelize your onions (I have done this many times) but it will take more time and they won’t be as crispy.
  7. Top your mdardara with the crispy fried onions and serve with yogurt (to keep this meal vegan leave the yogurt out), radishes, mint, and a fresh salad.

img_0074

img_0083

img_0097

img_0090

What are some healthy meals you hated growing up but grew to love as adults? Let us know in the comment section below.

If you liked this post please follow us and share!

Instagram