There and Back Again: A last-minute DIY Halloween Hobbit Costume

 Halloween is just a day away so if you’re scrambling for a last minute costume idea, we have just the thing for you! Now do you want to take a wild guess what my son and daughter will be dressed up as? Hobbitses!!! Yes, Hobbits! Frodo Baggins and his side kick Samwise Gamjee to be exact. We don’t really celebrate Halloween per say (our kids don’t even eat candy) but every year my good friend hosts a “babyween” as a place for the kids to get together, dress up for fun, and enjoy healthy snacks and fun games. This year she will also be adding a giving component to the party so we will be taking canned goods that she will be donating to a local food pantry. As I’m sure you already know, we are huge fans (understatement) of J.R.R. Tolkien’s work. The way I see it, we all have role models that we admire and kids grow up looking for those role models. J.R.R. Tolkein’s mythology offers plenty of worthy role models; compassionate, brave, and principled characters that fight to defeat the greatest evil of their time. And what’s not to love about that?

IMG_5898

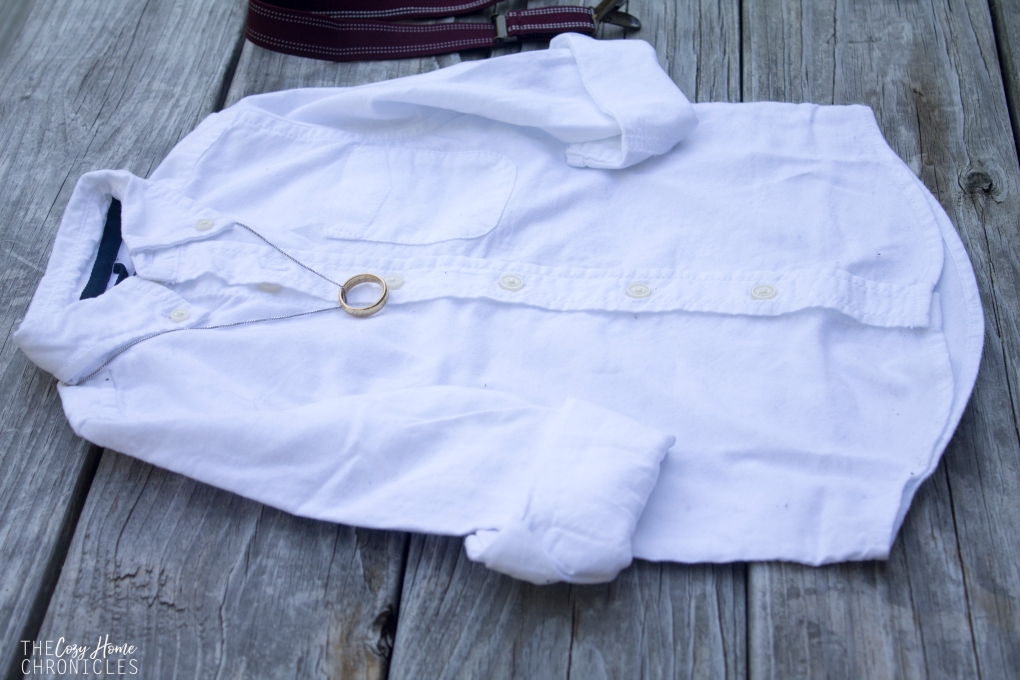
This costume is super easy to put together and most things (clothing items) you will probably already have at home. The only things you’ll need to get are a piece of fabric for the cloak and clay and a hair clip to make the elven brooch. The fabric doesn’t even need to be sewn because it looks more authentic with uneven and rustic ends. For the elven brooch, I just pulled up an image of the real one as I shaped the clay. It’s not perfect but it looks pretty good. After that, all that’s left is to get dressed in your fancy hobbit attire, pop on a chain with a ring on it, and clip your cloak on. Just remember,

“It’s a dangerous business, Frodo, going out your door. You step onto the road, and if you don’t keep your feet, there’s no knowing where you might be swept off to.”

What you’ll need:
White/Gray button down shirt
Suspenders
Dress pants like corduroy, khaki, or twill (preferably short or you can roll them up)
Necklace chain with a ring
Fleece fabric square
Elven Brooch

Note: Some of these components may be a choking hazard for young children so be very careful.

IMG_5897

DIY Elven Brooch:

  1. Shape white modeling clay into a leaf and bake for 20 minutes at 250F or according to instructions as it varies by brand.
  2. Once hardened and cool, paint the leaf with green acrylic paint. Let dry.
  3. Glue the clay leaf to a hair clip using hot glue or heavy duty glue. Let dry and you’re all done!

IMG_5881

IMG_6276

I’ll be sharing more of the final look on Instagram tomorrow so be sure to come see 🙂 And as always, if you liked this post please follow us and share!

Instagram

signature3


Tomato Parsley Rice Soup

IMG_5288

With colder weather finally on the horizon, I thought it would be a perfect time to share one of our favorite soup recipes. I wasn’t much into soup as a kid because I didn’t think it was a legit meal but this one always filled me up. I remember actually being happy coming home to see my dad standing over a large bubbling pot of his famous Tomato Parsley Rice soup. It’s the same look my husband gives when he comes home and sees it simmering on our stovetop. Pure joy. Because who doesn’t love a warm, hearty soup? The wonderful thing about this soup is that it is super easy to make with just a few simple ingredients you probably already have on hand. Although I call this recipe a tomato soup, it’s not so heavy on the tomato; the tomato paste is more for a bit of color. The real flavor lies in the broth; in the sweetness of the onion and richness of the beef. If you’re not into the meat scene, you can easily make this vegan by leaving the meat out and replacing the broth with a vegetable stock or tomato soup. I’ve made this meal countless times with a tomato soup base and it was a perfectly delicious, healthy, and filling alternative.

IMG_5809

Lately, I’ve been experimenting with boiling meat in advance and storing it with its broth in the freezer and I can happily report that it has not changed the quality of the meat. As long as you boil the meat until it’s tender you can have the base of a great stew or soup at the tip of your fingers. Simply defrost and add whatever flavoring, grains, and vegetables you like and you’ll have dinner ready in no time! This has been a huge time saver for me while my husband and I both navigate graduate school and homekeeping.

IMG_5814

Tomato Parsley Rice Soup

  • Difficulty: Easy
  • Print

Ingredients:
1 pound beef stew cubes
1 medium yellow onion, finely diced
1 large bunch parsley, chopped (plus extra for garnish)
1/4 cup uncooked rice ( I prefer long grain like basmati)
2 dry bay leaves
2 tablespoons tomato paste (more if you like it a deeper red)
8 cups water/vegetable/beef stock
2 tablespoons fresh lemon juice (more if you like it tangier)
olive oil
salt and pepper to taste

Directions:

  1. In a large pot, drizzle a bit of olive oil and brown the beef stew cubes and sauté the onions until translucent.
  2. Add your bay leaves and water/vegetable/beef stock and bring to a boil before reducing the heat. Be sure to skim any impurities that rise to the surface. Then cover and cook on a low simmer until the meat is tender (about 2 hours).
  3. Once your meat is tender, fish it out and shred it with a fork.
  4. To the broth, add in your rice, lemon juice, and tomato paste. Give it a quick stir and let it cook until the rice is tender (about 15-20 minutes). Stir in your shredded beef.
  5. Season with salt and pepper to your taste. Take the pot off the heat and add in the parsley, give it a gentle stir and let it sit for a few minutes before serving.
  6. Ladle into bowls, garnish with extra parsley and serve with a side of fresh crusty bread.

IMG_5820

IMG_5356

IMG_5840

If you do give this soup  recipe a try be sure to share with us. We love seeing our recipes on your table 🙂 And as always, if you liked this post please follow us and share!

signature3


One Room Challenge: Week 3 | Choosing Office Furniture

Hello friends and welcome to week 3 of our One Room Challenge Office Makeover. Hosted by Lisa of Calling It Home,  The One Room Challenge™, is a widely anticipated biannual event every April and October in which twenty design bloggers take the challenge of transforming a space in just six weeks. Every Wednesday, the designers document their progress while sharing their sources and professional advice. On Thursdays, guest bloggers, like us, can play along and support other guest bloggers that are also tackling a room renovation.

ORC GP

If you’ve been following along since the beginning, you’ll know that we are running a bit behind schedule. As of now, we are officially done with painting the room and we are getting ready to furnish it! Although we haven’t made any big changes yet, we did make some pretty big decisions recently including settling on a rug, blinds, and shelving system. Today is a big day because we are actually going to IKEA to finally purchase many of those things including the Algot system, which we will be installing on the wall where the desks will be located. I’ll be taking my brother and sister-in-law along  with me so they can test out office chairs to determine what is comfortable and stylish for them. Ideally, it would have been nice to thrift and reupholster some office chairs but for longevity and comfort purposes we opted to buy them new instead.  Here are just some of the things we will be picking up today:

ORCWeek3

We really wanted to build custom wood shelving but there is simply not enough time in our schedules. At the end of the day, we think the Algot system is the best choice because: 1) it’s easy to install, 2) reasonably priced, 3) modern and clean, and 4) customizable to fit any organizing needs. We will share a post in the future detailing exactly how to purchase and install the Algot for your office space. In the meantime, here are some pictures of the painted room and the itinerary for the last three weeks.

IMG_5697

IMG_5689

WEEK 1: Empty office, tape around the walls and windows, and paint

WEEK 2: Finish painting walls

WEEK 3: Finalize and purchase office furniture

WEEK 4: Install shelving, lighting, and window treatments

WEEK 5: Organizing, styling, and decorating

WEEK 6: Cleaning and Final Reveal

Be sure to check back next week for more updates on this fun office project! And as always, if you liked this post please follow us and share!

Instagram

signature3


One Room Challenge: Week 2 | Primed to Paint

Hello Friends and welcome to Week 2 of our One Room Challenge Office Makeover. It’s been a busy and rough week (our son got sick with some kind of stomach bug and we are running in the Detroit Free Press Marathon on Sunday) so we are a bit behind schedule. Because of the relatively small scale of work needed for this room, we are not really worried about finishing on time.

ORC GPHosted by Lisa of Calling It Home,  The One Room Challenge™, is a widely anticipated biannual event every April and October in which twenty design bloggers take the challenge of transforming a space in just six weeks. Every Wednesday, the designers document their progress while sharing their sources and professional advice. On Thursdays, guest bloggers, like us, can play along and support other guest bloggers that are also tackling a room renovation.

IMG_6165

IMG_6169

IMG_6170

IMG_1306

IMG_6076

As far as this week’s progress goes, we did manage to have the room emptied and primed (thanks little bro). Although it’s hard to tell in the pictures above, the primed walls give a small glimpse of how light paint will transform the feel of the room. And speaking of paint colors, after much deliberation at our local Home Depot, my sister in-law and I decided to go with Behr’s Ultra-Pure White. I think it will offer the blank canvas we need to build a space that is inviting and inspiring to work in. To get an idea of what this might look like in a room, you can read here about this once “color of the month.” All rightie, here’s what the rest of the schedule looks like now:

WEEK 1: Empty office, tape around the walls and windows, and paint

WEEK 2: Paint walls, install shelving and organization systems

WEEK 3: Change light fixture

WEEK 4: Install window treatments

WEEK 5: Organizing, styling, and decorating

WEEK 6: Cleaning and Final Reveal

Be sure to check back next week for more updates on this fun office project! And as always, if you liked this post please follow us and share!

Instagram


signature3


One Room Challenge: Week 1 | Simple Office Makeover Mood Board

Happy Friday friends! After getting a taste of our first One Room Challenge back in April when we renovated our bathroom, we are back for another round! Hosted by Lisa of Calling It Home,  The One Room Challenge™, is a widely anticipated biannual event every April and October in which twenty design bloggers take the challenge of transforming a space in just six weeks. Every Wednesday, the designers document their process while sharing their sources and professional advice. On Thursdays, guest bloggers, like us, can play along and support other guest bloggers that are also tackling a room renovation.

ORC GPThis year is a little interesting for us because we are now both in graduate school and so are VERY short on time (can’t stress that enough). While we would love to turn a room upside down for a makeover, we simply do not have the luxury of doing so. Instead we will be working with my brother and sister-in-law to help them design and makeover their home office. Both my brother and sister-in-law are in their last year of undergraduate school and they are newlyweds so they want a space that is budget friendly and one that is comfortable and organized as they continue to pursue their dreams. We are hoping to deliver on all fronts!

BEFORE

IMG_5607
IMG_5614
IMG_5608
IMG_5609

IMG_5990In this post, I’ll be sharing a mood board that I created as an inspirational blueprint. Before I put it together, I created a pinterest board and had my sister-in-law pin some of her favorite office spaces. Then as we boarded a plane for Kansas City, we went over her choices and why she liked them. Of course we didn’t leave out my brother in the decision-making, although he was a little less interested in the particulars. Based on their style interests this is the board I came up with:

ORC OFFICE

Obviously many of the elements will change as we proceed with the makeover but there are some things that we will stick with: neutrals and black with subtle pops of color, copper accents, and plants. To cut on costs, I will make use of free printables for the wall decor and I will also hit thrift stores and garage sales for much of the small storage furniture and decorative accessories. What I imagine we will spend the most on are office chairs and a rug. Unless by some miracle we hit the thrifting jackpot. The biggest challenges will face are keeping the cost low and balancing between function and aesthetics. My brother really wants a super comfy, ergonomic executive chair and unfortunately those are not the most visually appealing.

71xQWAfmXqL._SL1500_
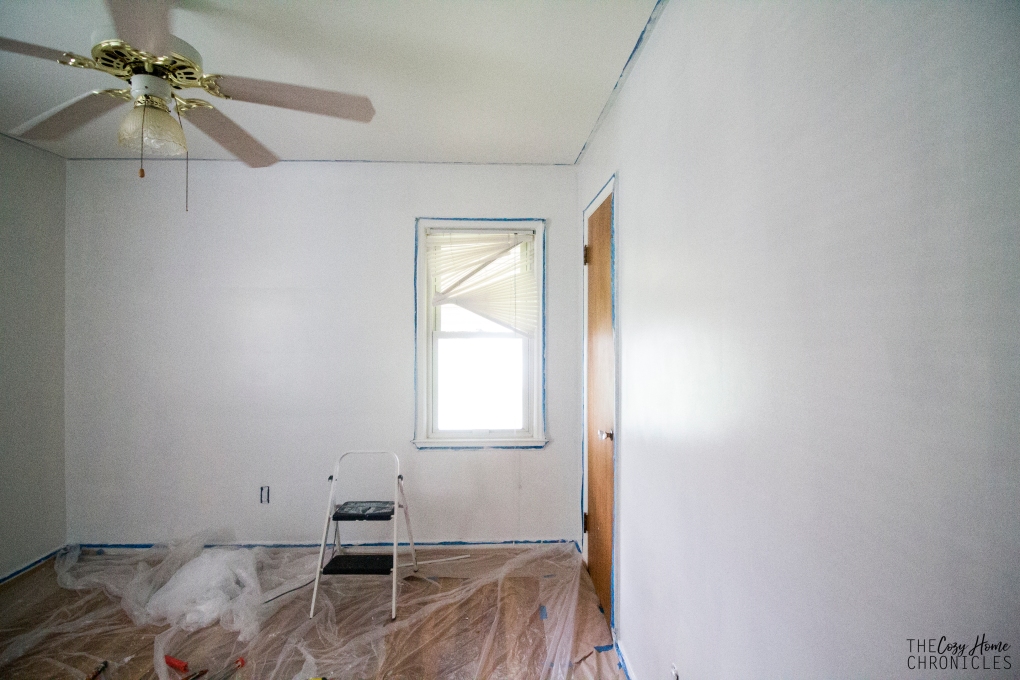
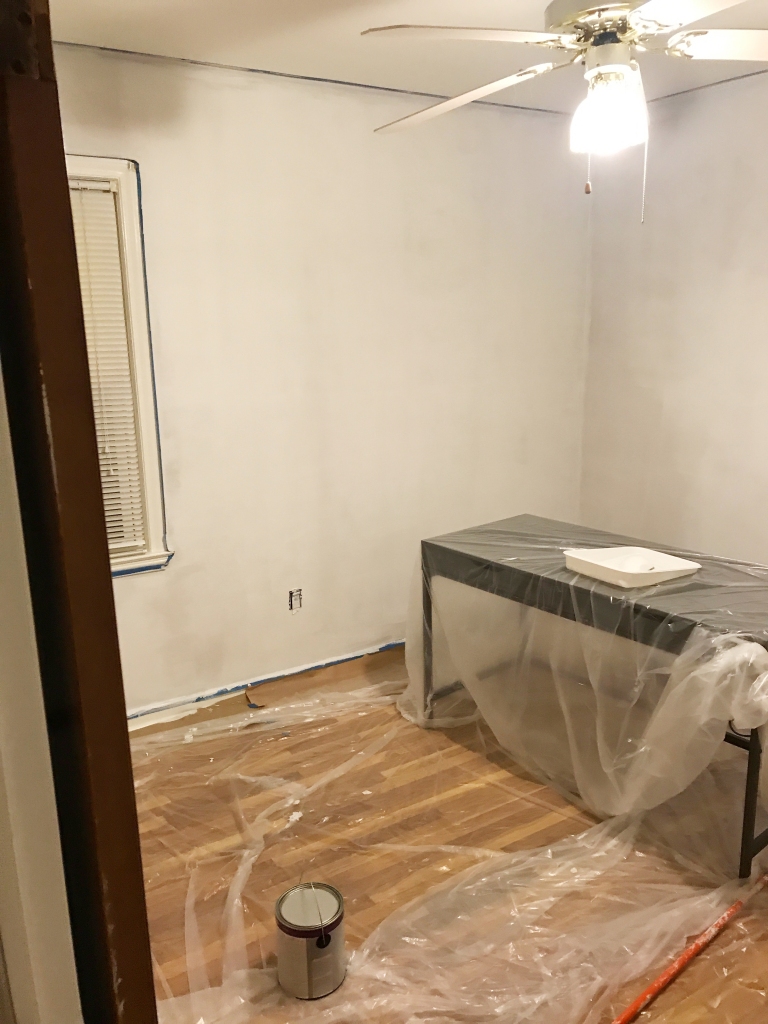
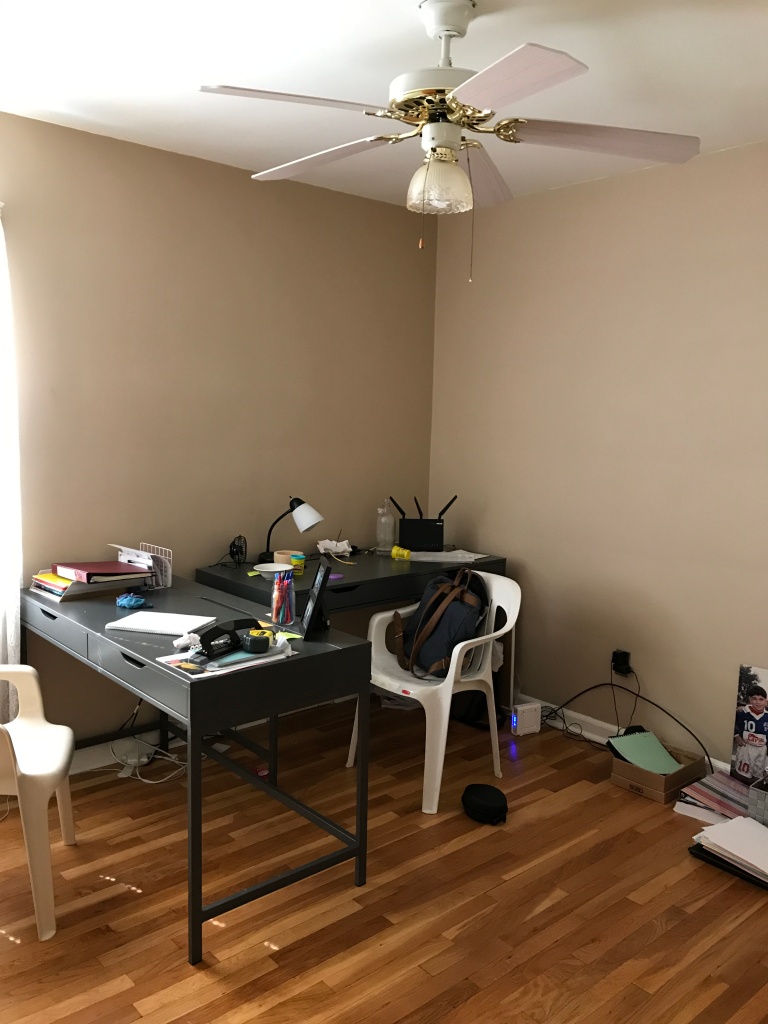
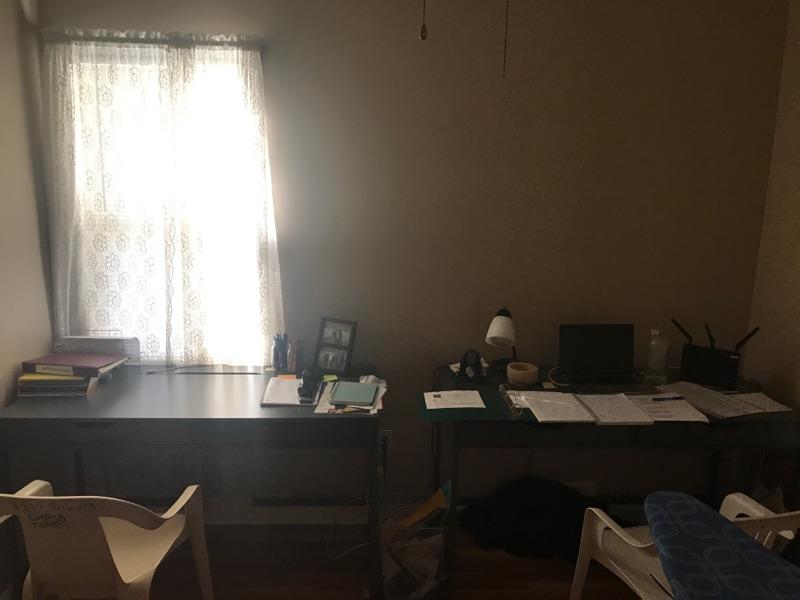
In terms of timeline here are where things stand. My brother is currently cleaning out the office {if you’re reading this bro, you better get on it ;)} to get it ready for painting. As you can see the walls are really dark so we will be picking out a fresh white to brighten up the space and get it primed to be ONE inspirational work space.

WEEK 1: Empty office, tape around the walls and windows, and paint

WEEK 2: Install shelving and organization systems

WEEK 3: Change light fixture

WEEK 4: Install window treatments

WEEK 5: Organizing, styling, and decorating

WEEK 6: Cleaning and Final Reveal

Anyone else working on a makeover for One Room Challenge? Feel free to share in the comments below, we would love to hear what you have planned! Until next week 🙂

If you liked this post please follow us and share!

Instagram


DIY Fall Harvest Wreath

IMG_5649

How is it already October?! In less than one month our daughter (aka Hobbit #2) will be turning one years old and we are feeling all the feels 😦 It doesn’t help that our days are filled with schoolwork and housework, with little time for much else. However, that doesn’t mean we can’t find a way to usher in one of our favorite seasons. As you’ve probably gleaned from our autumn tablescape post, we are really digging the more muted and subtle fall colors (think burgundy, peaches, grayish greens) and I really wanted to celebrate those colors in the form of a welcoming wreath. Between Michaels, Target, and Dollar Tree, I found all the elements that perfectly captured the look I was going for. I dare even say, “I nailed it.” My sister-in-law found it hard to believe that something so pretty could be made from Dollar Tree florals but it can and for well under $10 and 30 minutes too. So if you’re looking for ways to make a beautiful autumn statement but are tight on time and money then this is the perfect project for you 🙂 If you want to see how it’s made then you’re in luck because tomorrow I’ll be collaborating with the CraftBox Girls to bring you a live tutorial at 12 pm EST.  Be sure to tune in, say hello, and get some crafting inspiration 🙂

Supplies
18′ Grapevine Wreath ($3)
Faux Florals ($5)
Faux Pears ($5)
Eucalyptus ($3)
Hot glue gun & glue sticks

Total Cost: $16 + tax

IMG_5627

Pro tip: Don’t forget to use the Michaels app for coupons. I always use my coupon to save 40% off any regular priced item. With the supplies that I purchased, I was able to make 2 wreathes for the price of 1 putting the total cost per wreath at under $10.

IMG_5609

Directions:

  1. Collect your florals, eucalyptus, and faux fruit and start placing them around your grapevine wreath until you are happy with the arrangement. You might have to move things around several times to get the desired look.
  2. Once you have settled on your design, you will need to glue each piece in place using a generous amount of hot glue, embedding the stem deep into the vine, and holding down for 20-25 seconds until firmly in place.
  3. Once all the pieces have been glued down and any excess strands of glue have been removed, you can hang your wreath on a hook or door wreath hanger.

IMG_5681

IMG_5669

IMG_5674

IMG_5672

Share your autumn stories with us below and if you liked this post please follow us and share!

Instagram