Soy Chorizo Vegan Chili

We are so behind on our post schedule it’s not even funny but I figured as long as I’m not posting this recipe in June, we’re cool (your standards change when you’re a parent of two). So March is less than a week away but that means NOTHING here in Michigan because our weather is a wild card of unpredictability (sigh). I’m not totally complaining though because for those really chilly spring days, we have just the recipe to warm up our bones and souls. If you’re in graduate school like us or lead generally busy lives, this is another easy and delicious recipe to add to your meal plan during those really hectic weeks.

IMG_7650

As I’m sure I mentioned before on here, we are always looking for ways to cut down on our meat consumption and a few years ago I stumbled across this pretty stellar soy chorizo at Trader Joe’s for just $1.99. I know, right?! At first we used it in our egg scrambles but one day it hit me that it would make a great meat substitute base for a vegan chili. Spoiler alert: It does! Not only does it have that perfect ground beef texture but it’s so spicy you may find you don’t even need to season your chili at all. You can also cut the preparation time for this recipe by opting for canned beans instead of dried beans but either way, your watch, wallet, and tummy will be satisfied with this hearty bowl of goodness.

IMG_7628

Soy Chorizo Vegan Chili

  • Difficulty: Easy
  • Print

Ingredients
1 large onion, finely chopped
1 cup of finely chopped carrots
1 cup black beans, cooked
1 cup kidney beans, cooked
1 12 oz. package of Soy Chorizo, casing removed and crumbled
1 15 oz. can  of tomato sauce
4 cups water or vegetable stock
2 garlic cloves, minced
Olive Oil
Salt and pepper to taste

Note: *If you prefer your chili to be less thick, you can add more liquid to water it down. *You can also tweak this recipe to your liking and include more vegetables such as bell peppers, tomatoes, and corn. *I find the soy chorizo makes the chili spicy and flavorful enough for our taste, especially with the kids in mind, but if you find the flavor isn’t cutting it for you, you can add the following: 1 teaspoon ground sweet paprika, 1 teaspoon ground cumin, 1 tablespoon chili powder, and 1/4 teaspoon cayenne pepper (optional).

Directions
1. In a deep pot, drizzle a bit of olive oil and sauté your onion, and garlic on medium heat until the onions are soft, about 5 minutes.
2. Next add in the carrots and soy chorizo. Cook for about 2-3 minutes until the ingredients are well incorporated.
3. Finally, add in the water/stock, beans, and tomato sauce. Bring to a boil then let simmer on low until reduced and thickened, about 20-30 minutes.
4. Taste the chili and season to your liking or adjust the thickness.
5. Ladle your chili into bowls and serve with vegan cheese, non-dairy sour cream, and crispy tortilla chips.

IMG_7632

IMG_7652

If you liked this recipe and tried it, we would love it if you would share or leave a comment below. For more related content, you can find us on Instagram where we share more of our day-to-day and Pinterest where we share our ideas and inspiration. And as  always…

signature3

.


DIY Upcycled Tea Tin Planter


February is coming to an end and we are a tad bit in disbelief. I know, this seems like a reoccurring theme over here but during this busy season of our life it’s difficult to fully grasp how quickly the time is flying. We did take some time off for a family vacation (there’s a post in the works) in January and it was just what we needed to reset for this new year but when we came back we dove head first into our semesters and it took some time to get back on our feet. We are now back in the groove of things and excited to share what we have been working on. Last month I was lucky to be a part of Salvage Dior’s January Creative Team on Instagram where each week I, along with my four teammates, were responsible for creating something new for our homes that fit within the following themes: 1) Upcycle, 2) On the Wall, 3) Child’s Play, 4) Coffee Table Decor. In this post I’ll be sharing the project I completed for the first week, an upcycled tea tin turned planter.

IMG_8994

Loose leaf tea is something we drink quite a bit of in our home and I’m always left wondering what to do with the tins once they’re through. In the past I’ve used them as storage for spices and knick knacks but this time I wanted something a bit more creative. At the time we were also revamping our plant corner so I thought it would be nice to make some new planters for the Pothos and Sedum I was growing hydroponically. I was inspired by the recent trend in natural fiber textiles and wanted to create that woven look to contrast with the industrial shelving we chose for the plant’s display. If I wanted to buy what I was looking for, I could have easily spent anywhere from $6-25 a pot depending on the size. Instead, I was able to make this tea tin planter and some tin can planters for $0 because I had everything already on hand. The only thing that you would probably need to buy if you’re not DIY nerds like us is the bundling twine but that itself is very inexpensive ($3.98 for 525 feet). Alright, let’s make a planter!


If you are an avid DIYer, you most likely have a glue gun in your arsenal of crafting tools.

eb_loose_2

DIY Upcycled Tea Tin Planter

  • Difficulty: Easy
  • Print

Materials
Tea tins or tin cans, washed and dried
Bundling twine
Hot glue-sticks
Milk Paint (optional)

Tools
Glue Gun
Scissors
Drill (or a hammer and nail)

Directions

  1. Heat your glue gun and in the meantime use your drill to place drainage holes in the bottom of your tin. You can also use a hammer and a nail to do this or you can skip this step and just make sure to include a layer of small rocks beneath your soil for water drainage.
  2.  Glue the end of the bundling twine to the side of your tin at the very bottom and begin wrapping the twine around, making sure to glue the first 3 coils to the tin and to each other. As you wrap the twine, be sure to push the coils down tightly to close any gaps and give your planter a neat, elegant look.
  3. Continue wrapping the twine around, stopping midway to glue the coils down. Wind the twine around the tin until you reach the top and then cut the twine to length.
  4. Uncoil the twine a couple turns, then rewind it tightly against the tin using hot glue to secure the top two coils to the tin and to the adjoining coils.
  5. Take your scissors and trim off any noticeable twine hairs sticking out (see the time-lapse video below). At this point you can paint the planter and let it dry or go straight to planting and styling it!

IMG_8984

IMG_8998

If you liked this post and found it inspiring, we would love if you shared it. For more related content, you can find us on Instagram where we share more of our day-to-day and Pinterest where we share our ideas and inspiration. If you have any thoughts or suggestions about this DIY project, feel free to leave a comment below. And as always…

signature3


Family Finance: Why Amazon Prime?

Hello friends. It’s me again, here with your second dose of family finance for the new year. In the first post, I covered the very basics of budgeting and how to go about calculating a realistic budget based on your expenses. In the next few posts, I  will be discussing how we save money shopping by using subscription services like Amazon Prime and Costco’s Executive Membership. Today’s post will be specifically about Amazon Prime, a service that we have used for years and are well acquainted with. I am aware that there are pros and cons to each service that we recommend and I will try my best to address these today and in the upcoming posts.

IMG_9550

What is Amazon Prime in a nutshell?
Amazon Prime is an online shopping subscription service for $99/year that gives you access to 2-day delivery guarantee on Prime items. On top of the free 2-day delivery (nothing is free, I am sure the accountants have it all calculated in your prime pricing) it also gives you access to Amazon Photo, Amazon Video, Twitch and other Amazon owned subsidiary services. What Amazon does is that it spares you (both time and money) from having to hop in your car and drive to a number of different stores to purchase the goods that you need; everything from clothing to food to office supplies to home tools and appliances. You name it and it’s most likely on Amazon.

prime pantry

Although we don’t have Amazon Fresh where we live in Michigan, I am hopeful that with their acquisition of Whole Foods it will soon become a reality. Amazon Fresh is a service that has a contractor buy groceries per your request and deliver it straight to your door in a matter of hours. Yes, we are moving towards the future we saw in WALL-E (if you haven’t seen WALL-E, do me a favor and watch it. It’s one of Pixar’s masterpieces). My wife is adamant that even with Amazon Fresh she will still prefer going to the local grocer or farmer’s market, I guess we will just have to see about that. Until we get Amazon Fresh, we are currently making the most of the Subscribe & Save feature of our membership.

Subscribe & Save
As homeowners and parents, we take advantage of Amazon’s Subscribe and Save feature to receive items that we use regularly at home on a monthly basis at a discounted rate. The way it works is that there are items on Amazon you can subscribe to (these could be anything from cleaning products to personal care products to snacks). If you subscribe to less than 5 items you get 5% off the price of those items at checkout and if you subscribe to 5 or more items, you get 15-20% off those items.

Screen Shot 2018-01-28 at 6.57.17 AMAlthough you only get one subscription box a month, you have the option of changing the delivery date and the contents of your box to fit your needs. On top of the discounts received, you can get an additional 5% off in the form of Amazon points to use towards future purchases if you pay with an Amazon Prime Rewards Visa Card. Below is an example of what our Subscribe & Save looks like. Notice how on the left there are 5 bars highlighted in orange. This means that since we have 5 or more items in our subscription box, we are eligible for the extra 15-20% off.
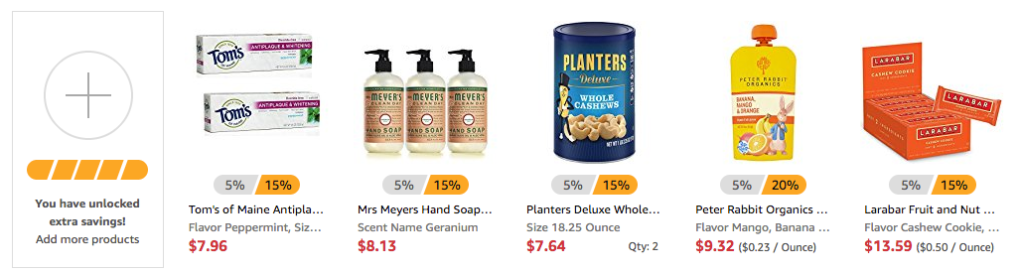
Screen Shot 2018-01-27 at 11.54.02 PMSample list:
Tom’s of Maine Toothpaste
Mrs. Meyers Hand Soap
ECOS Natural Dishwashing Liquid 
Peter Rabbit Organics Puree
Larabar Fruit and Nut Bar

IMG_9441

Amazon Prime Video
We don’t have cable because we don’t watch TV that often and we also HATE commercials with a passion. Amazon Video is a wonderful feature of our Amazon Prime membership (think like Netflix) with an extensive library that includes plenty of educational and family-friendly content for our Friday movie nights. If you decide on a Prime membership, Prime Video is automatically included but you can also sign up for Prime Video as a standalone service.

Screen Shot 2018-01-28 at 7.14.53 AM.pngAmazon Prime Pantry
The introduction of Prime Pantry allowed Amazon to expand its selection and offer thousands of items to Prime members that are cost prohibitive to ship for free individually. Since the items are smaller, individually shipping them isn’t an option, but if you fill a box worth of all your needs you can save substantially and also get Prime Pantry credit to use towards future Prime Pantry purchases. We don’t currently use this feature as we do most of our shopping at local grocery stores and Costco but it’s definitely something we are exploring because the pricing is competitive, it’s a real time saver once set up, and we can save an extra 5% by using our Amazon Prime Rewards credit card.

Screen Shot 2018-01-28 at 7.34.10 AM.png

Now you have an idea of what Amazon Prime is and how it works but the real question is: is it really worth it? What I have discussed up until this point, is just the surface of Amazon’s services. I haven’t even mentioned perks like your choice of a free kindle book every month or access to ad-free listening via Amazon Music or unlimited media storage through Amazon Photo. If I truly wanted to dissect each feature, this would turn into a VERY lengthy post so for the purposes of sticking to the topic, I will next address how a Prime membership can be an asset to managing your family’s finances and keeping to a budget.

Amazon Prime Memberships
In terms of types of Amazon Prime memberships, there are three different options: 1) Standard, 2) Family, and 3) Student. Below I’ve listed the three memberships along with links to their 30-day Free Trial if you’re interested in giving them a try. We currently have a standard membership but we suggest that if you’re a parent and you don’t cloth diaper that you sign up with Amazon Family as they offer discounts on many baby-related products including up to 20% off on  disposable diapers.

  1. Standard: Try Amazon Prime 30-Day Free Trial
  2. Family: Try Amazon Family 30-Day Free Trial 
  3. Student: Try Amazon Prime 50% Off For Students 

If you want to experience Amazon before diving into a membership or free trial and you’re either getting married or having a baby, I highly recommend you do your gift registry through Amazon. You get all the benefits of their customer service, everything delivered to your home,  and on top of it you get a coupon to purchase any remaining items off your list. If you have your baby registry with Amazon and you are a Prime member, however, you get additional perks including a $35 welcome box.

  1. Create a Amazon Wedding Registry
  2. Create a Amazon Baby Registry

Screen Shot 2018-01-28 at 12.10.38 AM

Why Amazon?
Okay, so Amazon Prime is awesome.  It saves you money by saving you time with its 2-day shipping, competitive pricing, and diverse selection of products. But you’re probably asking how does this translate in terms of numbers? To illustrate how the membership pays for itself, I’m going to share a few ways we save big using Amazon Prime.

Gifts.
Between holidays, birthdays, and just because, we do most of our gift shopping via Amazon Prime. I’m talking 50 gifts a year, at least (yeah, we are blessed with family and friends). If we were to pay 2-day shipping for even just 10 of those gifts, we would easily spend the $100 that our membership costs. Assuming shipping is around $10 (depending on box size and location this can vary from $7-$20+) on average (I just sent a small box to a city 30 minutes away and it was $8 for standard shipping), we save at least $400 a year not paying for shipping when we gift.

School books.
If you’re a student like us, you know that the cost of books can add up FAST. Not only are Amazon’s book prices consistently low compared to other retailers but on shipping alone, we definitely save big with a Prime membership. Since we first started using Amazon we’ve had over 100 book orders, and while it would take entirely too much time to calculate how much we saved going with Amazon as opposed to our university’s Barnes and Nobles, we definitely saved at least $500 on just shipping alone. On top of that we were able to sell our books back via Amazon Marketplace for much more than we would have received from our university bookstore. The bottom line is if you’re a student then you should seriously consider getting Amazon Prime (the membership is only $50/year for students).

Household.
From dishwasher detergent to a router, we have saved a great deal over the years going with Amazon for our household needs. We have purchased a rug for the nursery, a projector for our home theater system, and even our bikes from Amazon. For all of these items we were able to do extensive comparisons of pricing, customer reviews, and warranties to ensure that we were getting the most bang for our buck. Just to give you an idea, one of the rugs we ordered was $100 more at places like Walmart  and Home Depot and the projector we purchased was $200 more at Best Buy.

Baby.
Amazon has a diverse selection of products that we would not have had access to if we went to our local baby stores, especially with our choice to cloth diaper. We were able to get a variety of quality cloth diapers for a fraction of the cost ($26 for 6 as opposed to $15-20 each) as well as significant discounts on products such as strollers, baby proofing essentials and bilingual toys and books.

IMG_9554

Is Amazon Prime guaranteed to save you money and lower your bills? Not necessarily  but it certainly can if you play your cards right. I like to think of Amazon as a tool or technology that can be used either for good or bad. Amazon Prime often gets a bad rap as an enabler of mismanagement because of its effortless accessibility and it’s not hard to see why. I do think, however, that if you have a busy lifestyle and if you spend regularly on some of the things I listed then you can definitely use Amazon Prime to your advantage when budgeting and saving money. If you took the steps I suggested in the first post to create a budget, the best way to know if Amazon is right for you is to do some research on your expenses and determine whether you can cut costs with a Prime membership. In the next post we will introduce the other players that compete with Amazon and why we use a combination of services instead of solely using Amazon Prime.

If you found this post helpful, we would appreciate it if you like and share it.  If you  are an Amazon Prime member and have something to add to the conversation or you’re considering Prime and have more specific questions about their services and pricing, feel free to comment/ask below. We always love hearing from our readers 🙂 And as always… signature3


Ashta-Inspired Overnight Oatmeal with Orange Blossom and Rose Water

My son, who will be turning three later this summer, recently started this weird picky eating phase some time in November. Where before he would eat EVERYTHING, he is now much more cautious and often downright rejective. One thing he has not lost, however, is his love for oats. Hot oatmeal, granola, overnight oatmeal, muesli….anything with oats (even with nuts and dried fruit), he will eat. For the sake of variety, I’ve been experimenting with different ways of preparing them and I’m happy to share today one of my successful creations that I’ve been meaning to post for quite some time now.

IMG_8038
This specific overnight oatmeal recipe was inspired by the flavor profile of Middle Eastern sweets, specifically that of Ashta; a Lebanese clotted cream used as a filling in phyllo pastries and other desserts. From the creaminess of the milk, the fragrant sweetness of orange blossom and rose water, to the nutty bite of the pistachios, this nutritious breakfast will feel like an utter treat. The best part is that it’s naturally sweetened and there is no cooking required; the oats soften overnight as they soak in the milk. You can make them in a bowl if you’re eating breakfast at home or you can pack them in little mason jars for a quick breakfast on the go. According to the Minimalist Baker, one of my favorite food bloggers, overnight oats keep in the refrigerator for up to 2 days, but are best eaten within the first 12-24 hours so you might not want to make them too far ahead of time. As long as you have your ingredients on hand, you can whip one up every night in well under 10 minutes. Alright, let’s make some Middle Eastern dessert for breakfast!

IMG_8011

Ashta Overnight Oatmeal

  • Difficulty: Easy
  • Print

Ingredients
1/2 cup of Old Fashion Rolled Oats (We prefer Bob’s Red Mill Regular or Organic)
1 cup of unsweetened milk of choice
1 teaspoon orange blossom water
1 teaspoon rose water
1 tablespoon honey (more if you like it sweeter)

Toppings
Quality Honey
Ground pistachio, unsalted
Dried rose petal

Notes:
*Serving size: 1.

*If you want your overnight oats to have a thicker, slightly gelatinous texture like pudding then add 1-2 tablespoons of chia seeds. My husband isn’t a fan so I leave them out.
*If you’re not a vegan and would like some extra richness and creaminess, you can add 1-2 tablespoons of ashta or greek yogurt.
* I purchase my pistachios whole  from Trader Joe’s and grind them myself in a small food processor.

Directions
1. In a bowl or mason jar, add milk, honey, orange blossom water, and rose water. Stir to combine.
2. Add in the oats and stir until all the oats are fully immersed in the liquid.
3. Cover securely and place in the fridge overnight.
4. The next morning, take your container out of the fridge and stir the mixture. . Drizzle with quality honey and top generously with crushed pistachios and rose petals. Enjoy

IMG_8022

IMG_8057

IMG_8049

What are your favorite ways to eat oats? We would love to hear from you in the comments below and if you try this recipe, share your thoughts  and tag us on Instagram so we can see. And as always if you enjoyed this post, please follow us and share.

signature3


5 Strategies and Resources for Keeping Toddlers Screen-Free

Happy New Year friends! We hope all of you had a blessed holiday with your loved ones and we wish everyone peace, success, and happiness in 2018. Things are crazy busy here as we are preparing for a family vacation to Florida this weekend. I’ll be honest, between the kids being sick early last month and the holidays, they have seen far more screen time in December alone than they have in a year (we used to be strict about this but that’s for another post). And boy are we ready to detox and resume our screen-free daily routines once we get back. If reducing your child/children’s screen-time is one of your new year resolutions then you’re in luck because I have 5 simple strategies and a handful of fun resources to help get you on track for just that.

“Play is the beginning of knowledge.” -George Dorsey.

IMG_8856

  1. Identify what they like and stick with it. I know this may seem like common sense but living in this age of information overload, it can be difficult to filter through everything to decide what’s applicable and what’s not. Not everything that works for other children may work for yours and that’s okay. The best way to get to know your child is to try a range of different activities with them and see what keeps their short attention span occupied. Chances are you already have an idea without needing to do much investigating. My son is currently really into play dough, Mega Bloks, and dragons at the moment and is very active so if I’m going to get frustrated that he’s not sitting down for a coloring activity for more than 5 minutes, I can’t blame anyone but myself. It doesn’t mean that we don’t try other activities but for the sake of my schedule, I only do things like cooking or reading for school when my children are engaged with an activity for the long haul.
  2. Make a weekly activity plan. With all things in life, if you have an outline or plan of action then you’re more likely to follow through with it. If you are really committed to screen-free quality time then try investing 15-30 minutes on the weekend to brainstorming and arranging for activities during the week. You don’t have to be doing crazy chemistry lab experiments to make it fun. As you’ll come to see in the links I’m sharing below, it doesn’t take much to make children happy. I also want to add the disclaimer that an activity plan should be treated more like a guide rather than a strict schedule. It should be a way for you to think through your day and have activities on hand when you need them most.
  3. Talk it up. Sometimes for kids it’s less about the activity and more about the presentation. Maybe that’s just my experience with my kids but I feel they definitely pick up on my enthusiasm. I don’t have numbers to back up this claim but I find that my son is more engaged when I’ve talked about the activity beforehand. For example, if I were to ask him “prepare me something delicious to eat” while giving him his play kitchen tools, he would spend more time playing than if I were to just dump them on the floor and tell him, “here, play with this.”
  4. Limit accessibility and rotate activities to keep things interesting. In other words if you got it, don’t flaunt it. You will be surprised at what a huge difference it makes if you hide some toys away…because let’s face it, every parent is familiar with what happens when everything is accessible: toys strewn everywhere and bored, restless children. Not the funnest combination. Try taking some toys out of circulation and bringing them out in rotation when you sense boredom. Our MegaBloks, puzzles, and an array of large toy vehicles are stored way high up on a shelf and when I  bring them down, my son definitely relishes every moment.
  5. Don’t be afraid to make a mess. Okay maybe this is not what you want to hear but trust me. I’m not talking trash the house messy but more along the lines of confined chaos. There are plenty of activities that I’ll list below that allow children to really explore and be messy without you having a disaster on your hands. I don’t know what it is about messes but kids love making them and if they’re happy and occupied then you will be too 🙂

IMG_8861

With that being said, I’m sharing a list of fun activities that we have tried and enjoyed as well as some amazing resources that I turn to when planning out activities for the kids. I’m also linking our Pinterest board as I do pin fun toddler activities as I come across them for inspiration. I feel like I should state again that the point of this post isn’t that you must have scheduled activities in a curriculum sense but rather a collection of activities suitable for play. Children should be free to explore and play and the activities you choose should exemplify that philosophy.

“Do not keep children to their studies by compulsion but by play.” -Plato

Sensory and Fine Motor Activities

  1. Make homemade play dough and model/build/cut with cookie cutters
  2. Thread pipe cleaners through a colander or box with holes
  3. Freeze toys in water and do an ice excavation
  4. Make colorful squishy gel bags with glitter and beads
  5. Pom Pom Ball Color Sorting

“Messy” Activities

  1. Go dumpster diving for lost toys in a cardboard box
  2. Create a dry pasta/rice/lentil construction site
  3. Paint with shaving cream on a plastic bin lid
  4. Make a scoop and pour activity station with containers and random objects
  5. Pour flour and shredded coconut in a bin with small cars for a snowy ride

Physical Activities

  1. Set up a simple indoor obstacle course with everyday objects
  2. Have a color-themed scavenger hunt with this song
  3. Have an alphabet or number scavenger hunt
  4. Set up a bubble machine and chase after bubbles to pop them.
  5. Blow up balloons and play balloon tennis, volleyball, or soccer.

Imaginative Play

  1. Make a play boat from a cardboard box and pretend you’re fishing or escaping sharks
  2. Give children kitchen tools and utensils to play chef
  3. Play veterinarian or doctor with sick action figures and stuffed animals
  4. Build a tent from blankets and go pretend camping
  5. Host a pretend picnic or tea party for their toys

IMG_8937

These are just some of the MANY activities out there and there are plenty more waiting to be discovered or created by you to fit your child’s needs (Disclaimer: All the activities I’ve listed are intended to be done with adult supervision even if they don’t necessarily require your active participation). I hope this post is a good starting point for helping you feel less overwhelmed and more capable of keeping your children engaged and occupied without resorting to screens. To help me get organized and plan better (and help you do the same), I’ve created a weekly activity plan to fill out to help guide me through my days at home. The image below is just an example of how you can fill it out but you’ll want to do so according to your own daily rhythms and routines, interests and likes. I also included a column for time but I do not adhere to it strictly and you can completely ignore it all together if you want. The time column is more to remember fixed moments of the day such as snack time, lunch, and nap time. I want to also add that I think it’s very important to be flexible and not hold yourself to unreasonable and unattainable scheduling expectations because this isn’t school.

Weekly toddler planWeekly Activity Plan Free Download

IMG_8945

Once you have downloaded this blank activity guide, you can visit the links below to get started planning your days with your little one(s). While I’m no child psychologist or educator, I think that it’s good to have a balance of diverse activities; literacy, sensory/fine motor, physical activity, and imaginative play. The best part about designing your day is you get to customize activities that blend motor skills, creativity, and learning (science, math, language, etc.) in ways that are fun and appealing to your child. The last thing children need is to be lectured classroom-style. If there are specific concepts that you would like them to be learning then write them down in the “focus” section. This will help you be mindful of your learning goals so you can incorporate them up during activities and moments throughout your day. Alright, let’s get planning!

Resources for Activity Planning

  1.  Hands on As We Grow
  2. Busy Toddler
  3. Fun at Home With Kids
  4. The stay-at-home-mom survival guide
  5. Meri Cherry
  6. Toddler Approved
  7. Playtivities

If you liked this post and found it helpful, we would love it if you would share. For more related content, you can find us on Instagram where we share more of our day-to-day and Pinterest where we share our ideas and inspiration. If you have any thoughts or suggestions about this topic, feel free to leave a comment down below. And as always…

signature3


DIY Upcycled Brown Paper Bag Gift Wrap

It’s finally the holiday weekend and that means we are inching ever closer to the start of 2018. We recently hit our 2 year blogging anniversary earlier this month and we thought it would be nice to celebrate with a short reflection and a makeover of the first post that ever went up on this blog. Why? Because sometimes, in the nitty gritty of blogging we can find ourselves questioning it all and in our tunnel vision of self-pity and negativity, we forget how far we have come. Comparison isn’t so bad when you’re looking at yourself and everyone loves a good before and after so here is ours.

IMG_8421

IMG_7538

As you can see clearly, our styling and photography has drastically improved in the last two years. Our first post was written in 2015 just a week before Christmas and right before I was about to dive into a week of hell taking my PhD qualifying examinations (a 7 day, 40+ page writing endeavor). Since that first post, we have connected with some wonderful bloggers, participated in two One Room Challenges, built a small but amazing community, and even wrote our first sponsored blog post.  There have been many times this year when we would feel frustrated with our engagement or turn-around time and even question what kind of blog we were aiming to be but looking back to our first post, I think the answer has always been there. DIYing is obviously something we are very passionate about as well as striving to live as simply and sustainably as possible and that’s exactly the commitment that our first post embodies. In this post, we will be sharing our revamped post with a little twist; using stencils to create beautiful gift wrap designs. For those of you who waited until last minute to wrap your gifts, you’ll want to hold off on that last minute Target run because this is such a simple way to add a personal touch to your gift wrapping and for next to no cost at all (depending on what your craft supply stash looks like). The wonderful thing about this gift-wrap is that it’s not just for Christmas; you can customize it to fit any holiday or occasion year round.

IMG_7551

Supplies
Brown paper bag
Scissors
Stencils
Metallic Paint Marker, paint pens, or sharpies
Twine
Embellishments such as eucalyptus, flowers, pine cones, etc..

IMG_7527

Directions

  1. Flatten your brown paper bag and cut down to the size you need.
  2. With a metallic paint pen, stencil in the blank side of the bag using the pattern of your choosing.
  3. Place your thoughtful gift inside and wrap nicely.
  4. Embellish with rustic twine, eucalyptus, pine cones, or holly.

IMG_7536

As you can see, I was going for a minimalist/bohemian look (surprise, surprise) with the copper and white pattern, twine, and eucalyptus accent. It’s almost too pretty to open!

IMG_7546

So what does 2018 hold for us? It’s been really hard to answer this question because life is pretty busy with two kids and graduate school on our plates. We do know that we love what we do and we love sharing it with you. We hope that we can continue growing; growing ourselves, our skills, and our blog and hopefully inspiring you all along the way. We can say for certain that we will definitely be sharing more DIY projects, simple family recipes, our simple living journey, and parenting adventures but whether we can keep up with our 50 blog posts/year productivity will remain to be seen. If there are topics you would like to see more of here on The Cozy Home Chronicles, please feel free to leave your suggestions in the comments below. And for those of you new bloggers, those considering starting blogs, or even veteran bloggers wondering “what’s the point?”, keep on dreaming and working towards those dreams with your eyes on the journey and not solely on the destination.

“Tell your heart that the fear of suffering is worse than the suffering itself. And that no heart has ever suffered when it goes in search of its dreams, because every second of the search is a second’s encounter with God and with eternity.”-Paulo Coehlo, The Alchemist

signature3


Family Finance: A Simple Budget Overview

Finance Image

Hello friends! Today’s post is going be different than the usual and it might even seem a little off topic because it’s about numbers (my favorite subject). As a financial analyst, budgeting is a subject near and dear to my heart and something I have been wanting to write about for a while now. While it doesn’t fit the usual cozy home posts of DIY projects and healthy recipes, it is something that is essential to the kind of lifestyle we write about. Sound budgeting not only reduces stress but it is absolutely necessary for eating healthy, saving for the future, and investing in quality experiences (just to name a few).

pexels-photo-616849

Although life is busy with two kids and endless responsibilities, I try to make sure that my wife and I are on the same page when it comes to our finances. While talking about money sometimes gets a bad rap in certain cultures (it can be taken for stinginess or greed) the reality is that money is an important aspect of life that, when managed properly, can be a real source of strength for your family.  With the New Year just around the corner, I wanted to write a series of posts that would be helpful for those looking to review and improve their financial stability by acquainting them with some basic concepts, tools, and resources to budget better, save more, and stress less. In this first post, I will discuss a simple approach to budgeting that will involve choosing a methodology for budgeting and tracking that is comfortable and realistic for you and your lifestyle. Let’s get started!

Agenda

  • Choose a methodology for budgeting that is realistic
  • Find and maximize your budgeting strategy to free up time for other activities
  • Help you commit to a new financial awareness

1. Cash vs. Credit: Choose a spending system
There are many blogs and websites out there that tout the merits of using cash-only while vilifying credit cards as enablers of mismanagement. While there is some truth to this, there are many benefits to using credit cards especially when used alongside online budgeting platforms. I am a firm believer of using a hybrid system and as of right now we have an 80/20 split between credit and cash respectively. Choosing a system is important because it will dictate how you track your numbers.  For example, if you decide to use mostly credit like we do, along with an online budgeting platform, much of the work in terms of tracking numbers will be done for you automatically. Another benefit of using credit is being able to take advantage of cash-back or point bonus systems that many well-known credit card companies offer. While your budget will dictate to some extent what your spending system will look like, it’s important to envision how you’re comfortable spending so you can get into a rhythm that works for your lifestyle and fits into tracking and accountability.

IMG_8342

2. Written vs. Digital: Tracking your numbers
Aside from choosing a spending system, it’s also important to pick your preference when it comes to keeping track of your income and expenses. There are many budgeting apps and free online software’s such as Mint, YNABGoogle Sheets, and Microsoft Excel to name a few. I use Excel because I always have but if I didn’t have access to it then Google Sheets would be a more than capable replacement. If you can’t see yourself committing to updating a sheet every day or two on the computer then stick to good old pen and paper (you can find PDF expense trackers here). If you’re not into tracking at all then you might want to really consider an online system like MINT or YNAB. All you need to sign up is a valid e-mail address and the rest is simply adding your financial account information.  Mint is a free platform while YNAB is free for some people such as college students (more on their pricing structure here). The most important thing is that you choose a medium that is comfortable for you so that you can be consistent and disciplined.

Now that you have an idea of what kind of spending system you’d like and how you want to keep track of your numbers, let’s do a very basic run through of how to calculate a budget.

IMG_8360

3. Fixed vs. Variable Expenses: Determining your Budget

Fixed expenses: A fixed expense is one that you can’t change and tends to stay around the same dollar amount every month. Mortgage payments, apartment rent, and car lease payments are all examples of fixed expenses.

Variable expenses: A variable expense is something that changes from month to month based on different factors. Groceries, clothing, entertainment, and gifts would be examples of variable expenses because you decide how much to spend to some degree.

To determine your monthly budget, you will need to calculate your expenses (fixed + variable) and subtract them from your monthly income. I have provided a sample Excel  sheet template below for downloading to show you how this is done. As you can see, there are three sections: income, fixed expenses, and variable expenses. If you want to follow along using the custom budget template that I created, go ahead and start by inputting your  income first followed by your expenses. In this example, the income is $3500/month, total expenses are $2402, and there is a positive balance of $1098.

Budget Template Img

You can adjust the expense categories to more accurately reflect your family’s lifestyle but I tried to include a diverse list of expenses to give you an idea of what to account for. If you’re totally clueless on what you’re spending on or even how much you spend on basic things like groceries, I suggest you try a 30-day trial period where you diligently track each and every expense. This will help acquaint you with your spending habits and allow you to identify practices that are not budget-friendly. For example, if your grocery expense is much higher than you’re comfortable with and you’d really like to be saving for say a post-graduation trip then you might want to adopt practices like meal planning and meal prepping to work alongside your budgeting approach. While you do want to be as accurate as possible when accounting for your spending, you don’t want to be too extreme to the point that you’re tracking every penny unless you are in a very tight situation. Once you’ve figured out you’re spending habits, created a budget, and have begun tracking your monthly expenses you are now able to do the fun part of analyzing your data and working towards saving and investing.

IMG_8349

Now with the basics down, it will be much easier for me to share some of my tips and tricks for saving monthly, planning trips, and investing in the future. I have a few posts planned out for this series already; one to cover college savings funds and another to cover the advantages of memberships like Amazon Prime and Costco. As I said early on in this post, finance is a subject that I am very passionate about so if there’s something you’d like to see covered in this series then please don’t hesitate to contact us either through email or by leaving a message in the comments below. We hope this post was the spark you needed to rethink your budget and saving strategies for 2018. As always, if you liked this post please follow us and share!

Instagram

signature3


Salted Maple Vanilla Caramel Sauce & Snack Board

**This is a sponsored post written by us on behalf of DairyPure. All opinions are 100% our own.** 

Cozy. It’s a simple, four-letter word that evokes plenty of warm fuzzy feelings. It’s also at the heart of our blog. Coziness, for us, is less about having a particular sense of style and more about cultivating specific practices that are meaningful and beautiful to you. One practice we find universally cozy (and we are sure you’ll agree) is the ability to create joyful memories with loved ones.

IMG_8106
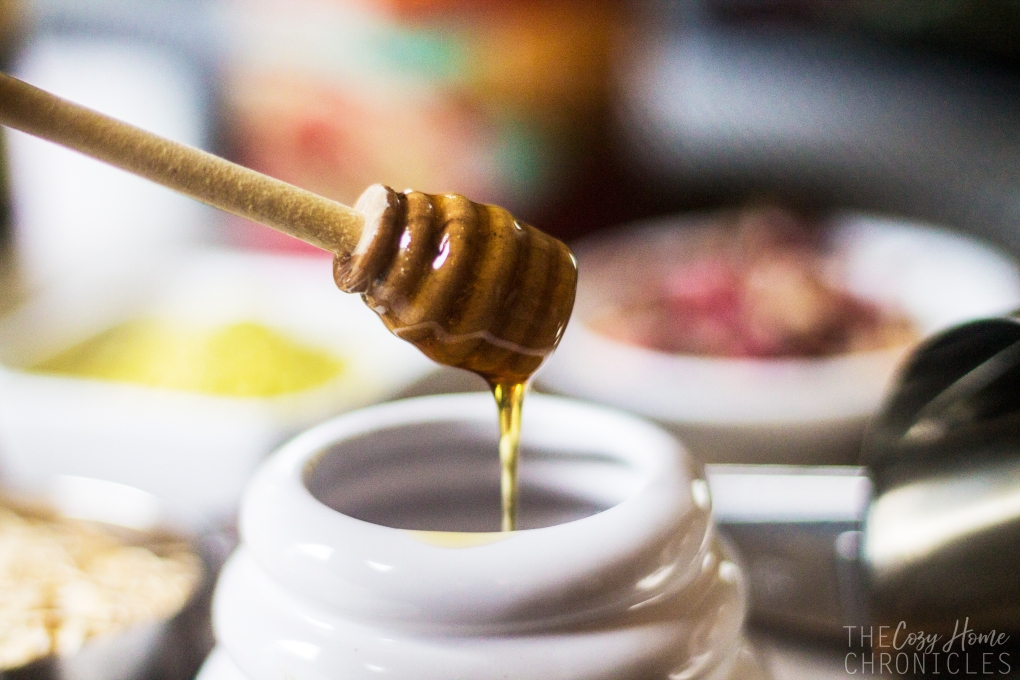
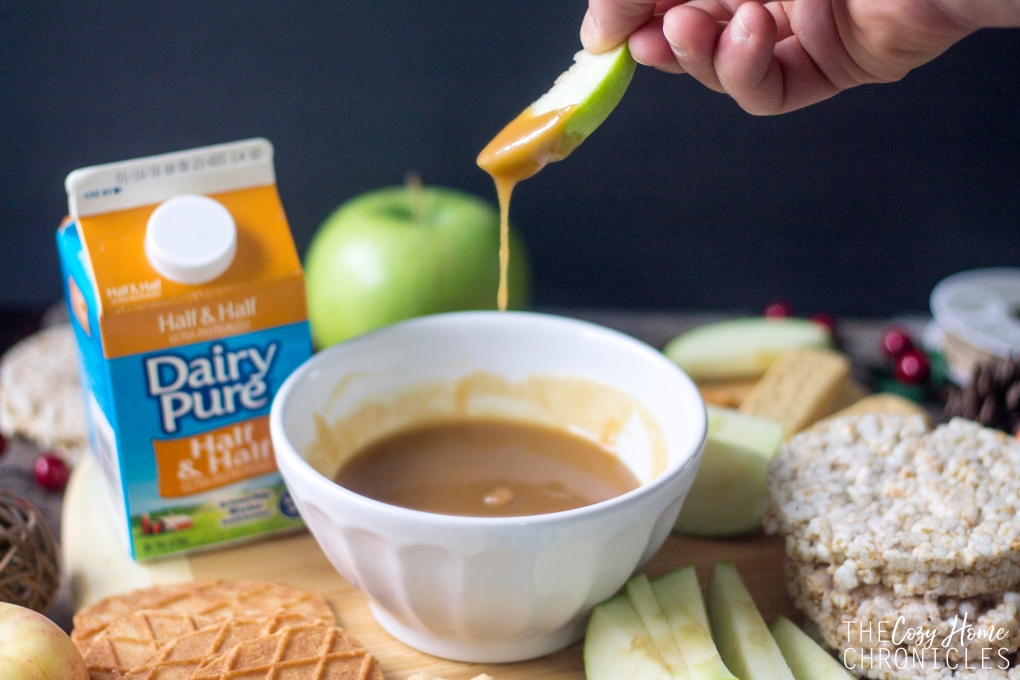
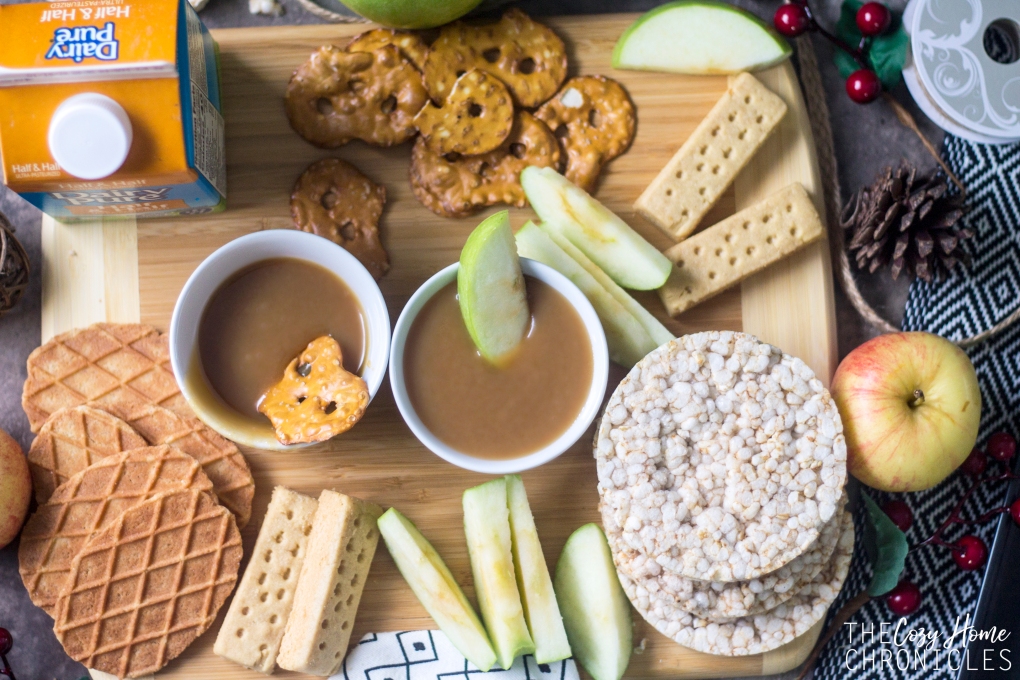
Everyone knows that food brings people together and while this is true, it doesn’t mean you have to prepare a three-course dinner to have a successful family gathering. A simple snack will more than suffice and that’s exactly what we have for you today. A delicious, naturally sweetened caramel dip that pairs well with your choice of wholesome snacks like apple slices, pretzels, and rice cakes. The best part about this caramel dip, is that it’s easy to make in a pinch. With just 5 ingredients and in under 20 minutes, you will have a decadent dip that would satisfy any sweet & salty tooth. And not just any ingredients. This dip is made with ingredients you can feel good about feeding your family; from the DairyPure cream, backed by its 5-point purity promise and sourced from local dairy farms to the 100% pure Maple syrup. Considering store-bought caramel dips are filled with artificial flavors and colors, these ingredients might even make you feel less guilty about eating the caramel straight from the jar (guilty as charged). With the holidays around the corner, we could all do with a little more relaxing and a little less stressing. Whether it’s your next family game night or your annual ugly sweater Christmas party, this snack board featuring our salted maple vanilla caramel sauce is sure to help you do just that!

IMG_8072

Salted Maple Vanilla Caramel Sauce

  • Difficulty: Easy
  • Print

Ingredients
1/3 cup DairyPure Half & Half or Heavy Cream
4 tablespoons unsalted quality butter
1 cup 100% pure Maple Syrup
1 teaspoon natural Vanilla extract
Pinch of Salt (I use Himalayan pink)

Note: If you want the sauce richer and creamier, you can substitute the DairyPure Half & Half for DairyPure Heavy Cream instead.

For serving:
Apple slices
Pretzels
Rice cakes
Waffle crisps
Shortbread cookies

Directions:
1. In a deep saucepan, bring the maple syrup to a boil then turn on low and let simmer for 10-15 minutes until the syrup has thickened enough to coat the back of a spoon.
2. Add in the butter, vanilla, and salt and stir until the butter has melted.
3. Now pour in the half and half, stir for a minute or two and pour into a bowl or jar for serving. The sauce will solidify more as it cools so don’t be alarmed if it’s loose. If you want it thicker you can always let it simmer for a little bit longer.
4. For a fun presentation, arrange a cutting board with snacks for dipping around a bowl of caramel sauce.

IMG_8096

IMG_8111

What are your favorite family-time snacks? Let us know in the comments below and if you make this recipe or any other DairyPure simple recipes be sure to share and tag us on Instagram @thecozyhomechronicles and use the hashtag #SIMPLYMADEMEMORIES for a chance to be featured in our stories. Be sure to check here for special holiday coupons before you make that shopping trip!

As always if you liked this post, please follow us and share!

signature3


Organizing for Your Lifestyle: Strategies for Developing Sustainable Organizing Solutions

Let’s be real. Maintaining a clean house most days is a challenge in itself. Now add two young children and school and we are looking at nearly impossible. But we manage somehow. Believe it or not, the hardest part is not having to pick up after our little ones but rather picking up in a timely manner. In order to do that, one needs to be…dun..dun..dun.. yep, you guessed it. ORGANIZED! Since both my husband and I are in school this semester, we figured it was high time we got our house sustainably organized once and for all. Of course, it doesn’t hurt to get a little bit of help.

IMG_5906

In her book Organizing for your Lifestyle, Jane Stoller offers inspiration and practical advice for tackling any organization project from the smallest closet to the biggest room. The first chapter is a general overview of organization philosophy covering the very basics including the health and cost benefits of organizing as well as organization approaches such as minimalism. After that expect to dive straight in. My favorite part of the book is the way in which it is organized; each chapter serves as a guide to a different space. As someone who suffers from indecisivism (is that a thing?) I can tell you that knowing where to start is the most stressful part so following a list definitely helped eliminate that stress. Here’s how the book is split up:

  1. Closet
  2. Bathroom
  3. Kitchen
  4. Travel
  5. Books
  6. Storage Room

Suddenly, a good pre-New Year’s purging doesn’t sound too bad now does it?! Today I’m sharing five of my favorite practical tips from the book and how I’m applying them as we tackle our organizational woes.

1. Have a date with your closet every year. Jane recommends evaluating and reorganizing your closet twice annually as “this will help you to stay fully in control of what you have, and knowledgeable about what you need, while ensuring that no excess clothing outstays its welcome.” We recently tackled the kid’s closet and ended up donating a TON of stuff they had outgrown that was taking up valuable space. After seeing how much space this opened up, I added reminders to my calendar to do this on a quarterly basis.

IMG_5909

2. Think in terms of frequency of use. Mentally sorting out your belongings into daily use/weekly use/sparse use really puts things into perspective and allows you to tailor your organization system to your practical needs so that you have what you need when you need it. This has been really helpful in our bathroom as I have tried to make sure that we have easy access to the things we use every day like toothpaste and shampoo whereas medications that are used infrequently are tucked away out of sight.

3. “Organize so your mother (or father) can cook in your kitchen.” This one really stood out to me because the kitchen is the heart of our home. If you don’t have easy access to basic tools and ingredients while cooking then you’re wasting valuable time during meal prep. Imagining someone else using your kitchen is a great exercise for thinking about the efficiency of your space. I used the opportunity to remove some unwanted gadgets, dinnerware, and Tupperware out of circulation to make room for things that I actually use and need.

IMG_5743

4. Find a balance between function and aesthetics. What works for one person or family doesn’t work for everyone and that’s okay. It’s up to you to find a solution that is both functional and visually appealing for your needs (sometimes function will trump aesthetics and that’s also okay). This issue came up for me while I sifted through my scarf collection. Although I can see how the variety of colors and patterns hanging together on a wall can be visually unappealing, this strategy has proven to be the most practical for my lifestyle because it offers easy open access to all my scarves.

IMG_5969

5. Make organizing a lifestyle. This is by far the most important advice because it requires you to think in the long term. With this philosophy, organizing is no longer about buying storage containers or fancy systems but rather about asking yourself, “how can I stay organized?” The answer, I think, will lie in a happy medium between a designated system, daily practices, monthly maintenance, and a quarterly assessment of successes and failures. To help us along through this process, I’ve created a diagram to envision what this would look like.

Organizing Chart

We are by no means completely organized because we haven’t had the time to tackle all of these spaces in one sitting but we have been thinking through these tips as we slowly organize our home corner by corner. These strategies have certainly helped me be more intentional about finding sustainable organization solutions and I look forward to sharing more as we work on making our home better organized. If you want more organizing inspiration as well as tips and tricks on the specifics of storage, folding, and labeling, you can find Jane’s book here.

If you enjoyed this read, please share and follow!

Instagram

signature3


One Room Challenge: Week 7 |Simple Office Makeover Reveal

Today is the big day friends! Although we weren’t able to keep up with the weekly progress posts for our One Room Challenge, we still managed to finish the room on time (hooray!). If you’re just tuning in here for the very first time and don’t know what The One Room Challenge™ is, it’s a widely anticipated biannual event every April and October, hosted by Lisa of Calling It Home, in which twenty design bloggers take the challenge of transforming a space in just six weeks. Every Wednesday, the designers document their process while sharing their sources and professional advice. On Thursdays, guest bloggers, like us, can play along and support other guest bloggers that are also tackling a room renovation. As you may already know, we were working on an office makeover for my brother and sister-in-law because although we love DIYing, we couldn’t handle the stress of doing our own home renovation while both of us are in school.

ORC GP
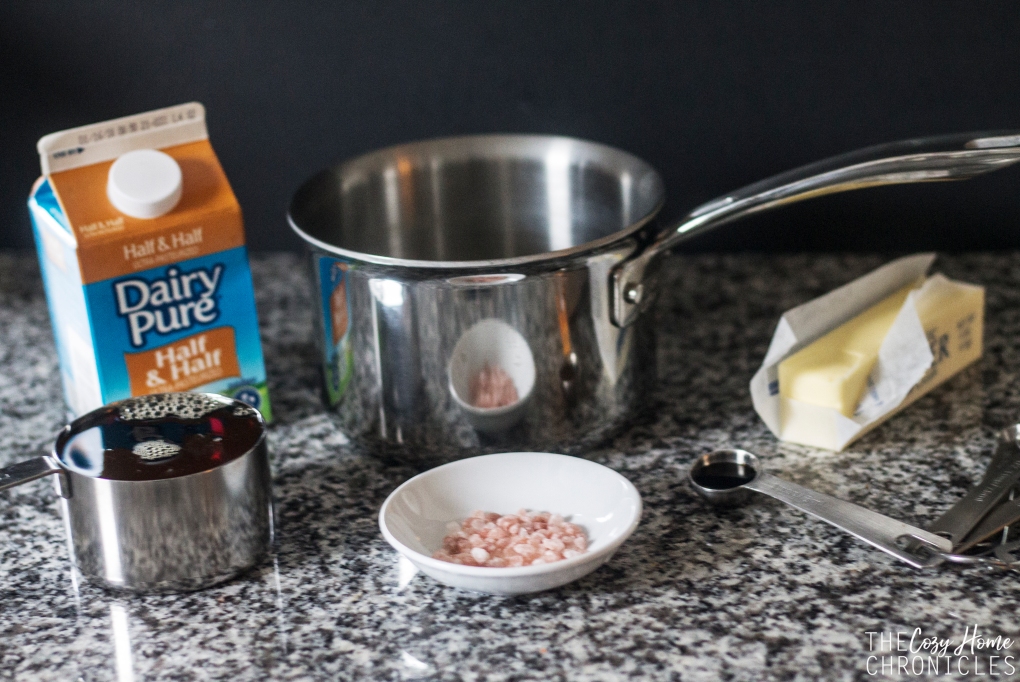
Don’t worry I’m not going to chit chat too much. The whole point of this post is to see a satisfying transformation and we will get to that in just a minute. Of course we also want this post to be inspirational and informative so following the before and afters we will give an overview of the changes this project entailed, the cost, and our sources. If you don’t even remember how this project began you can refer to weeks
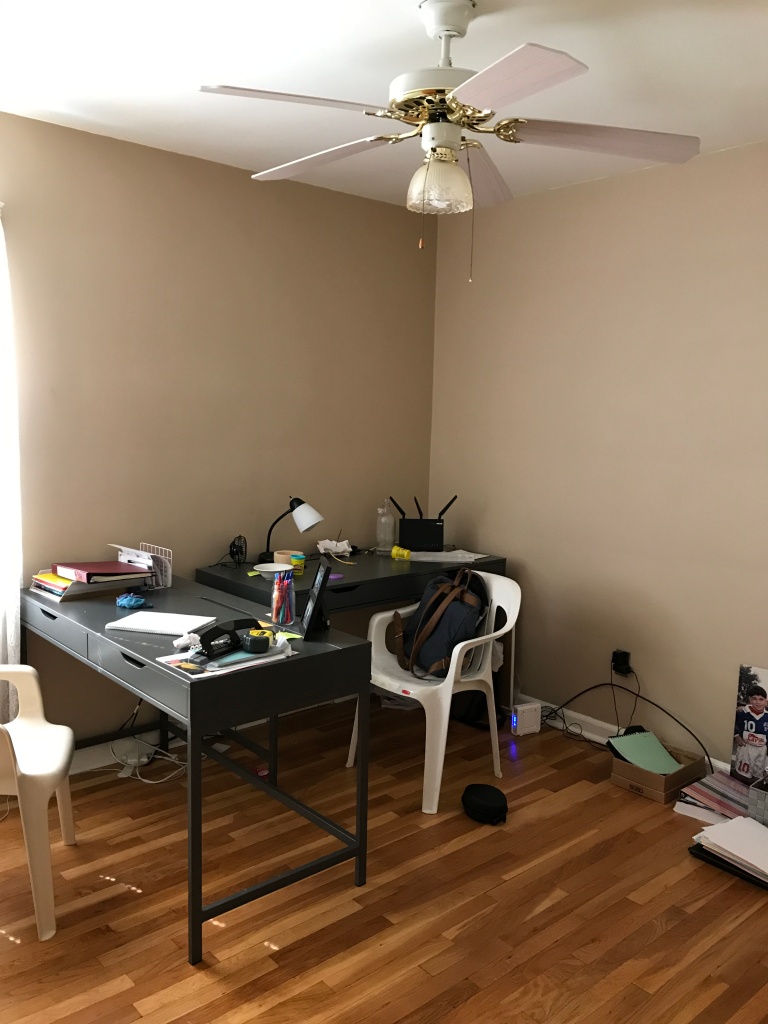
 one, two, and three for a quick reminder.

BEFORE: A DARK & SAD ROOM

IMG_5608

IMG_5607

AFTER: WORK SPACE GOALS

IMG_7365

IMG_7355


IMG_7361

IMG_7377

IMG_7121

So how did we get from A to Z? Never underestimate the power of a fresh coat of paint. In our opinion it is the cheapest, easiest, and most impactful way to transform a space. My sister-in-law wanted a bright and modern space so we went with Behr in Ultra White for a fresh clean look. Another impactful thing we did was to take down the vintage lace curtains and replace them with brand new blinds that I purchased from IKEA for $2 each (yes you read that correctly). Let’s just say it pays to lurk in the last chance section!

IMG_7371

Replacing the fan light with a modern ceiling light from IKEA for $30 also dramatically changed the look of the office. The black fixture really complemented the gray desks and the hardwood floors and brought in much needed light. Of course one of the most expensive purchases was the Algot system which we added for shelf space above the desks. While we did toy around with the idea of building custom shelving, we decided in the end that spending a little more on a system that could be adjustable to changing needs would be the smartest choice. For $85, it was well worth the investment and provided the perfect amount of space for organizing books, supplies, and for styling decor. The best part about this transformation was that nothing was difficult to do; painting, installing shelving, replacing the light fixture, all of these required no super special tools or skill sets (which means you could do it too!). 

IMG_7385

We could not be happier with how this room turned out. Considering our crazy schedules and all the stress in our lives, I think we did a pretty good job of bringing  our simple vision to life. We wanted a fresh, inspiring space with bohemian elements (patterned rug, copper accents, plants) and I think we definitely pulled that off. While we are very happy with the final look of the room, there are still some areas of improvement that we will probably return to. One of them is wire control. We definitely want to find a way to conceal and minimize the tangling of the printer, desk lamp, and laptop cords. We also want to add a little more color and character to the rest of the walls. I think this is something that will naturally come as my brother and sister-in-law live in the space and identify what speaks to their style. In that sense, I don’t mind the empty walls as much because I think of it as their decor journey has only just begun. I also thought it would be nice to have a fun little reading corner complete with fancy shmancy floor pillows but it looks like that will have to wait.


Sources


Ceiling Light $29.99 | Office Chair  $84.99 |Shelving  $85| Rug $69.99| Desk Lamp $12.99 Magazine Rack $14.99 |Vase $2.99 | Plants $2.99| Hanging Storage $4.36| Frames $.99

As you can see, many of the items we purchased are both accessible and reasonably priced for the average home DIYer. We took advantage of many deals to save big including using a 10% off coupon from Wayfair and thrifting to keep our makeover well under $500. The rug was my sister’s belated birthday gift to my brother for the renovation so all we really had to purchase was the shelving, chairs, lighting and accessories. This came out to about $350. For the decorating I was a little savvier as I relied on some thrifty finds like a set of 4 wall baskets for $1.99 and free printable wall art (tropical palm leaf and keep pushing on).

IMG_7199


All in all, it’s been another successful One Room Challenge and we can’t wait for the next one 🙂

Any questions? Thoughts? We would love to hear from you in the comments below. Don’t forget to check out everyone else’s final reveal posts and as always, if you liked this post please follow us and share!

Instagram

signature3