Reflections on a year of cloth-diapering

Our little hobbit turned one yesterday (where did the time go?!) and we have been reflecting all week on the year that has passed. It certainly wasn’t easy. There were so many things we had to learn and many more sleepless nights but we loved every minute of our first year as parents. One of our proud parent highlights of the year was our very positive experience with cloth-diapering. After one year of successful cloth-diapering we highly recommend it to anyone and everyone considering it. However, that doesn’t mean we didn’t learn a thing or two along the way so here we present to you 5 things we wish we knew or did from the beginning to make our cloth-diaper journey a bit smoother and less stressful.

CD3

 1. Print a schedule and keep track of laundry days

When you have a million other things to juggle it’s quite easy to forget the last time you did the diaper laundry. Trust us, it’s not so fun when you realize you’re out of diapers as you are preparing baby for bedtime. Keeping a schedule helps you keep the load of remembering off your shoulders and clean diapers on hand when you need them most.

2. A little bit of bleach goes a long way

Over time cloth diapers eventually start to smell even if you wash them consistently. Whether it’s ammonia or bacteria build-up, the smell can be extremely unpleasant and linger after several washes. Don’t worry, it’s not  necessarily something you are doing wrong. You just need to switch things up and find something that gets the smell out. We started adding a small amount of bleach to our cycles just once or twice a month and it was like hitting the reset button. The diapers not only smelled great but looked bright and clean too! Be careful not to overdo it with the bleach though. After all, it is a harmful chemical and should only be used sparingly.

3. Diaper liners will be your friend when baby starts solids

Remember when we wrote a post about how diaper liners sucked because they ruined our plumbing? While we still don’t recommend them for flushing, they definitely come in handy when your little one starts pooping solids. After several weeks of rinsing smeared poo off the inside of diapers, we decided to bring back the liners and we haven’t looked back since. Just toss the liner with the poo in the pail and you are good to go. No extra whiffing or rinsing required.

4. Some diaper rash creams leave stains

This one just bothers us because we had kept our diapers in such great condition for so long. If you’re like us and you care about keeping your diapers looking clean then know that certain diaper rash creams (non-water soluble like Desitin) don’t wash away. At least we haven’t yet discovered a way to get rid of them. We are definitely going to be using these diapers again for a baby #2 but if you are planning on selling them once you are done (we know many do) then this is something you might want to watch out for.

5. It’s okay to cheat once in a while

If you’re going on vacation or out longer than a few hours and you don’t have access to a diaper pail or laundry machine just go with disposables. That is unless you’re taking an extra luggage to haul back some reeking souvenirs. My brother got married recently and rather than lugging around a bag for dirty diapers to makeup, pictures, and the reception, we opted to use disposable diapers that day for the convenience. I’ll admit I did feel guilty but I eventually got over it. Look, you will have circumstances where it will be near impossible to cloth diaper and that’s completely okay. Don’t be too hard on yourself, cloth-diapering was never meant to make your life difficult.

CD2

If you already cloth diaper these will just have made you nod your head in agreement (we hope) but if you are just starting out then we really hope you find these tips helpful. And if you have any questions or comments we would love to hear from you 🙂 Until next time.

If you liked this post please follow us and share!

Instagram


Cloth Diapering Newbies: Part III

IMG_8987

Time to dive a little deeper into the world of cloth diapering. In this post we will be discussing, in much greater detail, how to wash and dry cloth diapers, inserts, and wipes based on what has worked for us. The most important yet often overlooked step in diaper laundry is the daily maintenance of cloth diaper cleanliness. It’s like the unsung hero of cloth diaper laundry. If you want your diapers to last longer and look clean, the last thing you want to do is have poop dry and crust on them until laundry day. Anytime there is poop involved, we recommend that you rinse the diaper immediately. Not to mention how gross it would be having a bunch of poop sloshing around in the wash. This is why in our first post we mentioned having a diaper sprayer or bidet. We use the sprayer to rinse off any debris immediately into the toilet and let the diapers hang over our laundry sink until laundry day. As a result, we have not had any major diaper stains. In fact, the only stains we have are from Desitin, not poop. Basically, we never put poopy diapers in the diaper pail so what you will read below is based on care for diapers that don’t have a significant amount of poo on them. On a side note, if you have not read our previous post and are considering using flushable liners, we suggest you read it and think twice. Unfortunately, there is no magic way around getting your hands dirty if you cloth diaper…unless you are prepared to pay up.

Another part of daily diaper maintenance is something that will just make your life easier on laundry day. Instead of waiting until the day of to separate the inserts from the diapers (assuming you are using pocket diapers like us), try pulling out the insert immediately after you change the diaper as you put it into the diaper pail. We make sure to do that so on laundry day there is no extra sorting. We literally dump all the contents of the diaper pail bag (inserts, diapers, and cloth wipes) straight into the washer and toss the bag in right after. It can’t get any easier than that. So now that that’s squared away, let’s get to the washing details.

First things first. Laundry detergent. One of the things we wondered about was what kind of detergent to use especially for something going directly on baby’s bum. The options are many from Seventh Generation, The Honest Co., Burt’s Bees, Babyganicf, etc. and all have minimal ingredients (scented with essential oils) and no harsh chemicals, which is perfect for diaper laundry. We settled on a brand called Ecos because it fit the criteria of being chemical-free, it had built-in softener, and being available at Costco meant the price was just right. So far we have zero complaints; it delivers stain free laundry that smells great and is budget friendly. Score!

350-520576-847__1


Washing

Cloth diaper laundry is surprisingly easy and straightforward. There is no special cycle or real need for several washes (unless you’re not rinsing the poop right way). The important thing to know here is that you should always wash your diapers, inserts, and cloth wipes on cold.  There is no reason to use warm/hot water unless you have some seriously messy diapers. Even then, try not to do that too often as frequent washing in warm/hot water can ruin the leakproof ability of the diapers. We did not try this to know, but if you’re spending all that money on cloth diapers you’ll probably want to play it safe and follow the manufacturers’ suggestions. Although it is subjective and hard to measure, we have not noticed any difference in absorbency (excessively leaky diapers or a drastic change in the number of diapers we use daily). Babies will always leak. Our baby leaked with pampers and seventh generation disposables and he leaks through cloth diapers. It’s just because he pees a lot and not because cloth diapers are not as absorbent.

Here are the exact settings we use for our wash cycle:

  • Wash Mode – Normal Cotton
  • Wash Time – 60-100 Minutes
  • Wash Temperature – Cold (30°)
  • Wash Soil Level – Medium or Heavy (depends on the situation)

img_0118

Drying

Once the wash cycle is complete you will want to separate the diapers from the inserts and cloth wipes. Go ahead and throw the inserts and wipes (and the diaper pail bags if you washed them) into the dryer. We set our dryer to 1 hour on medium heat and they turn out perfectly dry and smelling fresh. You really do not want to exceed medium heat because you can shrink and ruin your inserts. If you are in need of diapers immediately, toss them in the dryer afterwards on “Air Dry”. It will take time but not as much as hanging them to dry.

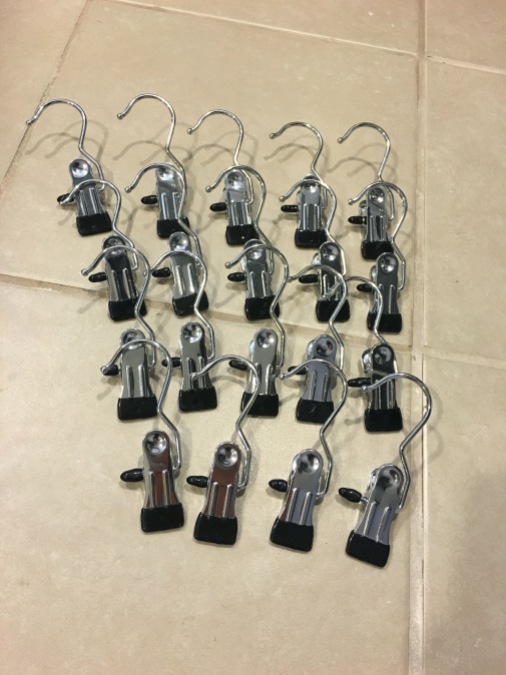
For drying the diapers, it is best to hang them on a rack somewhere where there is a draft or fresh air. If you are blessed to live where there is good sunny weather, you can hang them outside. Our weather doesn’t accommodate this luxury 8 months of the year so we installed a wall drying rack in our laundry room. Our setup (see below) cost around $40: $20 for the hook hangers by J.S. Hanger ( iPow is another good brand on Amazon) and $20 for the Grundtal Drying Rack by Ikea. Ikea has several cheaper options that are portable and foldable but if you’re looking to save space, a wall set-up is the way to go.

IMG_8356

IMG_8363

IMG_8359

Once your diapers have fully dried (around 3-4 hours), all that’s left to do is grab a helper, stuff your inserts back into the diaper, and lay your prepared diapers back on the changing table shelf for use again. Our baby loves the bright colors of his diapers so we usually sit all together in the nursery and talk about our day while we stuff the diapers and baby rolls around playing with his diapers. Cloth diapering is definitely not as “quick and easy” as disposable diapering but because it is meaningful to us we find ways to cultivate cozy moments around the routines that come with it.

IMG_9500

Our adorable helper

This concludes our cloth diapering series in terms of what you need to get started and how to maintain a cloth diapering lifestyle. Yes, it’s a bit of extra maintenance and laundry but it is not overly taxing or impossible. That is our takeaway message. We hope that if you are on the fence or hesitant about cloth diapering, you now feel it is something you can totally do (because it is)! While we have only been cloth diapering full-time for 6 months, we have had a very positive experience so far. There is still much to learn and reflect on and we will likely do a reflection/update post in the near future as we continue this journey. Until then, if you have any questions or comments we would love to hear from you!

If you liked this post please follow us and share!