Banana Honey Walnut Toasts

IMG_2240

Although Ramadan ended over a month ago, we are still having a difficult time breaking some of our Ramadan schedule and habits. Not only do we still stay up pretty late (midnight is the norm for me), but we also eat like mice early in the morning because it feels strange to fill up right after we’ve woken up. With all the things we have going on in our life, we certainly can’t afford to skip out on the most important meal of the day so today I’m sharing a simple breakfast idea that’s sweet, crunchy, and filling. Banana sandwiches are something we grew up eating as a treat. My father would make it for us and share stories of his picky-eating days, growing up in Beirut, where all he would eat was bread and sugar to fill up. I guess you can’t really go wrong with bread and banana! Thankfully none of us turned out that picky but that doesn’t mean we can’t celebrate the product of my father’s resourcefulness 🙂

When I got married, I was introduced to a whole different world of foods I had never eaten. One of those things was geimar, a creamy Iraqi spread similar to clotted cream. It’s thick and rich in just the right way and it’s unsweetened which makes it the perfect base for a sandwich like this. We don’t eat it often but when my in-laws are in town we make sure to get our fill of geimar, samoon (Iraqi flatbread), and honey. When I photographed this recipe, I used sourdough toast that I had on hand but you can use any bread you like. If you desire more substance and less bread, you can cut the banana length wise and roll it up in a thin pita bread just like my dad used to do.

Ingredients
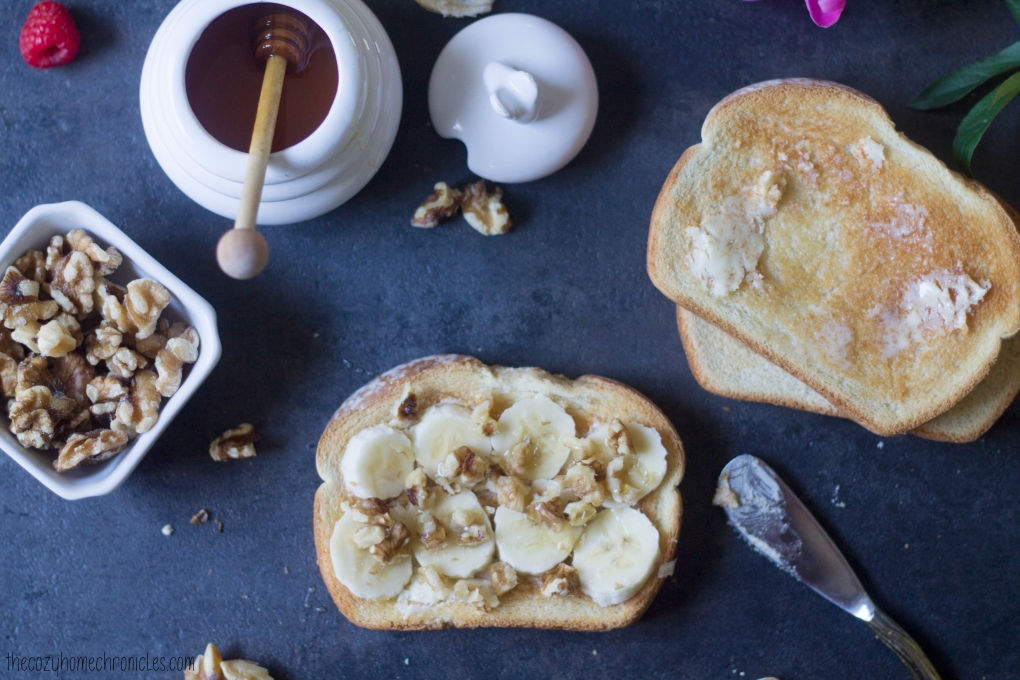
Quality artisan bread/toast
Salted butter or clotted cream
Banana
Honey
Walnuts

Note: You can use unsalted butter if you’d like but I find the saltiness works wonderfully with the sweetness of the honey and banana.

IMG_2245

Directions
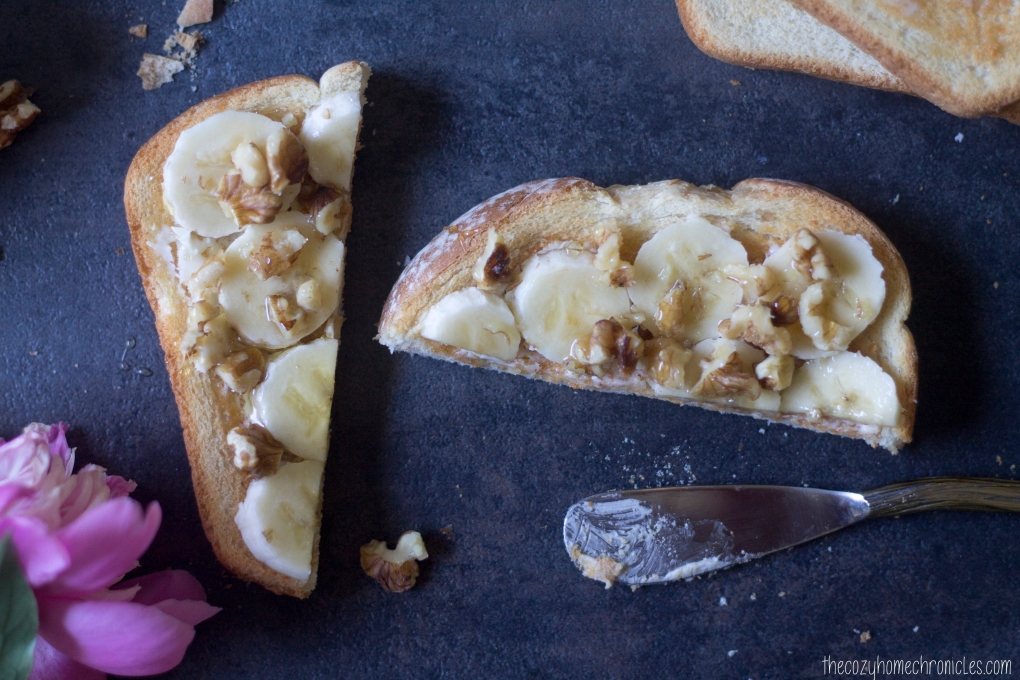
Toast the bread of your choice and generously lather on some butter while it’s still a bit warm. Layer on banana slices and walnuts and then drizzle on some honey. Serve alongside a nice cup of piping hot tea.

IMG_2251

IMG_2253

If you liked this post please follow us and share!

Instagram


Lebanese Lentil and Rice Pilaf (Mdardara)

img_0090

We know we haven’t posted in a while but we have been a bit busy working on some fun DIY projects around the house as well as an exciting project that we will be announcing next week. Although our lives are busy, we wholeheartedly believe in eating healthy homemade meals. It might seem difficult to strive for but there are plenty of healthy and simple meal options that one can make in a pinch. That’s why today I’m sharing one of our favorite vegetarian meal options that we enjoy almost every other week. I didn’t like this meal much when I was a child but it grew on me to the point that I now crave it as an adult. It’s a pilaf made of rice, onions, and lentils topped with more crispy caramelized onions and served with yogurt, crunchy radishes, and a side salad. It is both nutritious and delicious.

img_0099

To be honest though, there is one downside to making this dish. ONIONS. Your house will smell like onions, you will smell like onions, your car will smell like onions. The smell of onions will permeate your life for days. But I can promise you that it will all be totally worth it! I look back now and laugh but I remember in my early undergraduate days when I’d be getting ready to leave the house for my evening class and my father would start cooking this meal. I would try to race through the kitchen and out the side door but to no avail. That split second in the kitchen was enough to have me reeking. It’s funny to think that now, as a mom, I will be responsible for ensuring my family has their fair share of embarrassing, onion-filled moments. The circle of life. How beautiful 😉

img_0067

Lebanese Lentil and Rice Pilaf (Mdardara)

  • Difficulty: Easy
  • Print

Ingredients
1 cup brown lentils
1 cup white rice
2 medium yellow onions, diced
3 large yellow onions, cut into half rings (optional)
4-5 cups of water*
1 tablespoon extra virgin olive oil
1/4 cup vegetable oil
1 teaspoon salt
1/4 teaspoon black pepper

*Note: I use 2 cups of water to parboil the lentils and 3 cups to cook the onions, lentils, and rice together. Even on the lowest setting our stove gets very hot and cooks very fast. You may find you only need 2 cups of water rather than 3.

Directions

  1. Rinse your lentils under cold water and remove any small debris.
  2. In a small pot, parboil your lentils in 2 cups of water for 10-12 minutes. Drain and set aside for step 5.
  3. Meanwhile in a larger pot, begin caramelizing your finely diced onions in olive oil. This will take time so be patient. Keep the fire on low and stir every so often until you have beautiful golden brown (but not burnt) onions.
  4. Add the remaining 3 cups of water to the onions and bring to a boil. Stir well, reduce the heat, and let simmer for 2 minutes.
  5. Pour the rice, lentils, salt, and pepper into your onion mixture. Stir well, cover, and cook until all the water has been absorbed (about 15-20 minutes).
  6. While your rice and lentils are cooking, heat the vegetable oil in a saucepan and fry your onion rings in batches until crispy and golden brown. Let drain on a paper towel until ready to serve. This part of the recipe is a bit unhealthy and you can skip it though it won’t be the same. Or you can slow caramelize your onions (I have done this many times) but it will take more time and they won’t be as crispy.
  7. Top your mdardara with the crispy fried onions and serve with yogurt (to keep this meal vegan leave the yogurt out), radishes, mint, and a fresh salad.

img_0074

img_0083

img_0097

img_0090

What are some healthy meals you hated growing up but grew to love as adults? Let us know in the comment section below.

If you liked this post please follow us and share!

Instagram


Healthy Homemade Butterfingers

img_9645

My brother recently brought over a PB&J  Chobani Flip for me because he’s experimenting with “healthier” snacking and wanted me to try it out. Ignoring the fact that it had 18 grams of sugar, the crunchy peanut topping was quite good and reminded me instantly of the popular candy bar Butterfinger; something I haven’t had in a long time. Although we both love all things peanut butter and chocolate, we have chosen to stay away from processed foods especially made by Nestle. Of course I couldn’t leave my sweet tooth hanging so I sought to create a healthier, homemade version of the candy bar. And that is exactly what I did… in the form of a granola bark.

img_9198-1

Plain granola bark without the peanuts or chocolate drizzle on top.  

img_9633

Granola and roasted peanut cluster bark

I did look up how to make homemade Butterfinger but all the recipes I found either required a candy thermometer or even unhealthier store-bought candy corn. Ain’t nobody got time for that! All I did for this recipe was create a sweet, nutty, and crunchy granola as a substitute for the crispy textured inside of the candy bar and made it into a bark for easy assembly. At first, I tried making a batch of granola with regular peanut butter but I felt that I could not control the flavor as I desired so I used PB2 instead and experimented with different combinations of maple syrup, vanilla extract, and salt until I felt I achieved that distinctive Butterfinger taste and texture. You’ll be pleasantly surprised at how simple this recipe is and the best part is that it has real wholesome ingredients and none of the preservatives! Just know that this bark is addicting but it does store well in the fridge so try to save some for your friends and family. They’ll be happy you did 🙂

Healthy Homemade Butterfingers

  • Difficulty: Easy
  • Print

Ingredients

Granola
1 1/2  cups rolled oats
1/2 cup coarse crushed salt roasted peanuts
6 tablespoons PB2 powder
3-4 tablespoons water
1/2 teaspoon salt
1 teaspoon vanilla extract
1/4 cup pure maple syrup
2 tablespoons vegetable oil

Butterfinger bark
1/2 cup of quality milk chocolate, melted
1 1/2 cups of crunchy peanut granola
1/4 cup salt roasted peanuts (optional)

Directions
1. In a mixing bowl, combine PB2 and water. Stir in the salt, vanilla extract, maple syrup, and oil until smooth.
2. Add in rolled oats and crushed peanuts and combine until evenly coated.
3. Spread mixture on a thin baking sheet and bake at 250F for 30 minutes stirring every 5 minutes until evenly golden brown and crunchy.
4. In a double boiler or in the microwave, melt your milk chocolate and spread half of it thinly and evenly on a silicone baking sheet or parchment paper.
5. Immediately top with a generous amount of crunchy peanut butter granola and peanuts  (optional) then drizzle with remaining chocolate. Refrigerate until firm before peeling off the silicone or parchment paper and breaking the bark into pieces. If you have extra granola you can store in an airtight container for snacking at a later time 😉

img_9154

img_9161

img_9165

img_9648

Have you ever tried to make a copycat candy recipe? Do share in the comments below. And as always…

If you liked this post please follow us and share!

Instagram


Mexican Rainbow Rice Bowls

IMG_3934

It’s almost the end of September and I’m starting to panic because my due date for baby #2 is less than two months away. I have no name picked out and I’m nowhere near as ready or organized as I need to be. Luckily, I am finding some success with meal planning in the sense that I’m getting better at making our favorite go-to recipes last longer and work better in conjunction with other weekly meals. Hopefully this will come in handy when I’m juggling a rambunctious toddler and newborn come November…but I’m not holding my breath.

My husband LOVES (probably more than me…okay maybe not but almost) Mexican food. I’ll admit, there is definitely something heavenly about the combination of savory beans or meats, fresh garden salsa, creamy avocados, and dairy. We find this combination works best in the form of a rice bowl because it’s easy to both make and assemble especially if you want a meal that will last longer than a day or two. However, I’ve been wanting a rice base that packs a little more punch and nutrition than the usual rice bowls call for. Armed with half of the rainbow in peppers and some fresh cilantro, I concocted this colorful rice that will no doubt take your rice bowl from meh to marvelous. The best part? You’ll never need to go back to Chipotle again.

Mexican Rainbow Rice Bowls

  • Difficulty: Easy
  • Print

Ingredients
2 cups uncooked long-grain rice
1 tablespoon vegetable oil
1 red pepper, diced
1 green pepper, diced
1 orange pepper, diced
1 yellow pepper, diced
1 medium white onion, diced
1 bunch cilantro, finely chopped
1 garlic clove minced
1 cup lime juice
3 1/2 cups water (sub broth)
1 tablespoon tomato paste
1 teaspoon chili powder
1 teaspoon cumin
salt and pepper to taste

Topping Ideas
Spicy Black Beans, shredded chicken, or thinly sliced steak
Avocados or guacamole
Corn
Green onion
Shredded Lettuce
Tomato
Jalapeño
Salsa
Sour Cream
Shredded cheese

Directions
1. Oil a medium, heavy-bottom pot and sauté the diced onion, minced garlic, cilantro, and peppers until tender.
2. Stir in the uncooked rice along with the spices, tomato paste, salt and pepper until fragrant and well-incorporated.
4. Pour in the lime juice and water/broth and bring to a boil.
5. Reduce the heat and let simmer covered until the rice is tender and the liquid is absorbed (approximately 15-20 minutes depending on the type of rice you use).
6. Once the rice cools, scoop into a bowl and load it up with your favorite toppings for a flavor-packed, hearty meal.

IMG_3909

IMG_3921

IMG_3931

What are your favorite rice bowl toppings? We would love to know in the comments below and as always, if you liked this post please follow us and share!