One Room Challenge: Week 4|Mudding and Tiling a Bathroom

We are hitting week 4 of  The One Room Challenge™ and that means we are less than two weeks away from the final reveal. Yikes! All the cement boards are completely up on the floors and walls and we are mudding as I speak (type). In other news, our accent wall tile arrived! And boy are we happy with the product. If you’ve been following along, you’ll know that we were torn about what color to go with for our planned accent wall in the shower. We had to order it online and we made the split decision to go with the mint green arabesque from Home Depot. It was a gamble to order online because pictures can be very deceiving but luckily these Merola tiles are more gorgeous than we could have imagined.

All right! Here’s what we have left to do:

1. Tile and grout
2. Install the vanity
3. Install the medicine cabinet
4. Connect the toilet and sink
5. Decorate

ORC

IMG_6449

Progress:
I know it’s been a slow first few weeks but we are feeling the fire now and desperately trying to finish on time. This past week was spent cutting and installing cement boards on the floors and walls. We also got rid of the debris from the demolition over the weekend. The city that we live in opens the dump to the public on the third Saturday of every month, which is awesome because you can dump all types of material except hazardous chemicals. It’s super convenient and the timing couldn’t have been more perfect. On the down side, I managed to get a nice scar on my jaw when a mesh wire from the cement boards caught my skin. Ouch!

Once the mud dries we will sand and then thoroughly remove all the dust so that we can begin tiling tomorrow. We will start with the floors first and then do the walls. Next week, we will be sharing a design board of some decor ideas and a fun little printable we have been putting together for wall art. Until next time 🙂

IMG_6453

IMG_6471

IMG_6469

Would you like to see our progress as it unfolds? You can also follow along on Instagram @thecozyhomechronicles for behind-the-scene videos!

If you liked this post please follow us and share!

Instagram


Spring and New Beginnings

Happy Thursday friends 🙂 Guess what? Urban Jungle Bloggers, hosted by the inspiring Igor and Judith, is back with another season and this month is all about celebrating the circle of life. As if right on cue, many of our indoor plants have begun to show signs of new life. Our windowsill basil flowered beautifully bringing with it the sweet aroma of summer pesto.

IMG_0737

Our fern and white elephant leaves are unfurling gracefully and it is such a joy to watch. Now that we are parents, we find ourselves more attuned to the growth surrounding us in our home. It is a bittersweet reminder that our little humans will continue to grow up but also inspiring to know that the world progresses through incremental changes. How can we allow ourselves to mentally and spiritually stagnate, when our physical body and surroundings are on a continuous path of growth?

IMG_0739

IMG_0729

We are especially happy with our rooting pothos. We now have two living separately in clear glass vases and they have successfully stayed alive in water for over a year now. Not only do they look beautiful but they require very little maintenance. If you’re thinking of bringing plants into your home but think you have a black thumb then this is definitely a plant you should consider starting out with.

IMG_9587 copy

Meanwhile outside, our backyard is blossoming with life. A variety of birds including woodpeckers, cardinals, and blue jays have returned to our feeder. We are really excited to finish our bathroom renovation and turn our attention to our garden and landscaping. We have a garden inspiration board on Pinterest that we have been adding to and we can’t wait to make our imagination a reality. Anyone have any grand garden/landscaping plans? We would love to hear from you in the comments below.

IMG_0919


IMG_0926

IMG_0936

 If you liked this post please follow us and share!

Instagram


One Room Challenge: Week 3|Laying the Foundation for Tile

We are hitting week 3 of The One Room Challenge™ and boy has it been rough! We just finally finished the demolition this past weekend and up until an hour ago our bathroom was completely gutted. Right now we are seriously questioning if we can finish on time and that’s been a bit disheartening but we are pumped to make it happen. It’s called a challenge for a reason, right?! In this post we will be sharing why our progress has been slow as well as some mistakes that we made so that you can avoid them.

ORC

IMG_6067

Progress:
As you know from last week’s update, we had some hiccups with the walls because the tile wasn’t chipping away easily so we made the decision to take everything out all the way down to the studs. If you follow along on our Instagram stories, you might have seen how we completely demolished the walls and the floor in the bathroom. We also took out that hideous 300-pound blue tub (with help of course…that is why you have brother-in-laws!). With the walls and floors gone, we layed down the moisture barrier and plywood so that we can install the cement boards and tile. We have our plumber guy coming first thing tomorrow morning to replace some corroded pipes and get the bathtub and shower head/faucets all set up. Replacing plumbing wasn’t in our budget but now that we’ve gotten this far it doesn’t make sense to build something new on a faulty foundation. And those pipes were clearly nearing the end. Once the plumbing is all set, we can begin tiling!

IMG_5931

IMG_5960

Issues & Concerns:
The reason that our demolition took two weeks (besides that we are doing this in the evenings with two kids) is that the removal of the tile proved to be much more labor intensive and involved than we had anticipated. This was an issue we had little control over. There is one blunder that we made, however, that cost us unnecessary delays. The bathtub. You see, there’s not much you can do without your bathub in place. During the entire brainstorming and design stage of this project, we focused entirely on the tile, vanity, and lighting and we completely neglected the bathtub! We just assumed that we could walk into a local Home Depot and leave with a reasonably-priced, 5-star tub. Yeah, no. Once we started looking into reviews and the different types (cast-iron vs. steel) we became so overwhelmed. Many of the good ones were not available in-store and would have cost us another 1-2 weeks of time if we ordered online. In the end we settled on a tub that had decent reviews and was available in-store. The awesome thing about it is that it is 2 inches deeper than standard bathtubs. It is now sitting in the bathroom so that the plumber can set it up and we can finally begin putting this room back together again. The lesson in all of this? If you’re ever considering doing a bathroom renovation on a tight schedule then have a bathtub selected and a plumber arranged to come before you start.

IMG_1590

IMG_6156

IMG_1597

Would you like to see our progress as it unfolds? You can also follow along on Instagram @thecozyhomechronicles for behind-the-scene videos!

If you liked this post please follow us and share!

Instagram


Laundry Room Remodel with IKEA’s Algot System

As you may be well aware of, maintaining a home requires not only constant work but some level of organization in order to cultivate a sense of peace and stability. Sometimes organization can be found through specific practices such as meal planning or journaling, other times it can be found in the design of a space that maximizes storage and efficiency. In our home we try to maintain a happy balance between both practice and design. Before having children, doing laundry was manageable because we could fold and put our clothes away in our bedroom without any interruptions. Now with two little ones, we can’t afford to bring the laundry up to fold unless we want our clothes scattered all over the main floor. We found that even though we had scheduled days for doing specific loads, our laundry room was just not equipped to deal with us sorting, folding, hanging, and ironing our clothing in one space. There was no counter-space to fold and no shelving to store laundry baskets and cleaning supplies. Something had to be done!

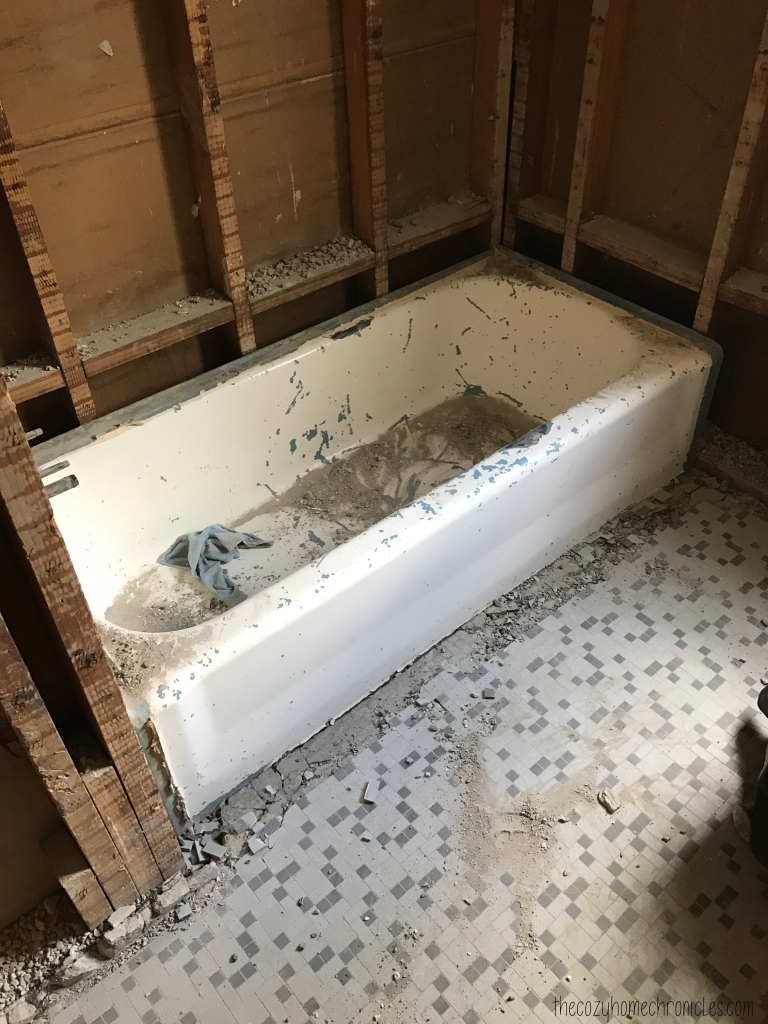
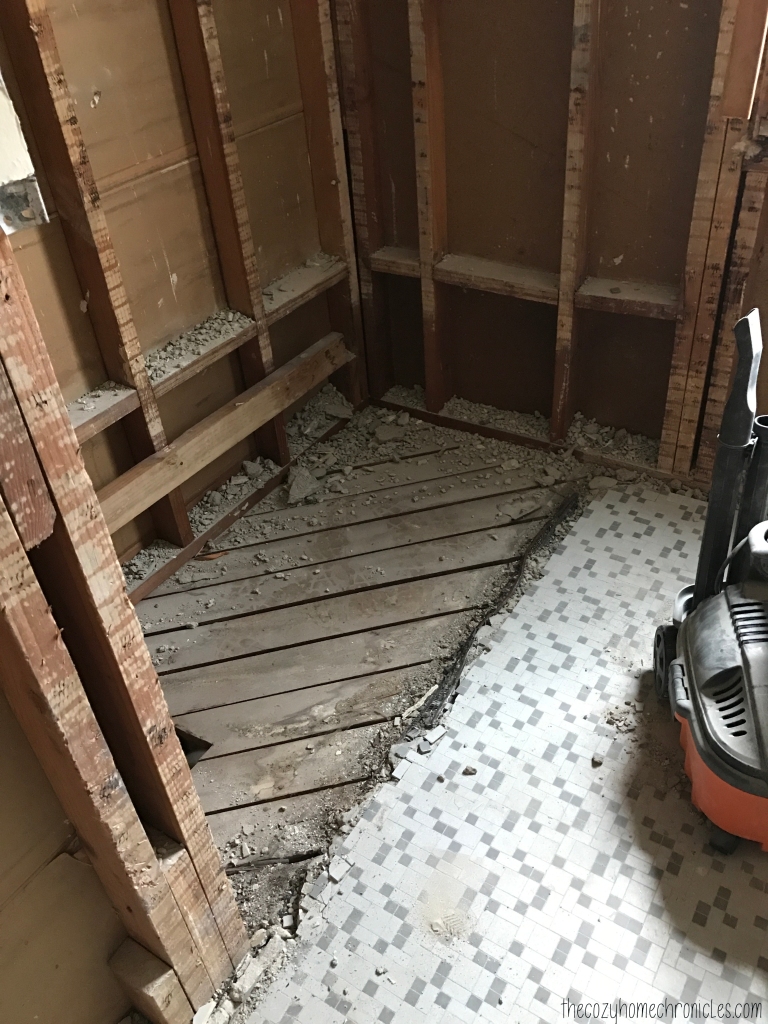
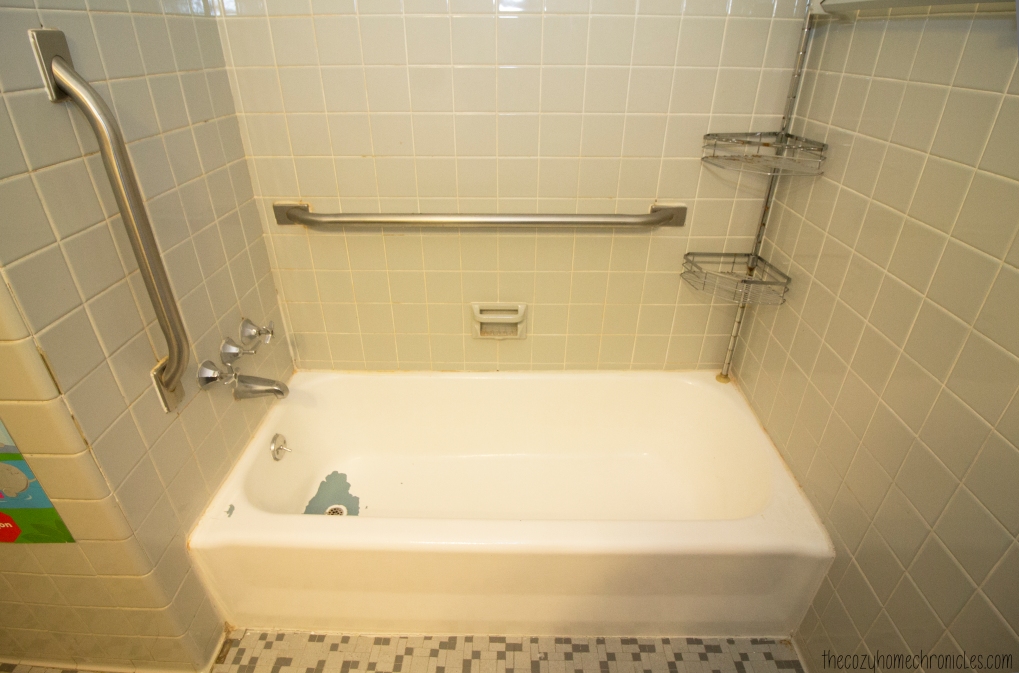
Here’s what our laundry room looked like before:

IMG_9673

IMG_9682

IMG_9680

IMG_9678

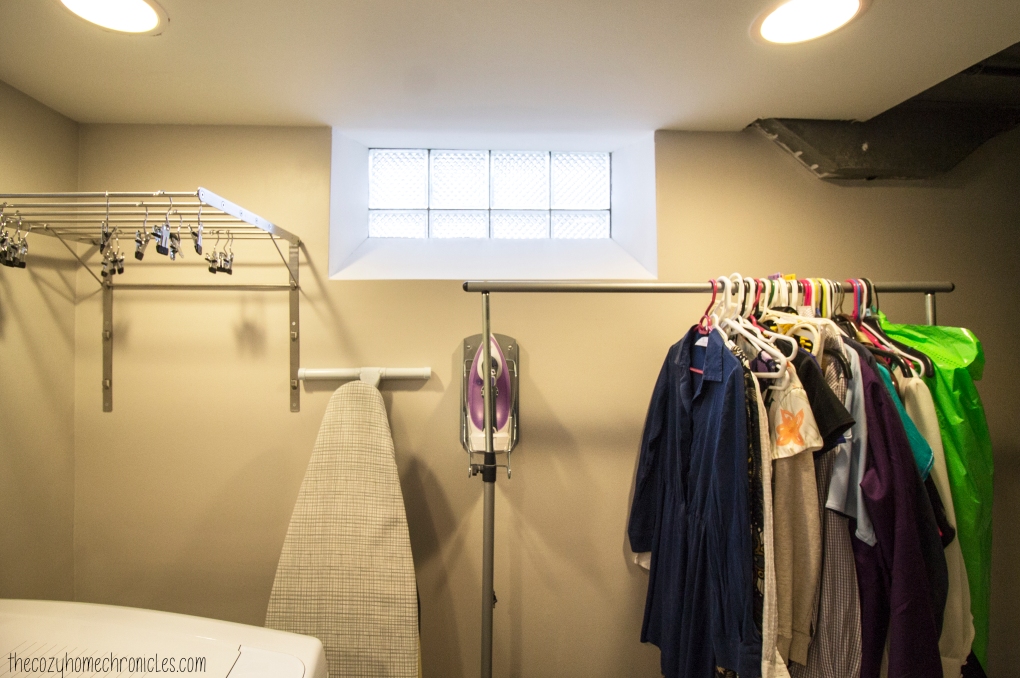
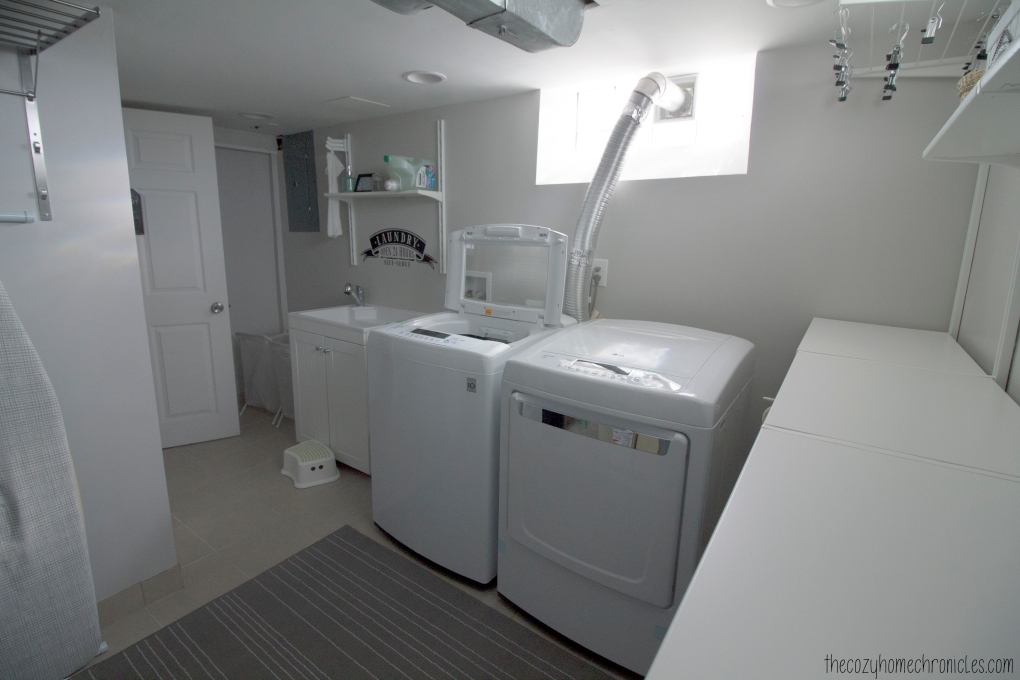
When we first bought our house, there was virtually no laundry room. There was just an old washer and dryer sitting in a dark and dusty, cement-walled basement. When we finished our basement in 2014, we made sure to include a space for laundry although we never put much more than a shelf and a sink cabinet. Fast forward to three years later and the realization that our laundry room was wasting valuable space. After much research and number crunching we decided that IKEA’s Algot system provided us with all of the features we were looking for at a very reasonable price. The Algot has a variety of options that accommodate any need from hanging rods to pull out drawers to drying racks. We are very familiar with the system because we had used it to replace our master bedroom and nursery closets but had never considered using it on an open wall. Until now.

In total, we spent $177 for the design we chose and we are very happy with the outcome. The system gave us the shelf space, hanging space, and counter space we desperately needed to deal effectively with laundry all in one space. If you are considering this system but are hesitant about what it will cost you, you can get 100% accurate pricing by designing your space through the Algot planner.

Here’s what our laundry room looks like after:

IMG_1006

IMG_1293

IMG_1355

IMG_1338

IMG_1344

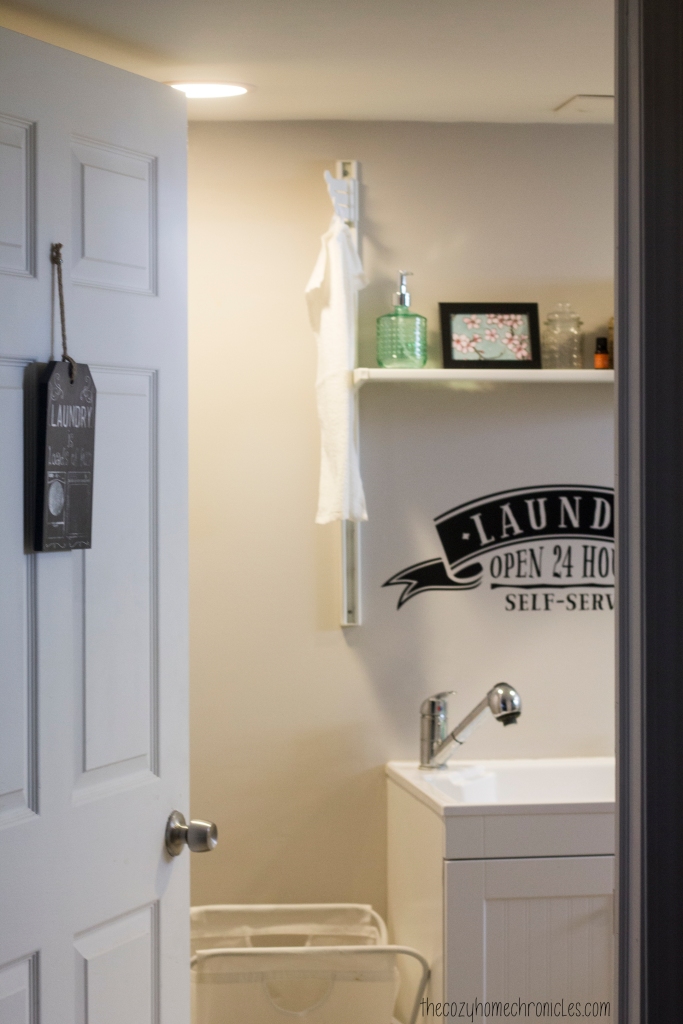
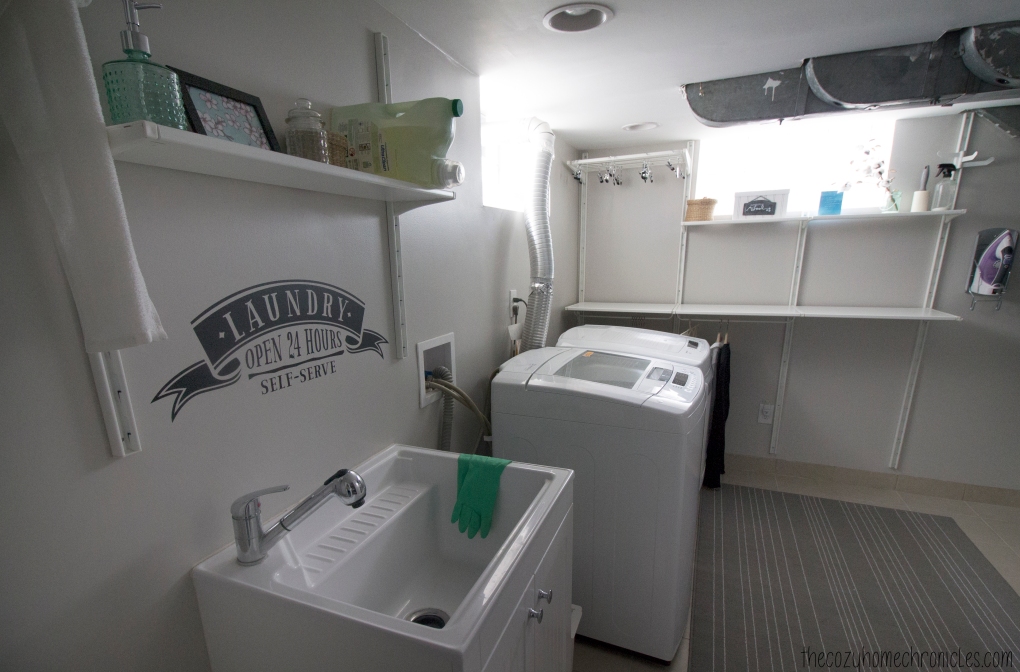
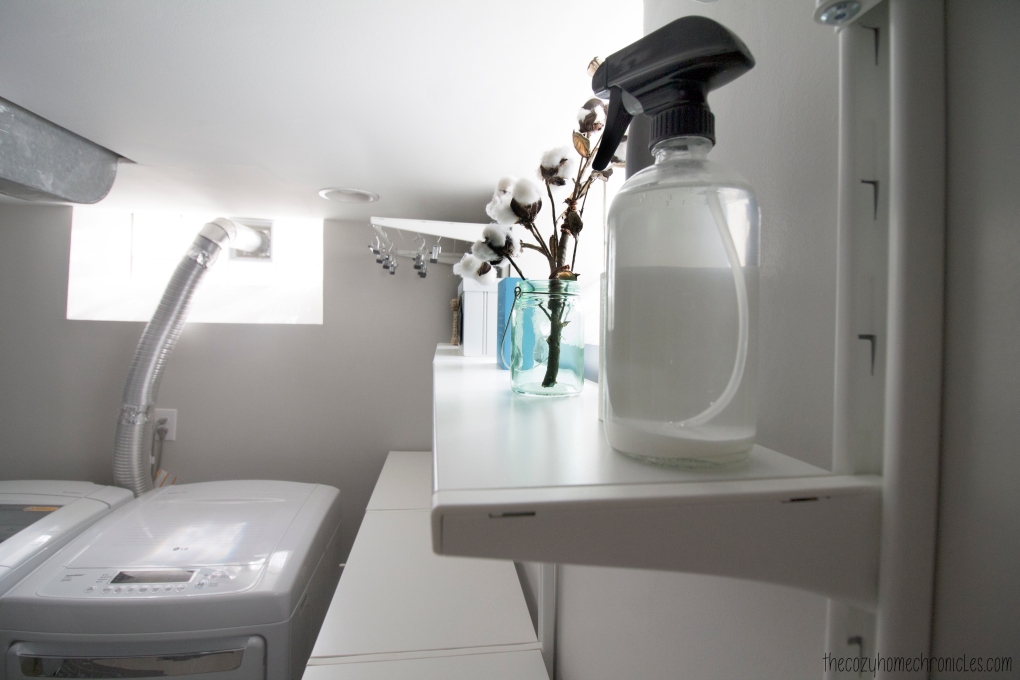
Of course a remodel wouldn’t be complete without some fresh new decor. Not only did we want a space that is efficient but we also wanted one that is cozy and pleasant to work in. Below we are sharing some of our favorite, simple decor ideas.

IMG_1349

  1. Laundry Wall Decal: We had such a hard time settling on one from MyDandelionDecal’s impressive 5-star rated shop but in the end chose a piece that was classic and inviting. The lovely shop owner has set up a 20% off code exclusively for our readers so if you’re interested in supporting a small business while decorating your home, the code is COZYCHRONICLE20
  2. DIY Wool Dryer Ball Basket:  Since we do not use dryer sheets, we needed something to keep our dryer balls from rolling all over the place. Armed with a paint pen, a clearance-priced metal plaque, and a white crate, I was able to put together this adorable storage box for under $10.
  3. IKEA Ljusnan Seagrass Baskets: These baskets add such a rustic touch and are perfect for storing clothes pins and essential oils.
  4. DIY Framed Wall Print: IKEA’s $0.99 Fiskbo Frame meets Michael’s $0.69 scrapbook paper for an inexpensive pop of color and pattern.
  5. Cotton Stem Bouquet: Who else thinks fresh cotton when they think of laundry? This inexpensive mint green jar is the perfect pair to Kirkland’s cotton stem.

IMG_3532

IMG_1004

IMG_0997

As with all things in our home, this laundry room is still a work in progress. One thing that we still have yet to do is designate and design a corner for our cleaning tools. In due time! At this stage in our busy lives, however, this update gives us all the things we needed. It just goes to show you, a space doesn’t have to be fancy to get the job done.

If you liked this post please follow us and share!

Instagram


One Room Challenge: Week 2|Bathroom Renovation Demolition

Good evening friends! Today is exactly one week since we started our bathroom renovation project in conjunction with The One Room Challenge™ and so far we are still in the demolition stage. In this post we will be sharing our progress and where we stand currently. To be honest, I thought we would be done with the demolition by now but we all got sick and needed to take it easy. I didn’t want to be a hero and push myself past my limit so I took off the last two days. Slow and steady wins the race.

ORCProgress:
If you follow along on our Instagram stories, you might have seen that we already removed the toilet and the vanity over the weekend. The last major piece we need to take out is our bright blue 1950’s tub. We managed to remove the majority of wall tile from the existing cement boards only to realize that the mortar isn’t coming off as we had imagined. Considering the age of the bathroom, I’m not all too surprised. The good news is that we are a little more settled on the tile we will be using. After a recent trip to Home Depot, we really fell in love with this Carrara Matte tile for our floors. With white subway tile for the walls, it’s going to look great!

IMG_5529

IMG_5554

Issues/Concerns:
Since I will not be sticking to the original plan of leaving the cement boards, I had to purchase a new blade for the angle grinder so we can cut through the cement boards and take them out piece by piece. Removing everything all the way to the studs is both a good thing and a bad thing. The good is that we will redo the bathroom with all new construction materials, we will be able to do a clean, solid job from beginning to end. The bad is that we will have to spend more $$$ on purchasing drywall and new cement backer boards. Considering that this bathroom is a small space, the additional expenses shouldn’t exceed $250 (and this is considering that I will also have to remove and replace the subfloor with new plywood & moisture barrier). We just really wanted to challenge ourselves to do this renovation on an extreme (but realistic) budget so we could inspire others who might not otherwise consider renovating because of the cost.

All this fun stuff with the walls and floor removal, which I had hoped I wouldn’t have to deal with, will add between 1-2 weeks to the job. As is the case with any renovation project, you have to be prepared for stumbling blocks and plan accordingly. Despite our setbacks, I think we will still make it out in 6 weeks. We sometimes get discouraged thinking it will take that long, so we have to keep reminding ourselves that we have day jobs and two little ones and that’s why we can’t just finish it as quickly as we would like. Until next week 🙂

IMG_2598

IMG_3028

IMG_5470

IMG_5467

You can also follow along on Instagram @thecozyhomechronicles for the latest behind-the-scenes and videos of our progress.

If you liked this post please follow us and share!

Instagram


Iraqi Eggs in Tomato Sauce (Makhlama)

IMG_0982

We pride ourselves in our diversity as a family so this post will touch on that a little bit. Together, my wife and I, have roots from six different countries including where we were raised: Albania, Iraq, Lebanon, Poland, Sweden, and The United States. This specific recipe has been a breakfast staple in my household growing up and my father used to make it for us as far back as I can remember. Although the ingredient list is simple, this dish is truly a labor of love; from the slow caramelizing of the onions to the bubbling and simmering of the fresh tomatoes with turmeric and pepper. It’s the spiciness and subtle sweetness of the scrambled eggs that really sets it apart from its omelet cousin. Served with warm, freshly-baked samoon or sangak and sweet, mint-infused black tea, makhlama is sure to brighten any morning.

IMG_0984

In 2014, we visited my family in Sweden and my wife was able to taste the epicness (made-up word) of my father’s makhlama for the first time. Since then, it has become a highlight of our weekend breakfasts together. While in Sweden, we would eat makhlama alongside räksallad, a creamy shrimp salad, and knäckebröd (Swedish crispbread) and it was simply delicious. At home in the States, we eat it with buttery croissants, sharp Vermont cheddar or creamy labneh, and arugula. We consider ourselves very blessed that we have such diverse tastebuds and culinary menus to draw from when meal planning. There is never a dull meal. We eat and enjoy dishes from all around the world and we get to share with each other (and hopefully one day with our children) the memories of what those meals conjure up.

IMG_0952

Iraqi Eggs in Tomato Sauce (Makhlama)

  • Difficulty: Easy
  • Print

Ingredients
4 eggs
1 medium sweet onion
4-5 small ripe tomatoes
1 teaspoon Turmeric
1/2 teaspoon salt
1/4 teaspoon ground black pepper
1/4 cup vegetable oil

Note: Serves 2-4

Directions
1. Dice the onions very finely and sauté in hot vegetable oil on low until light brown and caramelized. This takes time so be patient and stir often so as to not let it burn.
2. In the meantime, dice your tomatoes and prepare your spices. Once your onions are slightly caramelized, add in the tomatoes and spices and cook off until thickened.
3. Crack your eggs into the pan and scramble them around until cooked.
4. Serve with warm delicious breads, cheeses, and fresh herbs. And of course a nice hot cup of chai!

IMG_0961

IMG_0967

IMG_0977

IMG_0991

What are some meals that remind you of your childhood growing up in a different culture?

If you liked this post please follow us and share!

Instagram


One Room Challenge: Week 1|Bathroom Renovation Preparations

We are super excited to share that this year we will be participating in our first ever One Room Challenge! Hosted by Lisa of Calling It HomeThe One Room Challenge™, is a widely anticipated biannual event every April and October in which twenty design bloggers take the challenge of transforming a space in just six weeks. Every Wednesday, the designers document their process while sharing their sources and professional advice. On Thursdays, guest bloggers, like us, can play along and support other guest bloggers that are also tackling a room renovation. We have been wanting to participate for a while now but last year we started our kitchen renovation much later than anticipated and so we weren’t able to play along.  We really hope we can get this bathroom done in the six week period but with two kids under the age of two and graduate school on our plates that is a tall order. We are diving right in regardless.

ORCLast week, in anticipation of this event, we shared two design boards and some bathrooms for inspiration. You can check them out here. We spent the last two days completely emptying out our bathroom and relocating to the bathroom downstairs. With me gearing up to start dissertation fieldwork this summer and my husband starting his MBA soon, we decided this project could not wait any longer because life will just get busier. Besides getting it done in under six weeks, we also need to stick to a tight budget. Challenge accepted.

Alright! Here’s what our bathroom looks like now:

IMG_1136

IMG_1138

IMG_1141

IMG_1144

IMG_1147

Ugh.  So much YELLOW. As a photographer, the urge to edit these images was intense but I wanted to capture the space exactly as is so we can all enjoy the final transformation. The wall tiles are still in great condition but they make the space so dark. We really want a bright clean look that white subway tile will definitely give.

4548dc7e-0269-4621-829d-718bb55c38b1_1000

We started some of the demolition today by taking out the toilet, sink, and vanity. The tub will be next to go followed by the tile and then it’s all rebuilding from there. We still haven’t fully settled on the floor tile, accent wall tile, and vanity but we will be deciding in the next day or so. The feedback we have received from readers, family, and friends has overwhelmingly been in favor of Design Board #2 which is interesting because we are leaning toward white marble floors and black fixtures. I guess you will just have to tune in next week to see where we are in the process. You can also follow along on Instagram @thecozyhomechronicles for the latest behind-the-scenes and videos of our progress. Until next week 🙂

If you liked this post please follow us and share!

Instagram


National DIY Day Celebration

IMG_1096 NDD

Happy Monday Friends 🙂 Yesterday, April 2nd, we celebrated National DIY Day by gathering with a group of awesome volunteers to build raised garden beds for a local community garden. If you are unfamiliar with National DIY Day, it is a day founded by Craft Box Girls two years ago as a way to bring people together and celebrate creativity. Last year, people all over the world were celebrating April 2nd, some as far as Australia!

As DIY Day Ambassadors we wanted to use our DIY skills for a good cause and so we teamed up with Zaman International, a non-profit humanitarian organization committed to addressing the basic needs and empowerment of marginalized women and children locally and internationally, to host the event. Since their foundation, they have provided essential needs to more than 180,000 clients in Southeast Michigan. In April 2016, Zaman moved into a 40,500 square foot Hope for Humanity Center in Inkster, Michigan. Aside from launching a Food Pantry, Zaman was recently accepted into the Feeding Inkster Community Garden Program which provides seeds, plant starters, garden tools (as available), and technical assistance for the creation and harvesting of a community garden. They are expected to ensure low-income community residents receive harvested, fresh produce in a timely manner. With not much viable land near their warehouse, we stepped in to build and decorate raised beds that will allow them to grow their fruits, vegetables, and herbs. We will be returning early next month to fill the beds up with 2 inches of gravel, soil, and plants but until then we just wanted to share a little bit about our first successful event. There were a few minor hiccups and delays but overall we are very pleased with the end result.

With a team of 10 volunteers were able to put together four 4ft x 8ft beds in just a few short hours. Two local Home Depots were generous enough to provide $25 vouchers to help with the cost of supplies like the screws, paint, and weed-blocker while the Craftbox Girls sponsored the cost of the wood to build the beds. A friend with a background in interior design and art, came up with a few cool designs that were easy to paint and added a fun splash of color to the garden beds. Scroll on down to see pictures from the event and be sure to check back in with us next month when we return to complete the project. If you’re feeling inspired and want to build your own raised bed for your dream summer garden, head on over to our very own post that covers just that. If there’s anything we hope people take away from National DIY Day, it’s this: The ability to create is part of what makes us human. We all have it in us and anyone can unlock that potential and  create anything, if only they set their mind to do it.

IMG_1018

IMG_1030

IMG_1029

IMG_1022

IMG_1044

IMG_1055

IMG_1089

IMG_1096

IMG_1095

If you liked this post please follow us and share!

Instagram