Chickpea soup with tomato pickle salsa (Hummus M’Sabaha)

Ever since I purchased an Inkwell Press Meal Planner back in January and forced myself to commit to meal planning, we have been pretty consistent about practicing Meatless Mondays. Having a set genre for each day has really helped narrow down the selection for the menu, which is something I had a hard time doing prior because I enjoy making many different things. Today I’m sharing one of our favorite meatless dishes that’s nutritious and simple to make. It’s very similar to another Lebanese dish called foul and hummus except it’s without the foul or fava beans. Foul and hummus is usually eaten for breakfast and while I enjoy it now, I used to HATE it growing up. It was just too heavy for me and it wasn’t nachos or pizza so I was understandably upset when I could smell the distinctive aroma of garlic and fava beans wafting through the air. My father, the negotiator that he is, would allow me to leave out the fava beans as long as I ate everything else and that’s how my love for this dish of hummus m’sabaha blossomed. Traditional Lebanese hummus m’sabaha is much thicker and creamier than what I show here. Usually it’s roughly mashed and a little bit of tahini is added for creaminess. This spin on my childhood favorite is like a mix of hummus m’sabaha and lablabi, a Tunisian chickpea soup. We personally enjoy the combination of the light lemony, garlicky broth with the texture of whole chickpeas.  And speaking of broth, please don’t use canned chickpeas. Technically you can but if you do make sure to drain the chickpeas well and simmer them in a vegetable stock or bone broth. Starting with dried chickpeas is essential for getting flavorful chickpea broth that is not a metallic tasting goop.

IMG_3682

I always soak the dried chickpeas on Sunday evening and boil them first thing on Monday morning. My recipe calls for two cups because that’s what I soak but we don’t necessarily eat all two cups unless I planned to eat leftovers the next day {usually we don’t because it’s Taco Tuesday ;)}. Whatever I don’t use I will freeze for a rainy day. I grew up learning to cook from my father who never measured ingredients so I’m still working on how best to write and share these family recipes. Anyways, I hope you enjoy this as much as we do!

IMG_3708

IMG_3661

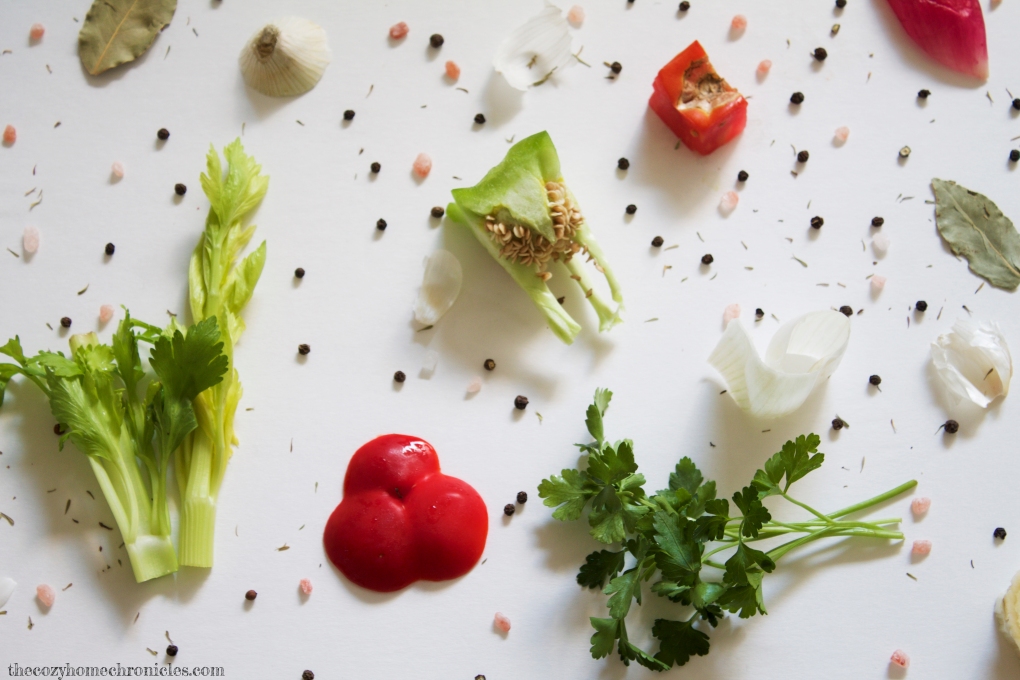
Chickpea soup with tomato pickle salsa (Hummus M'Sabaha)

  • Difficulty: Easy
  • Print

Ingredients
2 cups dried chickpeas
1 teaspoon baking soda
10-12 cups water
2-4 garlic cloves, minced*
1/2-1 cup lemon juice*
high quality extra virgin olive oil to drizzle
salt & pepper to taste

Salsa:
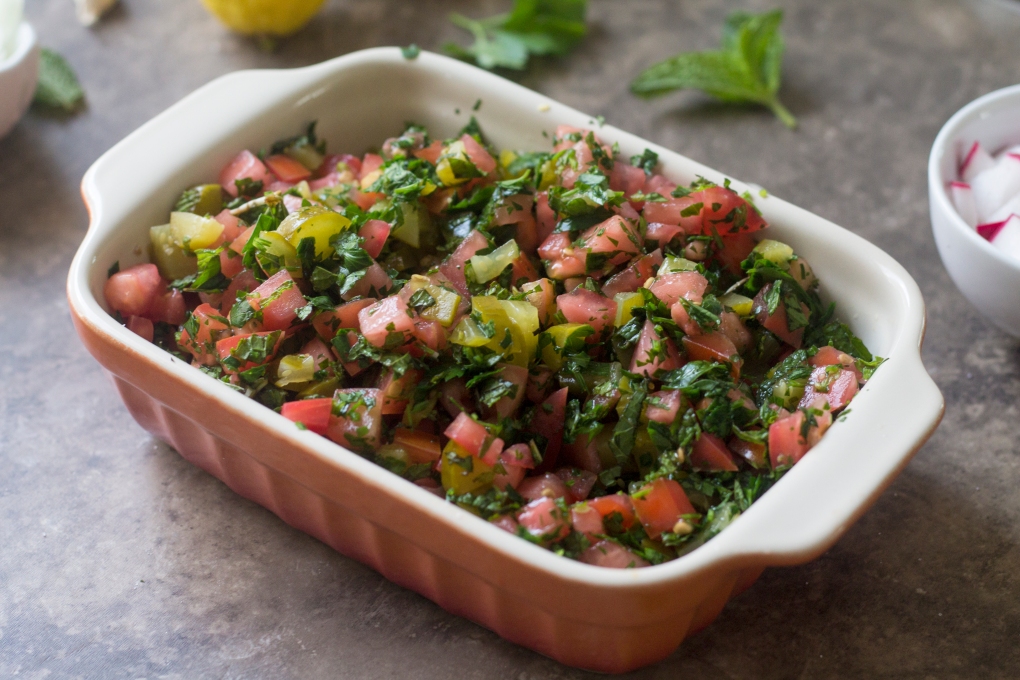
1 cup diced Lebanese pickled cucumbers
2 cups diced tomatoes
1/4 cup of fresh mint, chopped
1/4 cup of fresh parsley, chopped

To serve:
Radishes
Lebanese pickled cucumbers
Sweet onion, sliced
Pita bread
Lemon
Fresh herbs like mint and parsley

*Note: If you’re not afraid of flavor, you might consider adding more garlic and lemon juice.

Directions

  1. In a large bowl, add your chickpeas and baking soda and cover with water. Let the chickpeas soak overnight or for at least 8 hours.
  2. Drain and rinse your chickpeas and cover with 10-12 cups fresh water in a lidded pot. Bring to a boil then let simmer covered for 30-45 minutes or until tender.
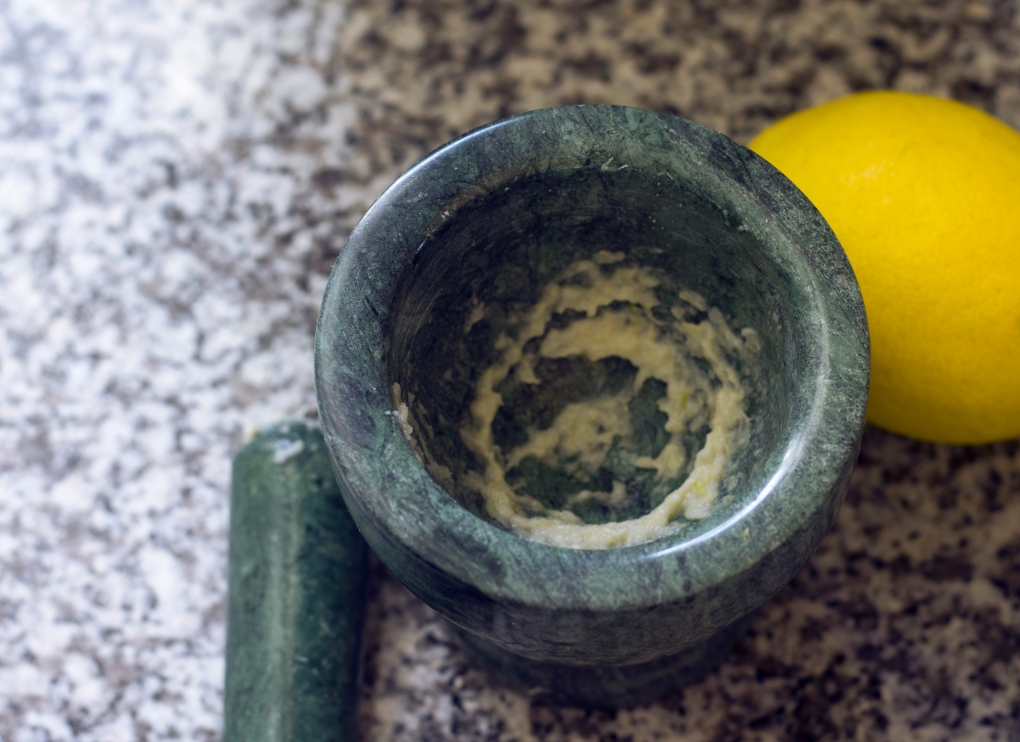
  3. Using a mortar and pestle, mince your garlic cloves with salt until you have a smooth paste.
  4. In the meantime make your salsa by combining diced tomatoes, diced pickles, chopped mint, and chopped parsley.
  5. Once the chickpeas are tender, add in your garlic paste, salt, pepper, and lemon juice. You can use your pestle to give some of the chickpeas a quick mash for thickness if you desire. Let simmer for another 10 minutes then adjust seasoning to your taste.
  6. Ladle into individual bowls, drizzle with olive oil generously and top with sweet onions and salsa. Serve with fresh pita bread and garnishments of your choice.

IMG_3689

IMG_3739

Instagram


Watercolor Painting with Beetroot

I am constantly looking for ways to reduce waste and simplify our life at home. Maybe I’m a little too determined. If I had things my way, we would probably be living knee-high in a collection of recyclable materials. Unfortunately there are not enough hours in the day to see all my ideas through and thankfully my husband is there to ensure that we do not become hoarders. Of course that doesn’t mean I don’t try to be resourceful within reason.

IMG_3754

Beets are something we eat quite a bit of in our home. We love snacking on boiled beets with a splash of vinegar and salt or incorporating them in a meal like this side-dish of Swedish Beetroot Salad I posted some time ago. One of my favorite things about beets is their deep magenta hue. I imagine there was a time, before synthetic dyes, when beets were used to naturally color everyday items and it makes me feel guilty to throw away such a beautiful by-product. I have experimented painting with beetroot juice many times but this was my first time sharing this experience with my son who has finally learned to wield a brush (as good as any toddler will). The last time I boiled beets, I stored some of the juice in a mason jar in the fridge and saved it for a rainy day.  My favorite part about this activity is the fact that this paint is completely natural. My son can snack on beets and even take a lick of his “paint” and I would have no qualms about it. This activity is perfect for a rainy indoor day but you can also take it outdoors if you want to spare yourself preparing for the messy aftermath. All this is to say: If you boil beets, don’t throw out the juice. For this activity here’s what you’ll need:

  • paper, preferably watercolor paper
  • small paint brushes
  • beetroot juice ( to make it concentrated, simply microwave in a small container to evaporate the water)
  • glass of clean water
  • fine salt and course salt
  • old newspaper or something to protect your work surface

IMG_3745

IMG_3766My son was ecstatic about pouring salt all over his painting (consider that he’s been attempting to dump salt out since he turned 18 months) but what he doesn’t know is that we were actually practicing a legit water color technique that I learned from Inkstruck Studio. As you can see this activity not only kept my toddler entertained but was a good learning exercise for me too. If you enjoy watercolor painting or hand lettering, you definitely could get something out of this activity if you plan ahead. Here’s a really good video tutorial that introduces basic watercolor and hand lettering techniques if you are interested. If you do try this activity be sure to share on Instagram and tag us @thecozyhomechronicles 🙂

IMG_3773

If you found this post helpful, leave a comment and tell us how we did!

Please follow us and share!

Instagram


3 Photography Backdrops under $3


IMG_5335 2
As an amateur photographer who has shot everything from engagements to family portraits, the switch to shooting flatlay scenes for our blog was a bit challenging because I had to create fun and engaging scenes in a tight space and on a small budget. The perfectionist in me believed that I needed fancy equipment and props to shoot beautiful pictures until I realized how expensive these items could get. Let’s just say things can add up real quick! I basically had to get creative fast, which isn’t hard to do when Home Depot and Michaels are your second home. I’ll never forget how excited I was when I came across these faux stone/marble laminate tiles at Home Depot. At the time we were shopping for our kitchen renovation and my husband was a bit concerned that I was purchasing laminate tile when we were in the process of getting rid of ours. But for the price, could you blame me? I had a similar epiphany at Michaels while browsing the paper aisle (yes I do this for fun) and realized I could get the rustic, wood-grain look that I love without breaking the bank.

img_9645

Why use backdrops might you ask? Well, if you’re someone who’s considering blogging or opening a business, one way you can grow your reach is by creating captivating photos to share your story or sell your product. We are by no means experts at this but we have certainly noticed more growth and engagement when we put more care into the images we created for our blogposts and social media accounts. Today, I’m sharing our favorite, inexpensive backdrops so that you too can make beautiful images for your blog or business. For your convenience, I’ve provided links to these backdrops below as well as examples of how I used them.

1. Woodgrain Scrapbook Paper: While not as durable as wood or stone, these papers offer a rustic, homey aura to the scene you are capturing. For only $.69 it’s totally worth getting a couple and experimenting with staging your products/recipes/art/etc…

IMG_3993 copy

IMG_2368 copy

2. Faux Stone/ Marble Tile: I especially love these for shooting recipes because I get that authentic countertop look with minimal effort and without having to replace our countertop 😉 The best part is they can be easily cleaned and can be picked up if you are chasing a natural light source. They also come in a variety of colors and textures some ranging from $0.89 to $2.98.

IMG_0952

IMG_1666 copy

3. Foam Poster Boards: Foam boards are the largest of these three options so if you’re looking to capture a bigger scene then they are your best bet. Solid boards are perfect for making the objects you’re capturing pop and they’re also handy for reflecting and directing light. Oh and you can find them for $1 at Dollar Tree.

IMG_1285

IMG_1642 copy

Of course you can also use these boards for more than just food photography. One thing I love to do is take everyday scenes that happen in our home and change up the backdrop. This allows me to share my vision and retell our story in a unique way. No fancy camera needed. Just your imagination, smart phone, and a backdrop for under $3.

IMG_3507

IMG_4283

If you found this post helpful, leave a comment and tell us how we did!

Please follow us and share!

Instagram


Banana Honey Walnut Toasts

IMG_2240

Although Ramadan ended over a month ago, we are still having a difficult time breaking some of our Ramadan schedule and habits. Not only do we still stay up pretty late (midnight is the norm for me), but we also eat like mice early in the morning because it feels strange to fill up right after we’ve woken up. With all the things we have going on in our life, we certainly can’t afford to skip out on the most important meal of the day so today I’m sharing a simple breakfast idea that’s sweet, crunchy, and filling. Banana sandwiches are something we grew up eating as a treat. My father would make it for us and share stories of his picky-eating days, growing up in Beirut, where all he would eat was bread and sugar to fill up. I guess you can’t really go wrong with bread and banana! Thankfully none of us turned out that picky but that doesn’t mean we can’t celebrate the product of my father’s resourcefulness 🙂

When I got married, I was introduced to a whole different world of foods I had never eaten. One of those things was geimar, a creamy Iraqi spread similar to clotted cream. It’s thick and rich in just the right way and it’s unsweetened which makes it the perfect base for a sandwich like this. We don’t eat it often but when my in-laws are in town we make sure to get our fill of geimar, samoon (Iraqi flatbread), and honey. When I photographed this recipe, I used sourdough toast that I had on hand but you can use any bread you like. If you desire more substance and less bread, you can cut the banana length wise and roll it up in a thin pita bread just like my dad used to do.

Ingredients
Quality artisan bread/toast
Salted butter or clotted cream
Banana
Honey
Walnuts

Note: You can use unsalted butter if you’d like but I find the saltiness works wonderfully with the sweetness of the honey and banana.

IMG_2245

Directions
Toast the bread of your choice and generously lather on some butter while it’s still a bit warm. Layer on banana slices and walnuts and then drizzle on some honey. Serve alongside a nice cup of piping hot tea.

IMG_2251

IMG_2253

If you liked this post please follow us and share!

Instagram


DIY Garden Lattice Light Fixture

IMG_3179

After finishing our crazy and exhausting 6-week bathroom renovation challenge in May, you would think we would wait just a littttle bit longer before DIYing again. But, nope. We just can’t help ourselves. It seems there is never a shortage of problems that need creative solutions and for us one of those problems has been the lack of adequate lighting in the living room. For the last four years we have made do with two lamps on our end tables and let’s just say, the amount of light they offered left much to be desired. Making our own light fixture has been a goal of ours and so we have been mulling ideas over for quite some time. All we knew was that we definitely wanted something that gave off rustic, jungalow, boho vibes. When I thought of inspiration that embodied these elements, my mind always went back to the same place: The lobby of a hotel in Philadelphia where I stayed for an anthropology conference.

IMG_6043

We also wanted something inexpensive; something we could make out of upcycled and thrifted materials. It didn’t take long for us to settle on the garden lattice sitting abandoned at the back of our garage. Not only did it give us the look we were going for but it also helped us solve another design problem: what to do with the overgrown arrowhead vine taking over the living room. And then, almost in what could only be described as divine intervention, something possessed my husband to stop at a garage sale where he found this set of 5 really cool Edison bulbs for $5 (normally they would go for around $7 a bulb). A few Home Depot trips later and we had settled on how to hang our new fixture. The funnest part of this whole process was seeing our random ideas become a reality. We are just so happy with the finished product and we love that it feels like a rustic garden in our living room. We like it so much, we just may consider putting another one up above the dining table 😉 Alrightie, here’s what you’ll need to make this fixture:

Supplies
Pressure Treated Lattice
(6) Ceiling Hooks – VersaHook
(10) Heavy Duty Cable Ties or Loop Wire and clamps*
(6) Metal Bolt – Everbilt 3/8 in. Eye Bolt with Nut
10 Vintage or LED Edison light bulbs
10 String Light socket
Faux Foliage

*Important: For safety purposes, make sure to use commercial cable ties with a tensile strength of at least 40 pounds or you risk the fixture falling down.

IMG_3170

Directions: 

  1. Cut the lattice to the desired size (we did 3ft wide by 5ft long) with a hand saw.
  2. On the lattice, choose 6 symmetrical points for hanging support and drill a hole for each. Secure the 3/8in eye bolts in each of the six holes.
  3. String the cable ties through the eye bolts and loop until completely secure. This is very important. You must not be able to open the loop or slide the tie back through the head.
  4. Measuring according to the location of the eye bolts on the lattice, drill 6 corresponding holes into the ceiling.
  5. Insert drywall anchors into the ceiling holes and secure the ceiling hooks by twisting.
  6. Just for a test run, install your fixture base by hanging the cable tie loops on the ceiling hooks. If everything looks good and sturdy then take it down and proceed with the next steps.
  7. Now for the fun part! Weave your string light sockets through the lattice and secure the wire in place with the remaining cable ties (you can use more if you like).
  8. Decorate your light fixture by arranging your faux foliage around the lattice either by weaving the stems through the lattice or using glue or a staple gun for a more permanent fix. Make sure to place the foliage a good distance away from the light bulbs or they can burn.
  9. Install your completed fixture by hanging the cable tie loops on the ceiling hooks.
  10. Finally, screw in your Edison bulbs, plug in the light, and enjoy the beautiful view!


IMG_3164

IMG_3171

With the lattice and the Edison bulbs as the base, you can customize this fixture for any home decor style with just a coat of paint and greenery of your choice. You can hang flower stems, eucalyptus, lavender, air plants, etc… The creative possibilities are endless. If you do attempt to make this, be sure to share and tag us so we can see 🙂

If you liked this post please follow us and share!

Instagram