Simple California Sushi Bowls

We LOVE sushi. What we don’t love, however, are all the dangerous ingredients hidden in restaurant-made sushi. The artificial colors in the surimi, the alcohol  and high-fructose corn syrup in the unagi, the MSG in the soy sauce. Many think of sushi as a healthy option but when you break it down, it becomes clear that these ingredients are far from clean and healthy. So what’s a sushi lover with little time to do? Make homemade sushi bowls of course!

IMG_7063

As you know, both my husband and I are in graduate school so the less time we can spend to have a filling and healthy meal on the table, the better! While I enjoy making sushi rolls every once in a while, I really don’t have time for it with my schedule. This is why I’ve been working on meal plans with little time investment but big impact. With a little bit of preparation, this meal can easily come together in under 30 minutes. 20 minutes for the rice to cook and cool while you cut up the vegetables and make the crab salad. That is it! For the crab salad, we use a surimi that is made from Alaska pollock and is free of alcohol, artificial colors, and phosphates. You can make this recipe even healthier by substituting the sushi rice with brown rice or cauliflower rice and using a larger variety of vegetable toppings including carrots and daikon. Either way you’ll have one amazing bowl packed with all the flavor of a California roll for a fraction of the cost and in no time at all!

IMG_7022

Simple California Sushi Bowls

  • Difficulty: Easy
  • Print

Ingredients
2 cups sushi rice (subsitute brown rice or cauliflower rice)
2 cups cold water
2 tablespoons rice vinegar
1 tablespoon sugar
1/2 tablespoon salt
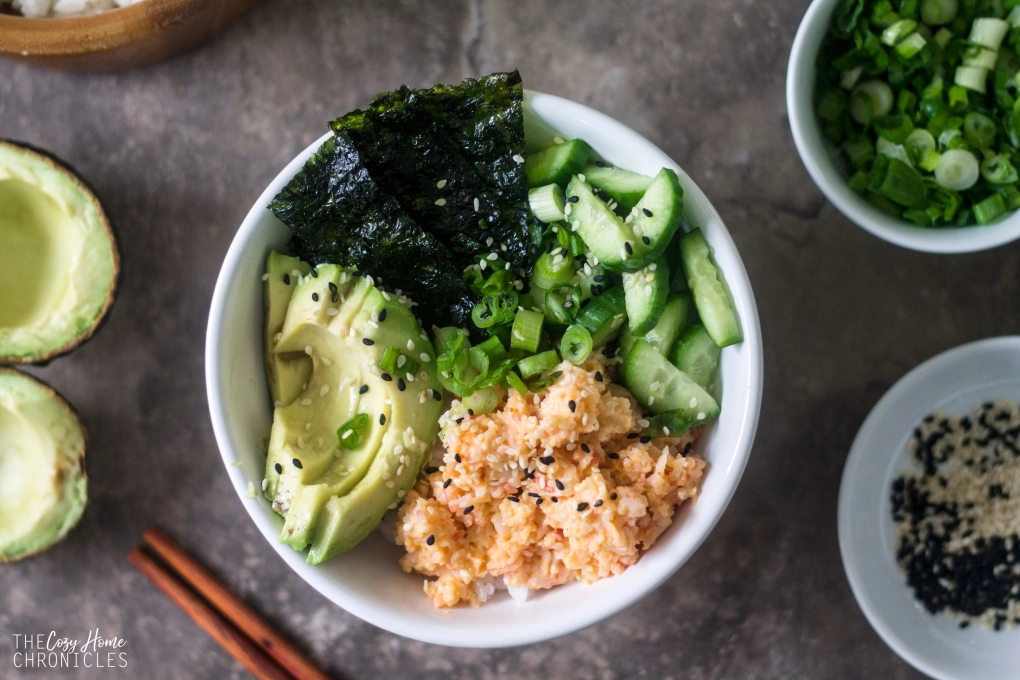
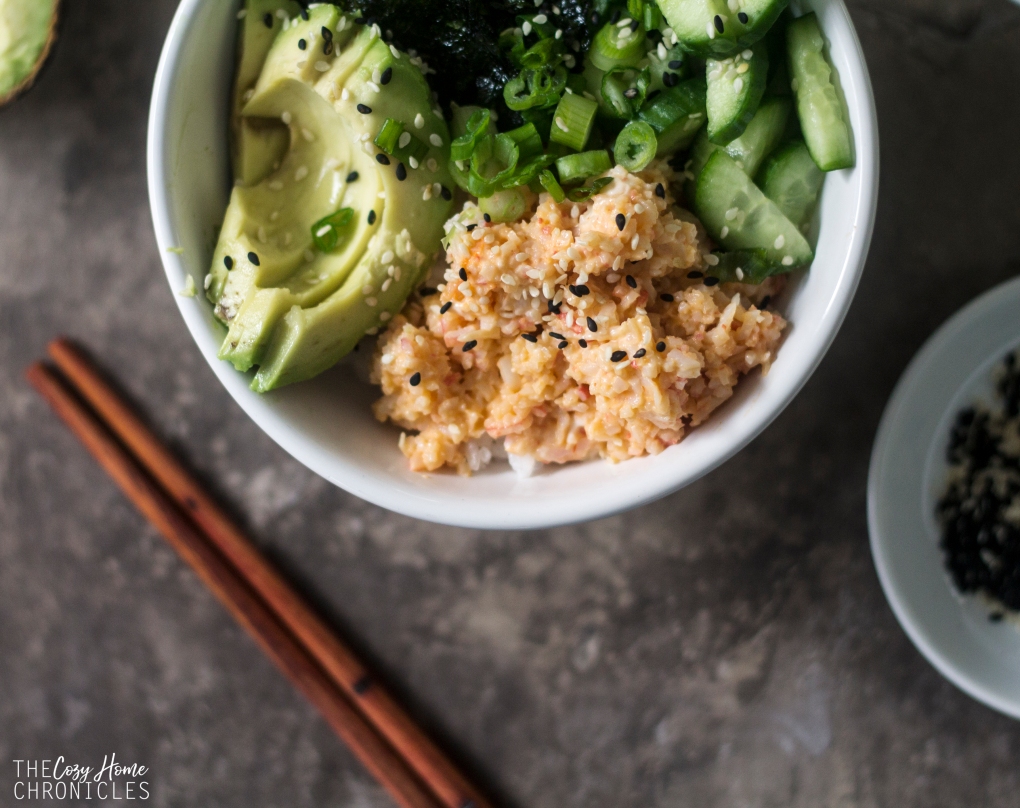
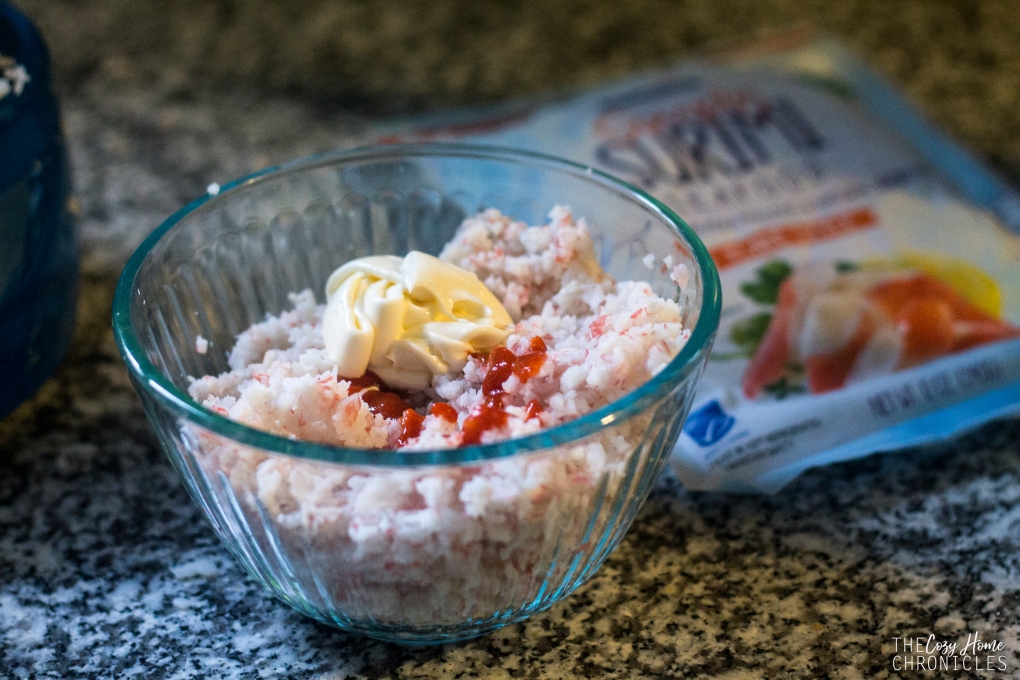
12 oz. flake style surimi (we use Simply Surimi)
2 tablespoons mayonnaise (more if you like it creamier)
1 teaspoon Sriracha (more if you like it spicier)
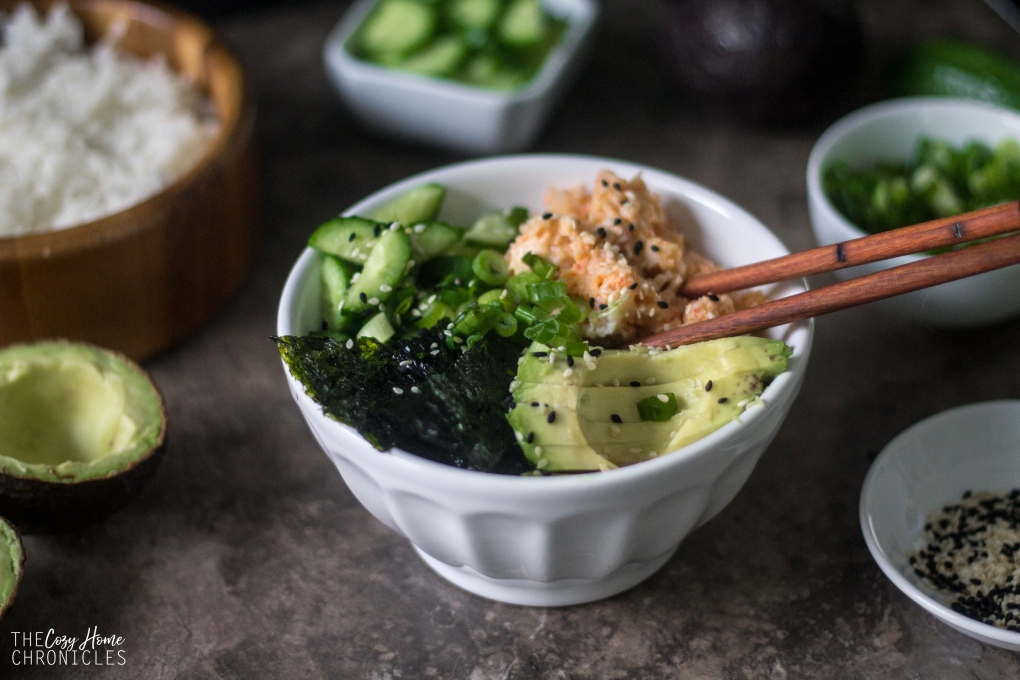
Toppings
Cucumbers
Avocado
Scallions
Sesame Seeds
Nori

Note: This recipe makes between 4-6 sushi bowl servings depending on how big your serving size is. If you’re an individual making this recipe, it is enough to have you covered for a week of lunches. If you’re a family of four, it will take care of one meal time.

Directions

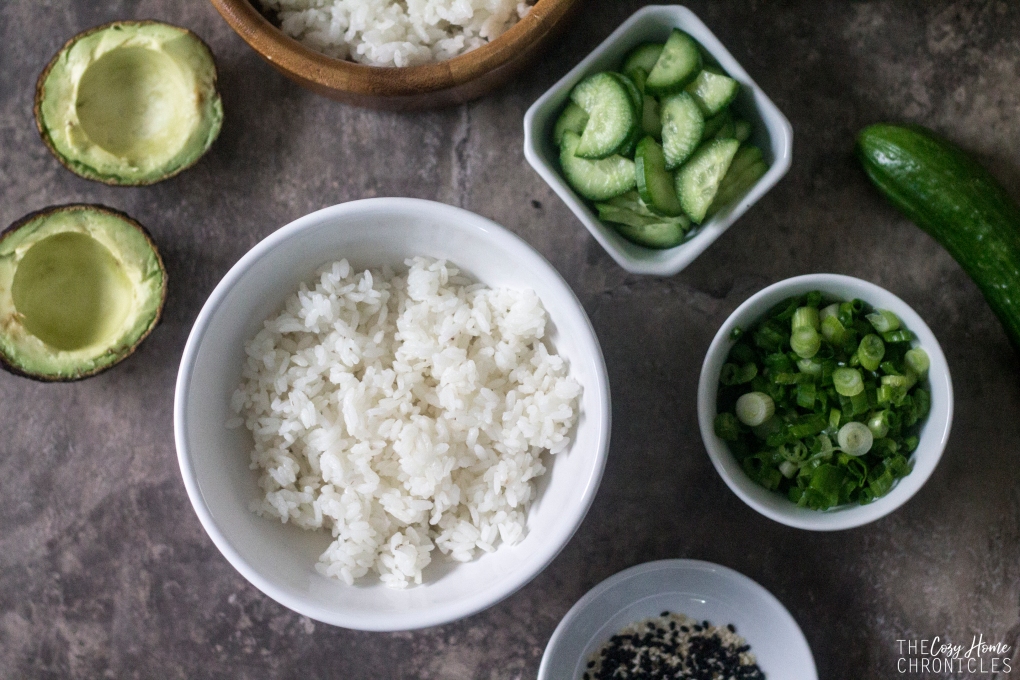
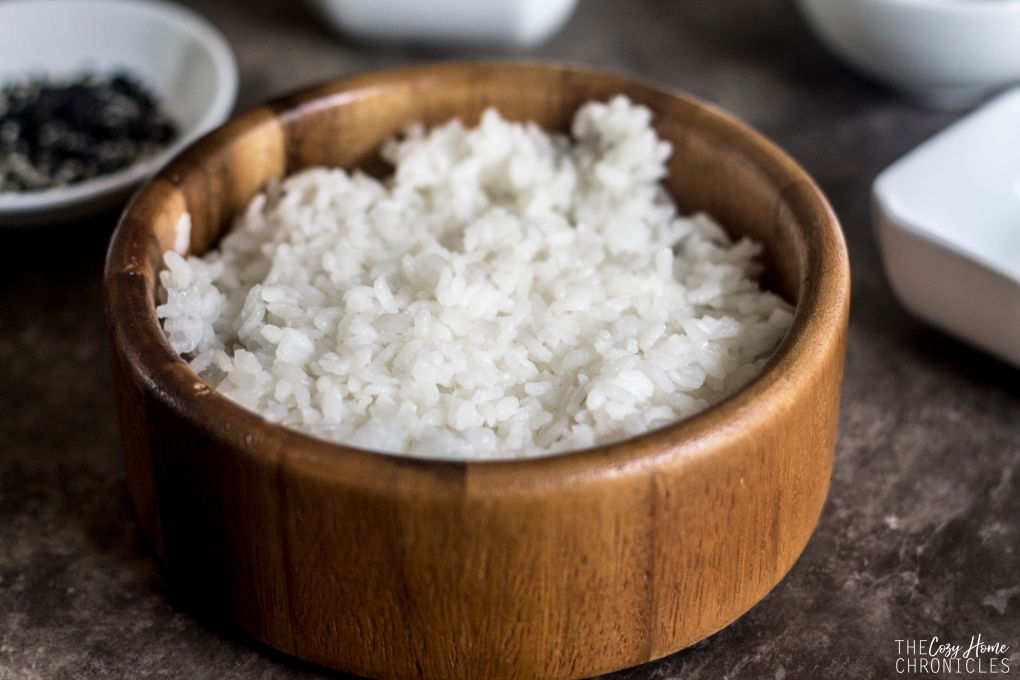
  1. Prepare your sushi rice by rinsing the rice in a bowl under cold water until the water becomes clear (about 3 times).
  2. In a medium saucepan bring the rice and 2 cups of water to a boil, then reduce the heat to low and cover. Cook for 15 minutes then remove from the heat and let stand for 5 minutes while you prepare the vinegar and sugar mix.
  3. While the rice is cooking you can dice your toppings and prepare the crab salad as outlined in step 6.
  4. Combine rice vinegar, sugar, and salt in a small bowl then pop it in the microwave for 30 seconds.
  5. Transfer the rice to a large wooden or glass bowl and add the vinegar mixture, folding gently to coat the grains. The rice is now ready for assembling the sushi bowls.
  6. In a food processor, pulse the surimi until you get a shredded texture. Then pour into a mixing bowl and add the mayo and Sriracha. Adjust to the level creaminess and heat depending on your taste.
  7. Assemble your sushi bowls by layering the sushi rice base and topping with the crab salad, nori, cucumbers, avocado, scallions, and sesame seeds. Serve alongside spicy mayo and soy sauce.

IMG_7002

IMG_7011

IMG_7053

IMG_7062

If you liked this post please follow us and share!

Instagram

signature3


Tomato Parsley Rice Soup

IMG_5288

With colder weather finally on the horizon, I thought it would be a perfect time to share one of our favorite soup recipes. I wasn’t much into soup as a kid because I didn’t think it was a legit meal but this one always filled me up. I remember actually being happy coming home to see my dad standing over a large bubbling pot of his famous Tomato Parsley Rice soup. It’s the same look my husband gives when he comes home and sees it simmering on our stovetop. Pure joy. Because who doesn’t love a warm, hearty soup? The wonderful thing about this soup is that it is super easy to make with just a few simple ingredients you probably already have on hand. Although I call this recipe a tomato soup, it’s not so heavy on the tomato; the tomato paste is more for a bit of color. The real flavor lies in the broth; in the sweetness of the onion and richness of the beef. If you’re not into the meat scene, you can easily make this vegan by leaving the meat out and replacing the broth with a vegetable stock or tomato soup. I’ve made this meal countless times with a tomato soup base and it was a perfectly delicious, healthy, and filling alternative.

IMG_5809

Lately, I’ve been experimenting with boiling meat in advance and storing it with its broth in the freezer and I can happily report that it has not changed the quality of the meat. As long as you boil the meat until it’s tender you can have the base of a great stew or soup at the tip of your fingers. Simply defrost and add whatever flavoring, grains, and vegetables you like and you’ll have dinner ready in no time! This has been a huge time saver for me while my husband and I both navigate graduate school and homekeeping.

IMG_5814

Tomato Parsley Rice Soup

  • Difficulty: Easy
  • Print

Ingredients:
1 pound beef stew cubes
1 medium yellow onion, finely diced
1 large bunch parsley, chopped (plus extra for garnish)
1/4 cup uncooked rice ( I prefer long grain like basmati)
2 dry bay leaves
2 tablespoons tomato paste (more if you like it a deeper red)
8 cups water/vegetable/beef stock
2 tablespoons fresh lemon juice (more if you like it tangier)
olive oil
salt and pepper to taste

Directions:

  1. In a large pot, drizzle a bit of olive oil and brown the beef stew cubes and sauté the onions until translucent.
  2. Add your bay leaves and water/vegetable/beef stock and bring to a boil before reducing the heat. Be sure to skim any impurities that rise to the surface. Then cover and cook on a low simmer until the meat is tender (about 2 hours).
  3. Once your meat is tender, fish it out and shred it with a fork.
  4. To the broth, add in your rice, lemon juice, and tomato paste. Give it a quick stir and let it cook until the rice is tender (about 15-20 minutes). Stir in your shredded beef.
  5. Season with salt and pepper to your taste. Take the pot off the heat and add in the parsley, give it a gentle stir and let it sit for a few minutes before serving.
  6. Ladle into bowls, garnish with extra parsley and serve with a side of fresh crusty bread.

IMG_5820

IMG_5356

IMG_5840

If you do give this soup  recipe a try be sure to share with us. We love seeing our recipes on your table 🙂 And as always, if you liked this post please follow us and share!

signature3


Chickpea soup with tomato pickle salsa (Hummus M’Sabaha)

Ever since I purchased an Inkwell Press Meal Planner back in January and forced myself to commit to meal planning, we have been pretty consistent about practicing Meatless Mondays. Having a set genre for each day has really helped narrow down the selection for the menu, which is something I had a hard time doing prior because I enjoy making many different things. Today I’m sharing one of our favorite meatless dishes that’s nutritious and simple to make. It’s very similar to another Lebanese dish called foul and hummus except it’s without the foul or fava beans. Foul and hummus is usually eaten for breakfast and while I enjoy it now, I used to HATE it growing up. It was just too heavy for me and it wasn’t nachos or pizza so I was understandably upset when I could smell the distinctive aroma of garlic and fava beans wafting through the air. My father, the negotiator that he is, would allow me to leave out the fava beans as long as I ate everything else and that’s how my love for this dish of hummus m’sabaha blossomed. Traditional Lebanese hummus m’sabaha is much thicker and creamier than what I show here. Usually it’s roughly mashed and a little bit of tahini is added for creaminess. This spin on my childhood favorite is like a mix of hummus m’sabaha and lablabi, a Tunisian chickpea soup. We personally enjoy the combination of the light lemony, garlicky broth with the texture of whole chickpeas.  And speaking of broth, please don’t use canned chickpeas. Technically you can but if you do make sure to drain the chickpeas well and simmer them in a vegetable stock or bone broth. Starting with dried chickpeas is essential for getting flavorful chickpea broth that is not a metallic tasting goop.

IMG_3682

I always soak the dried chickpeas on Sunday evening and boil them first thing on Monday morning. My recipe calls for two cups because that’s what I soak but we don’t necessarily eat all two cups unless I planned to eat leftovers the next day {usually we don’t because it’s Taco Tuesday ;)}. Whatever I don’t use I will freeze for a rainy day. I grew up learning to cook from my father who never measured ingredients so I’m still working on how best to write and share these family recipes. Anyways, I hope you enjoy this as much as we do!

IMG_3708

IMG_3661

Chickpea soup with tomato pickle salsa (Hummus M'Sabaha)

  • Difficulty: Easy
  • Print

Ingredients
2 cups dried chickpeas
1 teaspoon baking soda
10-12 cups water
2-4 garlic cloves, minced*
1/2-1 cup lemon juice*
high quality extra virgin olive oil to drizzle
salt & pepper to taste

Salsa:
1 cup diced Lebanese pickled cucumbers
2 cups diced tomatoes
1/4 cup of fresh mint, chopped
1/4 cup of fresh parsley, chopped

To serve:
Radishes
Lebanese pickled cucumbers
Sweet onion, sliced
Pita bread
Lemon
Fresh herbs like mint and parsley

*Note: If you’re not afraid of flavor, you might consider adding more garlic and lemon juice.

Directions

  1. In a large bowl, add your chickpeas and baking soda and cover with water. Let the chickpeas soak overnight or for at least 8 hours.
  2. Drain and rinse your chickpeas and cover with 10-12 cups fresh water in a lidded pot. Bring to a boil then let simmer covered for 30-45 minutes or until tender.
  3. Using a mortar and pestle, mince your garlic cloves with salt until you have a smooth paste.
  4. In the meantime make your salsa by combining diced tomatoes, diced pickles, chopped mint, and chopped parsley.
  5. Once the chickpeas are tender, add in your garlic paste, salt, pepper, and lemon juice. You can use your pestle to give some of the chickpeas a quick mash for thickness if you desire. Let simmer for another 10 minutes then adjust seasoning to your taste.
  6. Ladle into individual bowls, drizzle with olive oil generously and top with sweet onions and salsa. Serve with fresh pita bread and garnishments of your choice.

IMG_3689

IMG_3739

Instagram


Lebanese Stuffed Eggplants (Sheikh al-Mahshi)

img_7052

Growing up in a Lebanese household meant that eggplant was no stranger to the dinner table. One of my favorite eggplant dishes was (and still is) Sheikh-al Mahshi; a Lebanese casserole made of golden fried eggplants topped with spiced beef or lamb and cooked in a light tomato sauce. My father, who loved to cook for us, would make this dish using large purple eggplant slices for the base, tender filet mignon chunks and Lebanese pine nuts for the topping, and fresh homemade tomato sauce. Delicious is an understatement.

A few months ago, I was at a local market when I came across these large 11-pound boxes of assorted baby eggplant for only $3. It was a total steal and I ended up taking a box home with me to experiment with the other colorful eggplant varieties. Although I ended up blanching and freezing many of them for a rainy day, I decided to recreate my father’s recipe using baby eggplants for dinner one night. I have always found the Lebanese dishes I grew up with simple to make but with graduate school and a household to tend to, any shortcut that doesn’t jeopardize taste is definitely welcome. While I prefer the taste of homemade tomato sauce, having a quality canned sauce on hand can really speed things up. Cooking with ground beef also saves you the hassle of having to prepare and cut your meat. Some of my modifications, however, are not just to save time but to make the recipe a teeny bit healthier. Instead of deep-frying the eggplants to soften them, I blanched them and then browned the skins in a bit of olive oil. The only issue was that I found the skins of the yellow eggplant variety too thick to eat. I personally would not use them again in a recipe like this even though the flesh had a very nice flavor. With that being said, this version was a huge hit with the family and we hope you’ll consider adding this simple, healthy dish to your recipe box.

img_6981

Lebanese Stuffed Eggplants (Sheikh al-Mahshi)

  • Difficulty: Easy
  • Print

Ingredients

10-12 baby eggplant
1 lb lean ground beef
1 medium yellow onion, diced
1/4 cup pine nuts
1 15 oz can of tomato sauce (we use Simple Truth)
1 teaspoon ground cinnamon
1 teaspoon ground all-spice
1/2 cup chopped parsley
Extra virgin olive oil
salt and pepper (to taste)

Directions

  1. Preheat oven to 350F. Rinse the eggplants and trim the stems, leaving the hulls.
  2. Bring a large pot of water to boil and blanche the eggplants whole for 8-10 minutes until tender. In the meantime, toast the pine nuts until golden and set aside.
  3. Once the eggplants have cooled, gently make an incision from the hull to the bottom of the eggplant.
  4. OPTIONAL: Drizzle a bit of oil in a deep pan and brown the blanched eggplants in batches for 2-5 minutes then set aside (see step 7).
  5. Drizzle a bit of oil in a deep pan and sauté the diced onions until translucent.
  6. Add in the ground beef, cinnamon, all-spice, salt, and pepper and cook until meat is well done.
  7. Ladle a few spoons of tomato sauce into the bottom of a glass baking dish and lay the eggplants slit side up.
  8. Spoon the spiced meat mixture into each eggplant and cover with the remaining tomato sauce. Top with half of the toasted pine nuts and half of the chopped parsley.
  9. Cover your baking dish and bake in the oven for 30 minutes until the sauce is simmering.
  10. To serve, garnish with remaining pine nuts and parsley next to a bed of steaming vermicelli rice.

Note: If you end up with extra meat, just spoon the remainder evenly on the top of the sauce before baking.

img_6997

img_6998

img_7009

img_7027

If you liked this post please follow us and share!

Instagram