Keeping it Cozy: Simple ways to add warmth to your home

With Halloween behind us and Thanksgiving ahead, we are inevitably inching closer to the end of the year and to even colder weather (brrrr… just the thought makes us cold). The good news, however, is that there are a few simple ways to kick the coziness factor of your home up a few notches and I’ll be sharing them with you in this post. It really doesn’t take much to make a space inviting and cozy. No matter what your style is, if you can envision yourself curling up with a good book or good company and forget all your troubles then you’re doing something right. The fall and winter seasons makes this more of necessity because there’s less going out and more staying in. The last thing you want is to be sitting in is an uninspiring space all winter. Plus with the many holidays around the corner, you’ll definitely want a welcoming space where your family can gather. Here are just a few ideas that you can implement today:

Bring out the throws. Nothing says warmth like a soft, fluffy throw. A throw hanging out on your sofa is a nice invitation to relax and feel right at home after a long busy day.

IMG_6342

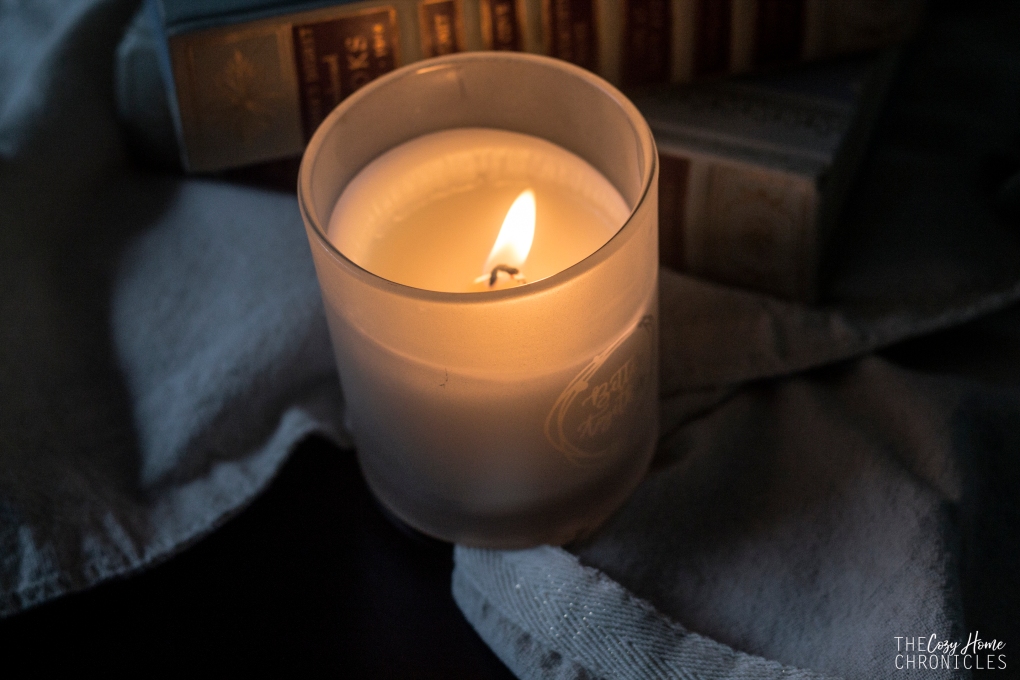
Light it up.  Candles and string lights add a warm, cozy glow to any space especially when it’s cold outside. Furthermore, the scent of your home can really make or break the mood. Try burning or diffusing fragrances that are meaningful to you. Some of our favorites include cotton, balsam fir, orange, and vanilla.
IMG_6373
IMG_6345

Warm drinks at the ready. Whether you’re a coffee or tea or hot cocoa drinker, having a tray or cart set up for an evening sip-a-thon will transform your space from cozy to COZY. I mean, who doesn’t dream of relaxing in their home with a warm mug of their favorite beverage in hand?
IMG_6419

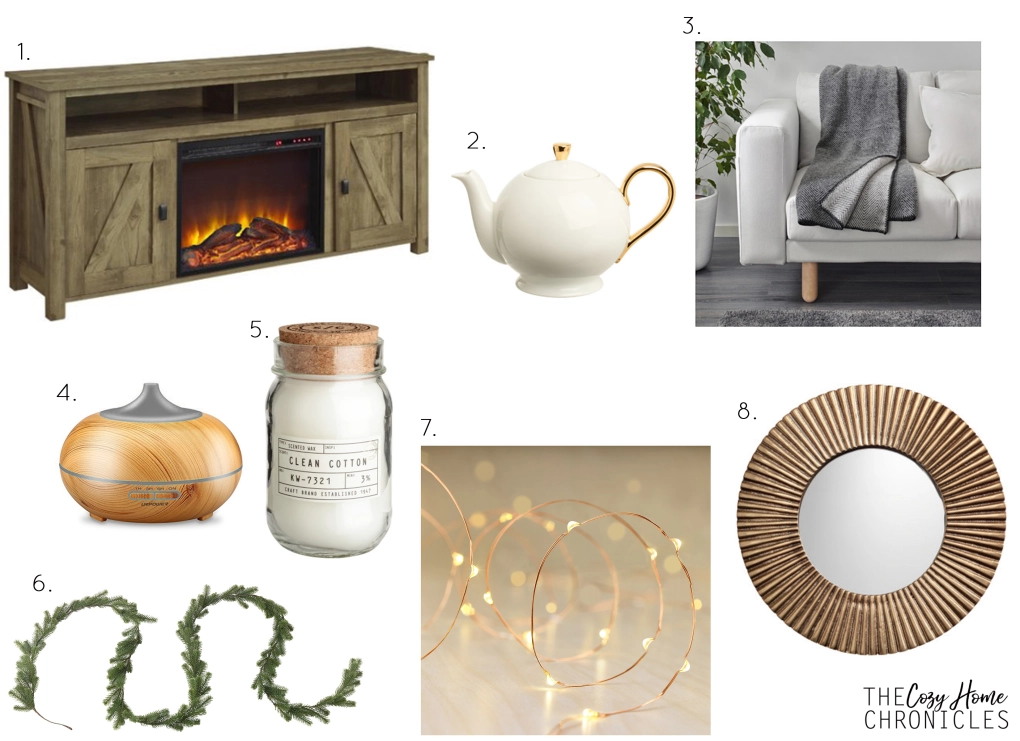
As you can see, I’ve been thinking quite a bit about how we can make our home a little cozier for the winter. During my browsing adventures, I came across many home decor items that I found both beautiful and cozy so I put them all in a mood board for you  with sources included. For now, my plan is to add winter greenery with some fairy lighting but our living room always feels cooler in the winter even with the heat on so I thought it would be nice to have a TV stand with fireplace. One can dream, am I right? Anyways, I hope you find inspiration in our little collection and in our simple tips for making your space cozy for this winter season.

Keep it Cozy Post

Sources: 1. Wayfair | 2. H&M Home | 3. IKEA | 4. Amazon | 5. H&M Home | 6. IKEA | 7. Target | 8. H&M Home

What are some ways you like to make your space cozy for the changing seasons? Tell us in the comments below and as always, if you liked this post please follow us and share!

Instagram

signature3


IKEA Hack: DIY Rustic Bread Tin Box

img_9537

We eat A LOT of bread… possibly too much of it but we are hobbits so that’s probably not going to change anytime soon. Although we finished renovating our kitchen this past May, there is still some work to be done in terms of organizing and decorating. One of the things that needed to get checked off of our to-do list was finding a way to preserve and store our leftover bread. When we searched for bread storage online, we immediately fell in love with the charm of those rustic farmhouse bread tins. Of course it would have been easy to click purchase and have one delivered straight to our doorstep for $45 but where’s the fun in that? Instead we took our time getting ideas until we came up with an easy DIY bread tin. Not only is it way cheaper than any bread tin you’ll find in store but it’s super easy to make and customizable too. IKEA has two different tin options that you can use for this project and both are under $15. 

The Beromlig that we settled on came with two sizes for $8.99 and we used the larger one to make the bread tin box (we will probably turn the smaller one into a cookie tin). That’s a steal considering simple tins like the one pictured below on wayfair.com are going for $26.99 at sale price. Besides the choice of tin, you also have the option to pick any font you want. We went for a classic look with “Old School Alphabet” stencils that we found at a local Michaels. Lastly, you’ll need to settle on an ink color from the many pretty shades that are out there. Why permanent marker you ask? Well we did try acrylic paint and it peeled off too easily. Although permanent marker can come off with rubbing alcohol (we checked!), it does not come off with a gentle wiping using a wet cloth. I suppose you can use spray paint or some other fancy medium but for a simple and inexpensive home decor item,a  good old Sharpie will do the trick. Alright, let’s get started!custom_imageMaterials
Beromlig Storage Tin
 or Hemsmak
Letter stencils
Permanent marker
Washi or painter’s tape

img_9524-copy

Directions

1. Wipe the inside and outside of the tin clean with a damp cloth and dry thoroughly.
2. Arrange and level your letters on the tin and tape them in place using washi or painter’s tape.
3. Fill in the letters with any color permanent ink you choose.
4. Let dry for 10 minutes before removing the stencils.
5. Find a happy place for your bread box and fill with delicious breads 🙂

img_9485

img_9497-copy

img_9527

img_9515-1

What projects and adventures are you working on right now? Please join the conversation below in our comment section, we would love to hear from you!

If you liked this post please follow us and share!

Instagram


Lebanese Stuffed Eggplants (Sheikh al-Mahshi)

img_7052

Growing up in a Lebanese household meant that eggplant was no stranger to the dinner table. One of my favorite eggplant dishes was (and still is) Sheikh-al Mahshi; a Lebanese casserole made of golden fried eggplants topped with spiced beef or lamb and cooked in a light tomato sauce. My father, who loved to cook for us, would make this dish using large purple eggplant slices for the base, tender filet mignon chunks and Lebanese pine nuts for the topping, and fresh homemade tomato sauce. Delicious is an understatement.

A few months ago, I was at a local market when I came across these large 11-pound boxes of assorted baby eggplant for only $3. It was a total steal and I ended up taking a box home with me to experiment with the other colorful eggplant varieties. Although I ended up blanching and freezing many of them for a rainy day, I decided to recreate my father’s recipe using baby eggplants for dinner one night. I have always found the Lebanese dishes I grew up with simple to make but with graduate school and a household to tend to, any shortcut that doesn’t jeopardize taste is definitely welcome. While I prefer the taste of homemade tomato sauce, having a quality canned sauce on hand can really speed things up. Cooking with ground beef also saves you the hassle of having to prepare and cut your meat. Some of my modifications, however, are not just to save time but to make the recipe a teeny bit healthier. Instead of deep-frying the eggplants to soften them, I blanched them and then browned the skins in a bit of olive oil. The only issue was that I found the skins of the yellow eggplant variety too thick to eat. I personally would not use them again in a recipe like this even though the flesh had a very nice flavor. With that being said, this version was a huge hit with the family and we hope you’ll consider adding this simple, healthy dish to your recipe box.

img_6981

Lebanese Stuffed Eggplants (Sheikh al-Mahshi)

  • Difficulty: Easy
  • Print

Ingredients

10-12 baby eggplant
1 lb lean ground beef
1 medium yellow onion, diced
1/4 cup pine nuts
1 15 oz can of tomato sauce (we use Simple Truth)
1 teaspoon ground cinnamon
1 teaspoon ground all-spice
1/2 cup chopped parsley
Extra virgin olive oil
salt and pepper (to taste)

Directions

  1. Preheat oven to 350F. Rinse the eggplants and trim the stems, leaving the hulls.
  2. Bring a large pot of water to boil and blanche the eggplants whole for 8-10 minutes until tender. In the meantime, toast the pine nuts until golden and set aside.
  3. Once the eggplants have cooled, gently make an incision from the hull to the bottom of the eggplant.
  4. OPTIONAL: Drizzle a bit of oil in a deep pan and brown the blanched eggplants in batches for 2-5 minutes then set aside (see step 7).
  5. Drizzle a bit of oil in a deep pan and sauté the diced onions until translucent.
  6. Add in the ground beef, cinnamon, all-spice, salt, and pepper and cook until meat is well done.
  7. Ladle a few spoons of tomato sauce into the bottom of a glass baking dish and lay the eggplants slit side up.
  8. Spoon the spiced meat mixture into each eggplant and cover with the remaining tomato sauce. Top with half of the toasted pine nuts and half of the chopped parsley.
  9. Cover your baking dish and bake in the oven for 30 minutes until the sauce is simmering.
  10. To serve, garnish with remaining pine nuts and parsley next to a bed of steaming vermicelli rice.

Note: If you end up with extra meat, just spoon the remainder evenly on the top of the sauce before baking.

img_6997

img_6998

img_7009

img_7027

If you liked this post please follow us and share!

Instagram


DIY Rustic Wooden Shelving

img_7585

This post is a detailed DIY tutorial for building reasonably-priced, open shelving using a combination of components from IKEA and Home Depot like the one we had in our updated kitchen. Initially, we were going to purchase the IKEA EKBY shelf system but they only had black, white and aluminum options for the actual shelf. Since we wanted to have rustic, woody elements to break up the modern features of our kitchen, we opted to use the EKBY brackets (which you can buy separately) with wood that fit our style and design. If you are wondering why I chose these lumber pieces specifically it is also because they are the perfect width and fit for the EKBY brackets.

The cost of IKEA EKBY shelving varies based on sizing with the standard 31″ shelf costing $19.99 and the larger 46″ shelf costing $29.99. Because we needed a total of 6 standard shelves, that would have put us at around $200 for both the brackets and the shelves. Instead, I was able to purchase eight, 10ft pressure-treated lumbers and cut them to my specifications for a total of $60. With the 6 bracket sets that put us at under $130 for all of our shelves so we saved over $60 in the process. Not only are these versions cheaper to make but you can build and install these shelves in 5 easy steps and without sacrificing on wood preference. Let’s get started, shall we?

Supplies
IKEA Shelf – EKBY BJÄRNUM (two available sizes, 7.5″ at $7 and 11″ at $10)
Home Depot WeatherShield – Pressure Treated Lumber (5/4 x 6 – 10ft at $7.47)
Drywall Anchors & Screws (10 1/2″ – 70 Pack $11.98)

Tools
Saw
Drill
Screw Driver
Small Level
Drywall Anchors
Measure Tape

Directions

1. Measure your space to determine the desired length of your shelves taking into account that the brackets will add about 1/2 inch total to the length.

2. Cut your lumber accordingly and fit them into the brackets to complete the shelf unit. To build one shelf, you will need two pieces of lumber for each pair of brackets.

3. Have someone hold the completed shelf up to the wall while you mark the points where you will install the shelves corresponding to the holes in the EKBY brackets.
CAUTION: Before you mark the holes or drill through them, lay a level on the shelf to make sure it is straight.

4. Proceed to drill through the markings and place drywall anchors into these holes.

5. Have a helper hold up the shelf  again while you fasten it to the wall using screws and a screw driver or drill.

img_1116

img_0928

img_1117

img_0930

img_0931

img_1128

If you liked this post please follow us and share!

Instagram