DIY Fall Harvest Wreath

IMG_5649

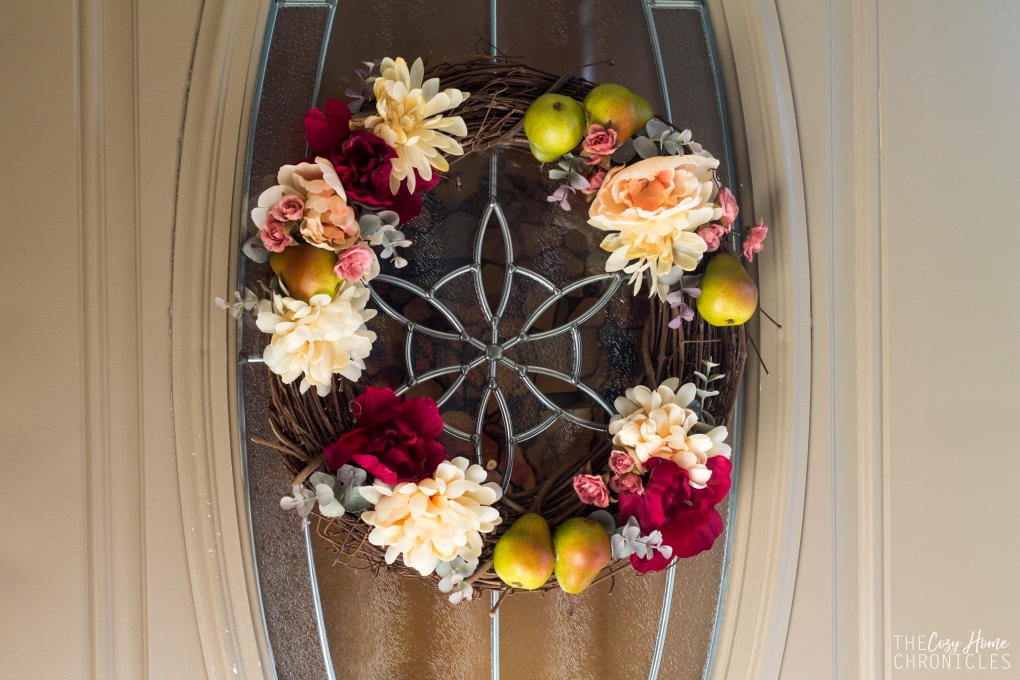
How is it already October?! In less than one month our daughter (aka Hobbit #2) will be turning one years old and we are feeling all the feels 😦 It doesn’t help that our days are filled with schoolwork and housework, with little time for much else. However, that doesn’t mean we can’t find a way to usher in one of our favorite seasons. As you’ve probably gleaned from our autumn tablescape post, we are really digging the more muted and subtle fall colors (think burgundy, peaches, grayish greens) and I really wanted to celebrate those colors in the form of a welcoming wreath. Between Michaels, Target, and Dollar Tree, I found all the elements that perfectly captured the look I was going for. I dare even say, “I nailed it.” My sister-in-law found it hard to believe that something so pretty could be made from Dollar Tree florals but it can and for well under $10 and 30 minutes too. So if you’re looking for ways to make a beautiful autumn statement but are tight on time and money then this is the perfect project for you 🙂 If you want to see how it’s made then you’re in luck because tomorrow I’ll be collaborating with the CraftBox Girls to bring you a live tutorial at 12 pm EST.  Be sure to tune in, say hello, and get some crafting inspiration 🙂

Supplies
18′ Grapevine Wreath ($3)
Faux Florals ($5)
Faux Pears ($5)
Eucalyptus ($3)
Hot glue gun & glue sticks

Total Cost: $16 + tax

IMG_5627

Pro tip: Don’t forget to use the Michaels app for coupons. I always use my coupon to save 40% off any regular priced item. With the supplies that I purchased, I was able to make 2 wreathes for the price of 1 putting the total cost per wreath at under $10.

IMG_5609

Directions:

  1. Collect your florals, eucalyptus, and faux fruit and start placing them around your grapevine wreath until you are happy with the arrangement. You might have to move things around several times to get the desired look.
  2. Once you have settled on your design, you will need to glue each piece in place using a generous amount of hot glue, embedding the stem deep into the vine, and holding down for 20-25 seconds until firmly in place.
  3. Once all the pieces have been glued down and any excess strands of glue have been removed, you can hang your wreath on a hook or door wreath hanger.

IMG_5681

IMG_5669

IMG_5674

IMG_5672

Share your autumn stories with us below and if you liked this post please follow us and share!

Instagram


DIY Garden Lattice Light Fixture

IMG_3179

After finishing our crazy and exhausting 6-week bathroom renovation challenge in May, you would think we would wait just a littttle bit longer before DIYing again. But, nope. We just can’t help ourselves. It seems there is never a shortage of problems that need creative solutions and for us one of those problems has been the lack of adequate lighting in the living room. For the last four years we have made do with two lamps on our end tables and let’s just say, the amount of light they offered left much to be desired. Making our own light fixture has been a goal of ours and so we have been mulling ideas over for quite some time. All we knew was that we definitely wanted something that gave off rustic, jungalow, boho vibes. When I thought of inspiration that embodied these elements, my mind always went back to the same place: The lobby of a hotel in Philadelphia where I stayed for an anthropology conference.

IMG_6043

We also wanted something inexpensive; something we could make out of upcycled and thrifted materials. It didn’t take long for us to settle on the garden lattice sitting abandoned at the back of our garage. Not only did it give us the look we were going for but it also helped us solve another design problem: what to do with the overgrown arrowhead vine taking over the living room. And then, almost in what could only be described as divine intervention, something possessed my husband to stop at a garage sale where he found this set of 5 really cool Edison bulbs for $5 (normally they would go for around $7 a bulb). A few Home Depot trips later and we had settled on how to hang our new fixture. The funnest part of this whole process was seeing our random ideas become a reality. We are just so happy with the finished product and we love that it feels like a rustic garden in our living room. We like it so much, we just may consider putting another one up above the dining table 😉 Alrightie, here’s what you’ll need to make this fixture:

Supplies
Pressure Treated Lattice
(6) Ceiling Hooks – VersaHook
(10) Heavy Duty Cable Ties or Loop Wire and clamps*
(6) Metal Bolt – Everbilt 3/8 in. Eye Bolt with Nut
10 Vintage or LED Edison light bulbs
10 String Light socket
Faux Foliage

*Important: For safety purposes, make sure to use commercial cable ties with a tensile strength of at least 40 pounds or you risk the fixture falling down.

IMG_3170

Directions: 

  1. Cut the lattice to the desired size (we did 3ft wide by 5ft long) with a hand saw.
  2. On the lattice, choose 6 symmetrical points for hanging support and drill a hole for each. Secure the 3/8in eye bolts in each of the six holes.
  3. String the cable ties through the eye bolts and loop until completely secure. This is very important. You must not be able to open the loop or slide the tie back through the head.
  4. Measuring according to the location of the eye bolts on the lattice, drill 6 corresponding holes into the ceiling.
  5. Insert drywall anchors into the ceiling holes and secure the ceiling hooks by twisting.
  6. Just for a test run, install your fixture base by hanging the cable tie loops on the ceiling hooks. If everything looks good and sturdy then take it down and proceed with the next steps.
  7. Now for the fun part! Weave your string light sockets through the lattice and secure the wire in place with the remaining cable ties (you can use more if you like).
  8. Decorate your light fixture by arranging your faux foliage around the lattice either by weaving the stems through the lattice or using glue or a staple gun for a more permanent fix. Make sure to place the foliage a good distance away from the light bulbs or they can burn.
  9. Install your completed fixture by hanging the cable tie loops on the ceiling hooks.
  10. Finally, screw in your Edison bulbs, plug in the light, and enjoy the beautiful view!


IMG_3164

IMG_3171

With the lattice and the Edison bulbs as the base, you can customize this fixture for any home decor style with just a coat of paint and greenery of your choice. You can hang flower stems, eucalyptus, lavender, air plants, etc… The creative possibilities are endless. If you do attempt to make this, be sure to share and tag us so we can see 🙂

If you liked this post please follow us and share!

Instagram


Laundry Room Remodel with IKEA’s Algot System

As you may be well aware of, maintaining a home requires not only constant work but some level of organization in order to cultivate a sense of peace and stability. Sometimes organization can be found through specific practices such as meal planning or journaling, other times it can be found in the design of a space that maximizes storage and efficiency. In our home we try to maintain a happy balance between both practice and design. Before having children, doing laundry was manageable because we could fold and put our clothes away in our bedroom without any interruptions. Now with two little ones, we can’t afford to bring the laundry up to fold unless we want our clothes scattered all over the main floor. We found that even though we had scheduled days for doing specific loads, our laundry room was just not equipped to deal with us sorting, folding, hanging, and ironing our clothing in one space. There was no counter-space to fold and no shelving to store laundry baskets and cleaning supplies. Something had to be done!

Here’s what our laundry room looked like before:

IMG_9673

IMG_9682

IMG_9680

IMG_9678

When we first bought our house, there was virtually no laundry room. There was just an old washer and dryer sitting in a dark and dusty, cement-walled basement. When we finished our basement in 2014, we made sure to include a space for laundry although we never put much more than a shelf and a sink cabinet. Fast forward to three years later and the realization that our laundry room was wasting valuable space. After much research and number crunching we decided that IKEA’s Algot system provided us with all of the features we were looking for at a very reasonable price. The Algot has a variety of options that accommodate any need from hanging rods to pull out drawers to drying racks. We are very familiar with the system because we had used it to replace our master bedroom and nursery closets but had never considered using it on an open wall. Until now.

In total, we spent $177 for the design we chose and we are very happy with the outcome. The system gave us the shelf space, hanging space, and counter space we desperately needed to deal effectively with laundry all in one space. If you are considering this system but are hesitant about what it will cost you, you can get 100% accurate pricing by designing your space through the Algot planner.

Here’s what our laundry room looks like after:

IMG_1006

IMG_1293

IMG_1355

IMG_1338

IMG_1344

Of course a remodel wouldn’t be complete without some fresh new decor. Not only did we want a space that is efficient but we also wanted one that is cozy and pleasant to work in. Below we are sharing some of our favorite, simple decor ideas.

IMG_1349

  1. Laundry Wall Decal: We had such a hard time settling on one from MyDandelionDecal’s impressive 5-star rated shop but in the end chose a piece that was classic and inviting. The lovely shop owner has set up a 20% off code exclusively for our readers so if you’re interested in supporting a small business while decorating your home, the code is COZYCHRONICLE20
  2. DIY Wool Dryer Ball Basket:  Since we do not use dryer sheets, we needed something to keep our dryer balls from rolling all over the place. Armed with a paint pen, a clearance-priced metal plaque, and a white crate, I was able to put together this adorable storage box for under $10.
  3. IKEA Ljusnan Seagrass Baskets: These baskets add such a rustic touch and are perfect for storing clothes pins and essential oils.
  4. DIY Framed Wall Print: IKEA’s $0.99 Fiskbo Frame meets Michael’s $0.69 scrapbook paper for an inexpensive pop of color and pattern.
  5. Cotton Stem Bouquet: Who else thinks fresh cotton when they think of laundry? This inexpensive mint green jar is the perfect pair to Kirkland’s cotton stem.

IMG_3532

IMG_1004

IMG_0997

As with all things in our home, this laundry room is still a work in progress. One thing that we still have yet to do is designate and design a corner for our cleaning tools. In due time! At this stage in our busy lives, however, this update gives us all the things we needed. It just goes to show you, a space doesn’t have to be fancy to get the job done.

If you liked this post please follow us and share!

Instagram