Soy Chorizo Vegan Chili

We are so behind on our post schedule it’s not even funny but I figured as long as I’m not posting this recipe in June, we’re cool (your standards change when you’re a parent of two). So March is less than a week away but that means NOTHING here in Michigan because our weather is a wild card of unpredictability (sigh). I’m not totally complaining though because for those really chilly spring days, we have just the recipe to warm up our bones and souls. If you’re in graduate school like us or lead generally busy lives, this is another easy and delicious recipe to add to your meal plan during those really hectic weeks.

IMG_7650

As I’m sure I mentioned before on here, we are always looking for ways to cut down on our meat consumption and a few years ago I stumbled across this pretty stellar soy chorizo at Trader Joe’s for just $1.99. I know, right?! At first we used it in our egg scrambles but one day it hit me that it would make a great meat substitute base for a vegan chili. Spoiler alert: It does! Not only does it have that perfect ground beef texture but it’s so spicy you may find you don’t even need to season your chili at all. You can also cut the preparation time for this recipe by opting for canned beans instead of dried beans but either way, your watch, wallet, and tummy will be satisfied with this hearty bowl of goodness.

IMG_7628

Soy Chorizo Vegan Chili

  • Difficulty: Easy
  • Print

Ingredients
1 large onion, finely chopped
1 cup of finely chopped carrots
1 cup black beans, cooked
1 cup kidney beans, cooked
1 12 oz. package of Soy Chorizo, casing removed and crumbled
1 15 oz. can  of tomato sauce
4 cups water or vegetable stock
2 garlic cloves, minced
Olive Oil
Salt and pepper to taste

Note: *If you prefer your chili to be less thick, you can add more liquid to water it down. *You can also tweak this recipe to your liking and include more vegetables such as bell peppers, tomatoes, and corn. *I find the soy chorizo makes the chili spicy and flavorful enough for our taste, especially with the kids in mind, but if you find the flavor isn’t cutting it for you, you can add the following: 1 teaspoon ground sweet paprika, 1 teaspoon ground cumin, 1 tablespoon chili powder, and 1/4 teaspoon cayenne pepper (optional).

Directions
1. In a deep pot, drizzle a bit of olive oil and sauté your onion, and garlic on medium heat until the onions are soft, about 5 minutes.
2. Next add in the carrots and soy chorizo. Cook for about 2-3 minutes until the ingredients are well incorporated.
3. Finally, add in the water/stock, beans, and tomato sauce. Bring to a boil then let simmer on low until reduced and thickened, about 20-30 minutes.
4. Taste the chili and season to your liking or adjust the thickness.
5. Ladle your chili into bowls and serve with vegan cheese, non-dairy sour cream, and crispy tortilla chips.

IMG_7632

IMG_7652

If you liked this recipe and tried it, we would love it if you would share or leave a comment below. For more related content, you can find us on Instagram where we share more of our day-to-day and Pinterest where we share our ideas and inspiration. And as  always…

signature3

.


5 Strategies and Resources for Keeping Toddlers Screen-Free

Happy New Year friends! We hope all of you had a blessed holiday with your loved ones and we wish everyone peace, success, and happiness in 2018. Things are crazy busy here as we are preparing for a family vacation to Florida this weekend. I’ll be honest, between the kids being sick early last month and the holidays, they have seen far more screen time in December alone than they have in a year (we used to be strict about this but that’s for another post). And boy are we ready to detox and resume our screen-free daily routines once we get back. If reducing your child/children’s screen-time is one of your new year resolutions then you’re in luck because I have 5 simple strategies and a handful of fun resources to help get you on track for just that.

“Play is the beginning of knowledge.” -George Dorsey.

IMG_8856

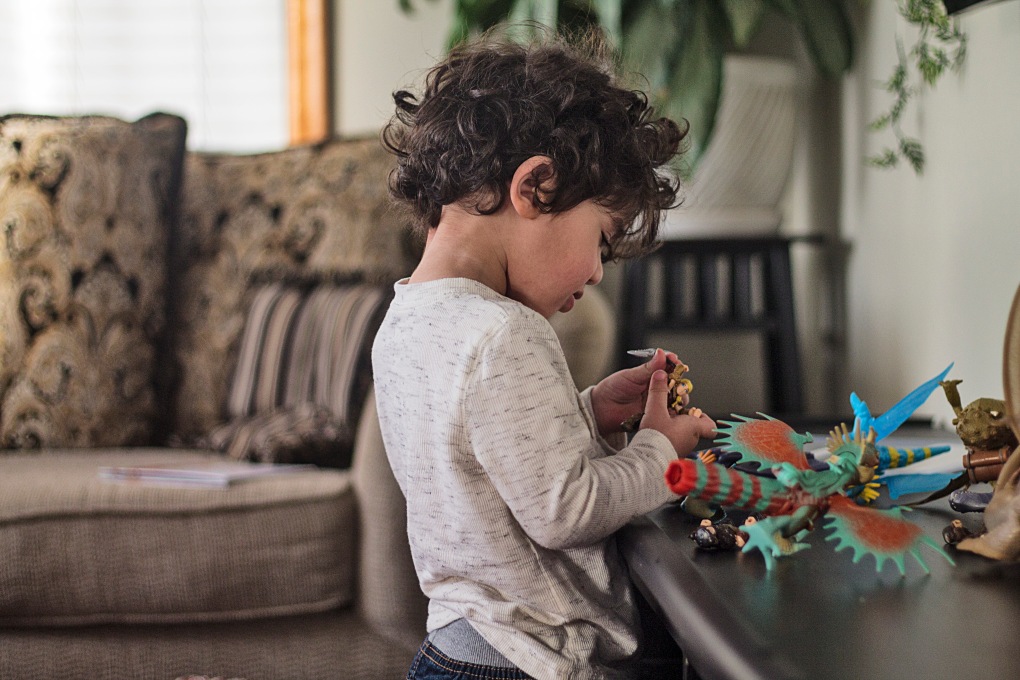
  1. Identify what they like and stick with it. I know this may seem like common sense but living in this age of information overload, it can be difficult to filter through everything to decide what’s applicable and what’s not. Not everything that works for other children may work for yours and that’s okay. The best way to get to know your child is to try a range of different activities with them and see what keeps their short attention span occupied. Chances are you already have an idea without needing to do much investigating. My son is currently really into play dough, Mega Bloks, and dragons at the moment and is very active so if I’m going to get frustrated that he’s not sitting down for a coloring activity for more than 5 minutes, I can’t blame anyone but myself. It doesn’t mean that we don’t try other activities but for the sake of my schedule, I only do things like cooking or reading for school when my children are engaged with an activity for the long haul.
  2. Make a weekly activity plan. With all things in life, if you have an outline or plan of action then you’re more likely to follow through with it. If you are really committed to screen-free quality time then try investing 15-30 minutes on the weekend to brainstorming and arranging for activities during the week. You don’t have to be doing crazy chemistry lab experiments to make it fun. As you’ll come to see in the links I’m sharing below, it doesn’t take much to make children happy. I also want to add the disclaimer that an activity plan should be treated more like a guide rather than a strict schedule. It should be a way for you to think through your day and have activities on hand when you need them most.
  3. Talk it up. Sometimes for kids it’s less about the activity and more about the presentation. Maybe that’s just my experience with my kids but I feel they definitely pick up on my enthusiasm. I don’t have numbers to back up this claim but I find that my son is more engaged when I’ve talked about the activity beforehand. For example, if I were to ask him “prepare me something delicious to eat” while giving him his play kitchen tools, he would spend more time playing than if I were to just dump them on the floor and tell him, “here, play with this.”
  4. Limit accessibility and rotate activities to keep things interesting. In other words if you got it, don’t flaunt it. You will be surprised at what a huge difference it makes if you hide some toys away…because let’s face it, every parent is familiar with what happens when everything is accessible: toys strewn everywhere and bored, restless children. Not the funnest combination. Try taking some toys out of circulation and bringing them out in rotation when you sense boredom. Our MegaBloks, puzzles, and an array of large toy vehicles are stored way high up on a shelf and when I  bring them down, my son definitely relishes every moment.
  5. Don’t be afraid to make a mess. Okay maybe this is not what you want to hear but trust me. I’m not talking trash the house messy but more along the lines of confined chaos. There are plenty of activities that I’ll list below that allow children to really explore and be messy without you having a disaster on your hands. I don’t know what it is about messes but kids love making them and if they’re happy and occupied then you will be too 🙂

IMG_8861

With that being said, I’m sharing a list of fun activities that we have tried and enjoyed as well as some amazing resources that I turn to when planning out activities for the kids. I’m also linking our Pinterest board as I do pin fun toddler activities as I come across them for inspiration. I feel like I should state again that the point of this post isn’t that you must have scheduled activities in a curriculum sense but rather a collection of activities suitable for play. Children should be free to explore and play and the activities you choose should exemplify that philosophy.

“Do not keep children to their studies by compulsion but by play.” -Plato

Sensory and Fine Motor Activities

  1. Make homemade play dough and model/build/cut with cookie cutters
  2. Thread pipe cleaners through a colander or box with holes
  3. Freeze toys in water and do an ice excavation
  4. Make colorful squishy gel bags with glitter and beads
  5. Pom Pom Ball Color Sorting

“Messy” Activities

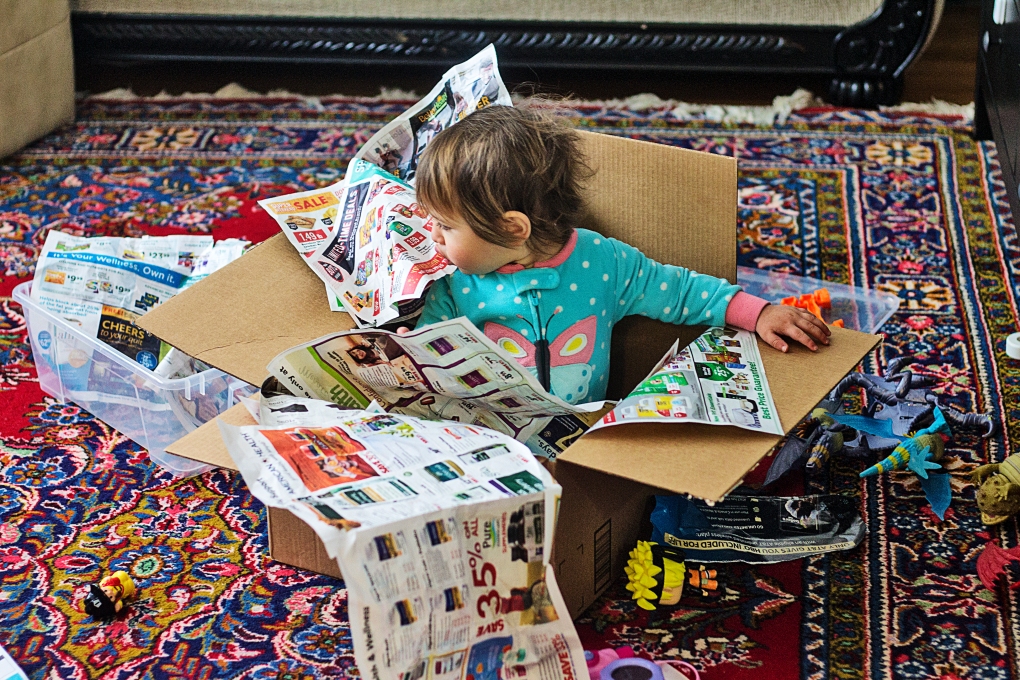
  1. Go dumpster diving for lost toys in a cardboard box
  2. Create a dry pasta/rice/lentil construction site
  3. Paint with shaving cream on a plastic bin lid
  4. Make a scoop and pour activity station with containers and random objects
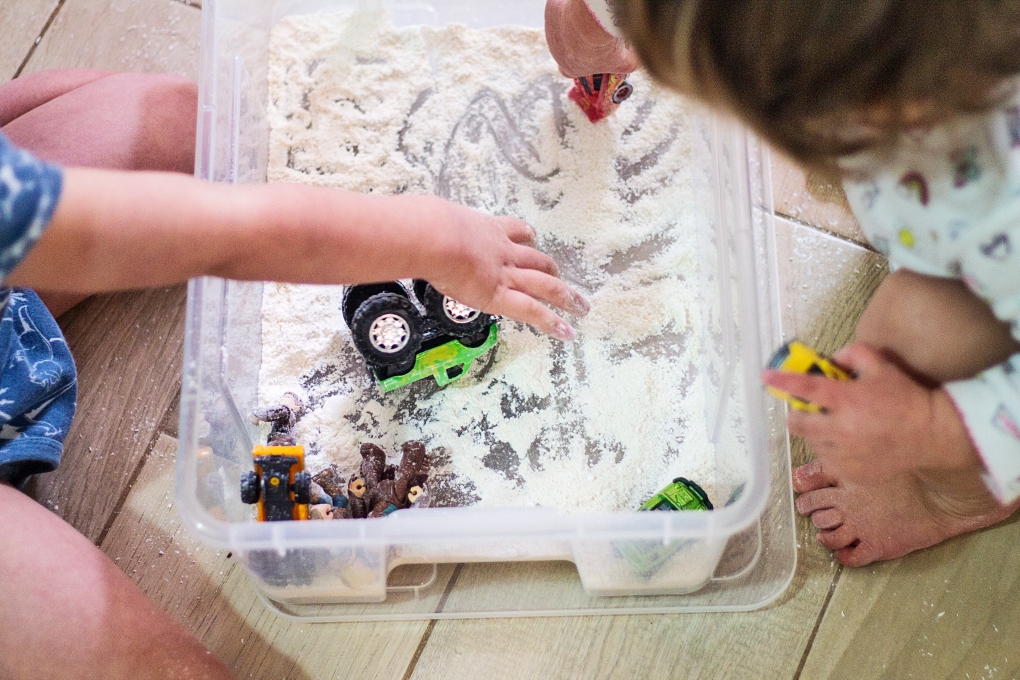
  5. Pour flour and shredded coconut in a bin with small cars for a snowy ride

Physical Activities

  1. Set up a simple indoor obstacle course with everyday objects
  2. Have a color-themed scavenger hunt with this song
  3. Have an alphabet or number scavenger hunt
  4. Set up a bubble machine and chase after bubbles to pop them.
  5. Blow up balloons and play balloon tennis, volleyball, or soccer.

Imaginative Play

  1. Make a play boat from a cardboard box and pretend you’re fishing or escaping sharks
  2. Give children kitchen tools and utensils to play chef
  3. Play veterinarian or doctor with sick action figures and stuffed animals
  4. Build a tent from blankets and go pretend camping
  5. Host a pretend picnic or tea party for their toys

IMG_8937

These are just some of the MANY activities out there and there are plenty more waiting to be discovered or created by you to fit your child’s needs (Disclaimer: All the activities I’ve listed are intended to be done with adult supervision even if they don’t necessarily require your active participation). I hope this post is a good starting point for helping you feel less overwhelmed and more capable of keeping your children engaged and occupied without resorting to screens. To help me get organized and plan better (and help you do the same), I’ve created a weekly activity plan to fill out to help guide me through my days at home. The image below is just an example of how you can fill it out but you’ll want to do so according to your own daily rhythms and routines, interests and likes. I also included a column for time but I do not adhere to it strictly and you can completely ignore it all together if you want. The time column is more to remember fixed moments of the day such as snack time, lunch, and nap time. I want to also add that I think it’s very important to be flexible and not hold yourself to unreasonable and unattainable scheduling expectations because this isn’t school.

Weekly toddler plan
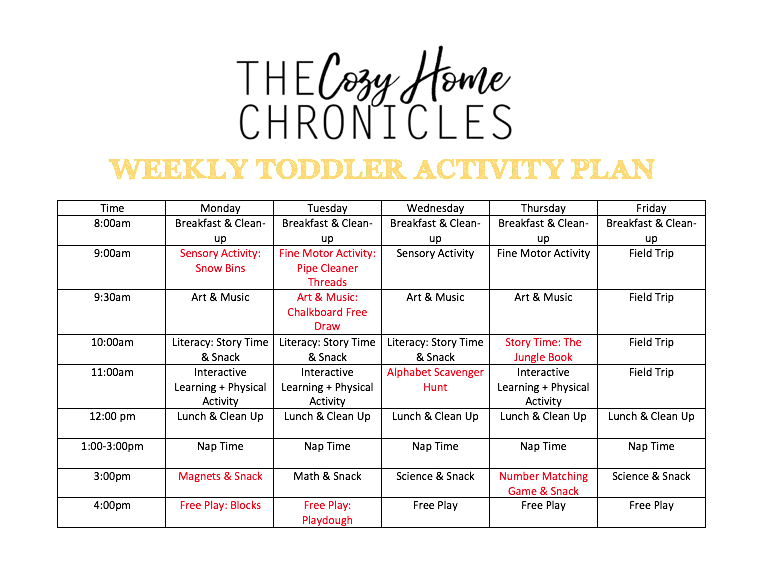
Weekly Activity Plan Free Download

IMG_8945

Once you have downloaded this blank activity guide, you can visit the links below to get started planning your days with your little one(s). While I’m no child psychologist or educator, I think that it’s good to have a balance of diverse activities; literacy, sensory/fine motor, physical activity, and imaginative play. The best part about designing your day is you get to customize activities that blend motor skills, creativity, and learning (science, math, language, etc.) in ways that are fun and appealing to your child. The last thing children need is to be lectured classroom-style. If there are specific concepts that you would like them to be learning then write them down in the “focus” section. This will help you be mindful of your learning goals so you can incorporate them up during activities and moments throughout your day. Alright, let’s get planning!

Resources for Activity Planning

  1.  Hands on As We Grow
  2. Busy Toddler
  3. Fun at Home With Kids
  4. The stay-at-home-mom survival guide
  5. Meri Cherry
  6. Toddler Approved
  7. Playtivities

If you liked this post and found it helpful, we would love it if you would share. For more related content, you can find us on Instagram where we share more of our day-to-day and Pinterest where we share our ideas and inspiration. If you have any thoughts or suggestions about this topic, feel free to leave a comment down below. And as always…

signature3


2 Ingredient All Natural Baby Powder

IMG_4007

Although we are passionate DIYers, we do recognize that we can’t make EVERYTHING in life, even if we wanted to. There are simply not enough hours in the day. However there are some things, in our opinion, that are just silly not to make and this post is about one of them. Less than a month ago, this news came out: “$417 Million Awarded in Suit Tying Johnson’s Baby Powder to Cancer.” It’s not like it was shocking news but it certainly opened up many people to the possibility that baby products were not as clean and safe as they thought. As if parents didn’t have enough to worry about! After I saw my friends sharing the news on Facebook, I figured it would be a good time to write a post about our super simple, alternative baby powder.

It’s not that there aren’t natural or organic baby powder products out there. There certainly are. But expect to dish out anywhere from $7-12 for less than a pound of product, which can definitely add up over time. With my firstborn, we did not really use baby powder and the times when we did use it, our son would get an allergic reaction (we were using Burts Bees, I suspect it was either the fragrance or the limonene). With our second baby, we actually really needed something because our daughter had very sensitive skin and would constantly break out with just the tiniest bit of moisture. Naturally, we tried corn starch but just found it to be so clumpy when it absorbed. After a bit of research I came across the perfect substitute starch: Arrowroot powder, a natural root starch that’s soft, velvety, and absorbs cleanly. For a mild scent, I ground up some dried chamomile which is hypoallergenic and has anti-inflammatory properties (I’m not a doctor but this is pretty common knowledge). I’m not going to say that our daughter’s rash magically disappeared overnight but it did resolve after a few days. We have been using this ever since and have not had any problems. That’s it. Two ingredients. One happy baby bum. Lastly, there are many different containers, including upcycled spice dispensers, that you can use to store and dispense your baby powder but I find that something with a sifter lid works best to get a light and even dusting. I purchased mine from Marshalls for $6 but you can find similar ones on Amazon here.

IMG_4015

Ingredients
1 1/2 cups Arrowroot Powder
1 tablespoon Ground Chamomile

Supplies
Measuring cup
Stainless Steel Container with mesh sifting lid

Directions
1. Measure out and mix your ingredients.
2. Store in a stainless steel dispenser and use regularly as you would any baby powder. I should also add that one should be cautious when using baby powder in general because it can cause respiratory problems if the particles are inhaled. Dispense lightly and away from your baby’s face.

IMG_4016

IMG_4023

IMG_4032

Disclaimer: This post contains affiliate links for your convenience only.

Thanks for reading, let us know your thoughts below in the comment section, follow us and share.

Instagram


Cinnamon French Toast Granola

IMG_1324

Who doesn’t like french toast? Cinnamon buttery goodness topped with sweet sticky maple syrup. Now imagine that same flavor in the form of a healthy snack. I recently started making my own granola and I just had to share how easy it is. Many recipes I found called for honey but I was craving the deep richness of pure maple syrup, which is how I ended up with a cinnamon french toast flavor (yum!). Quality store-bought granola can set you back anywhere from $6-9 a pound. Homemade granola, however,  is not only simple to make but it’s much more economical too. So here’s to healthy, homemade snacking on a budget!

Cinnamon French Toast Granola

  • Difficulty: Easy
  • Print

Ingredients
4 cups Quick Oats
2 cups raw sunflower seeds
1/2 cup pure maple syrup
1 tablespoon ground cinnamon
1/4 teaspoon ground nutmeg
1/2 teaspoon vanilla extract
1/3 cup vegetable or coconut oil

Directions
Preheat your oven to 325 F. Combine all your ingredients in a mixing bowl and stir well to coat. Spread the mixture evenly on two sheet pans and pop in the oven for approximately 20 minutes until golden brown. While baking, take the pans out every 5 minutes and move the granola around so that they cook evenly and don’t burn. Once the granola is done and cooled, seal in a airtight container and enjoy as a cereal, mid-day nibble, or as a yogurt topper.

IMG_1311

IMG_1321

IMG_1324

IMG_1334

If you liked this post please follow us and share!

Instagram


No-Waste Slow Cooker Vegetable Broth

IMG_1284

We are constantly trying to find new ways to recycle and reduce waste so when I attended a food demonstration at the healthcare system where I work, I was super excited when the cook revealed her secret for making use of unwanted vegetable scraps. Instead of throwing away the peels, ends, and cores of vegetables, she tossed them into a freezer bag until she had a nice collection and then threw them into a pot of boiling water to make vegetable broth. Since then, I have made this practice a habit and I have never needed to buy vegetable stock. All this requires of you is to be mindful during meal prep. Set aside any vegetable scraps you would normally throw away and store them in the freezer until you have a large collection. Once you’ve filled a bag or jar to the brim (over the course of however long it takes), toss the contents of the bag into a slow cooker or stock pot with water and the result will be a beautiful golden broth every single time. This broth is not only simple to make but it packs a ton of flavor, making it the perfect vegetarian substitute for chicken stock. You can use this broth to make soups, stews, rice, or even as a more flavorful substitute for water in your favorite recipe. Nutrient-rich, flavorful food, more savings, less waste. I think we can all agree this is a win-win-win!

Ingredients
1 quart freezer-bag or jar worth of clean frozen vegetable scraps (peppers, onions, garlic, squash, carrots, celery, etc..)
12 cups of water
1/2 teaspoon peppercorns
Sea salt (to taste)
2 Bay leaves

Note: Do not put any moldy, rotting, or bad vegetable scraps in your broth scrap bag. Before I am ready to make my broth, I also do a rundown of the fridge and toss in any parsley that is near expiration.

Directions
Place all your ingredients in a slow cooker, turn on high, and let it simmer for 6 hours while you do other awesome, productive things (Yay!).  If you’re using a stock pot on the stove, I would let it boil for two hours covered on low. Once the broth is done and has cooled, strain it into a larger bowl or pitcher and distribute evenly among your freezer storage of choice: glass jars or freezer bags.  Then, when you’re ready to cook, you’ll have delicious homemade broth ready at hand.

IMG_1285

IMG_1289

IMG_1304

IMG_1310

IMG_1347

What are the ways you try to reduce waste in your homes? We would love to hear from you! And as always, if you liked this post please follow us and share!

Instagram