Ramadan Decor: Moon-Phase Garland

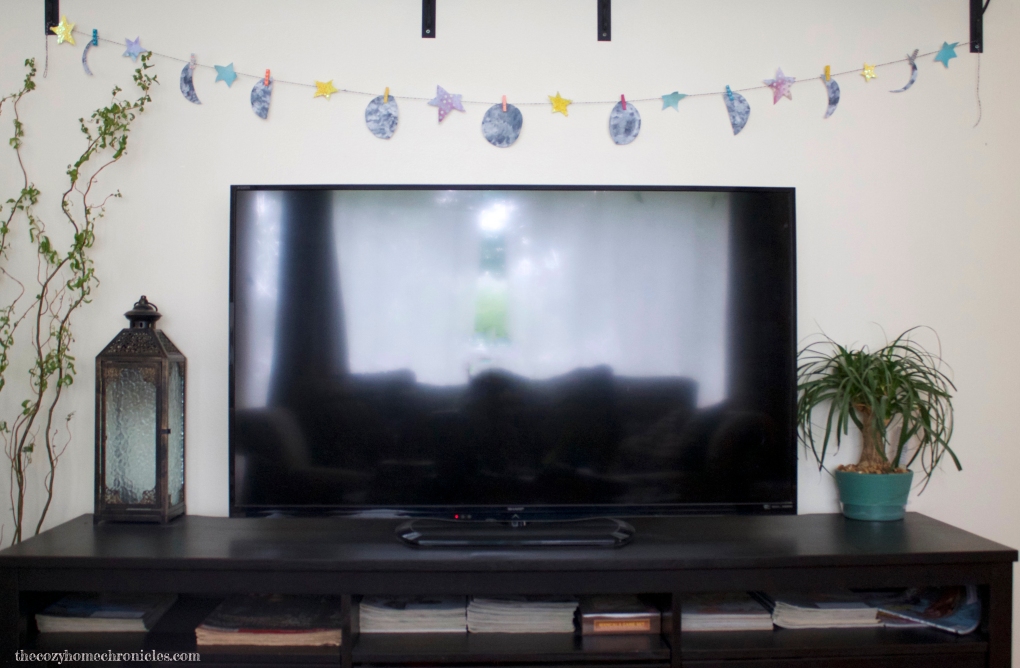
The month of Ramadan is set to begin this week and I have been brainstorming countless ways to make it more special and festive for our family. Decorating is obviously one really fun way to do this (especially if you have young children) but it seems the selection of Ramadan decor out there is a bit too generic (think green and white and palm trees). Since as Muslims we follow a lunar calendar, and Ramadan begins and ends with the sighting of the new moon, I thought it would be really nice to capture the beauty of phases of the moon. Not only is this garland super cute and simple to put together but making it is a great way to bring the family together for a creative activity that inspires reflection on the wonders of astronomy.

IMG_2167

Supplies
Paper (plain white textured and assorted colors)
Acrylic paints (Any shades of gray, white, clear glitter, and yellow)
Paint brush and foam brushes
Scissors
String
Adhesives (tape and glue)
Mini clothespins
Glitter

Directions

IMG_2073

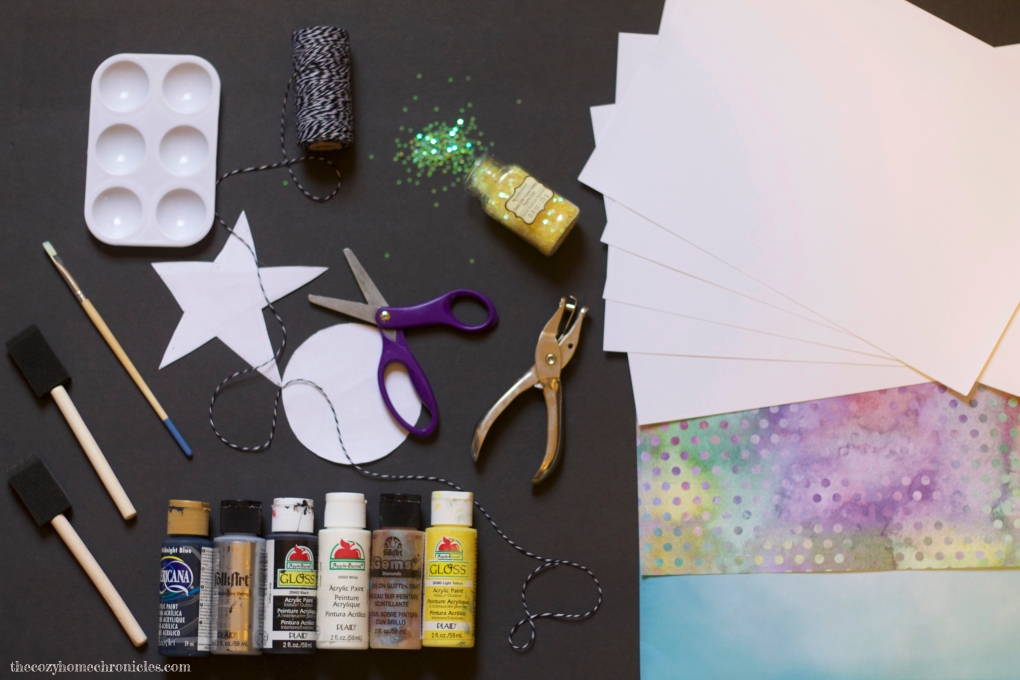
Gather your supplies

IMG_2087

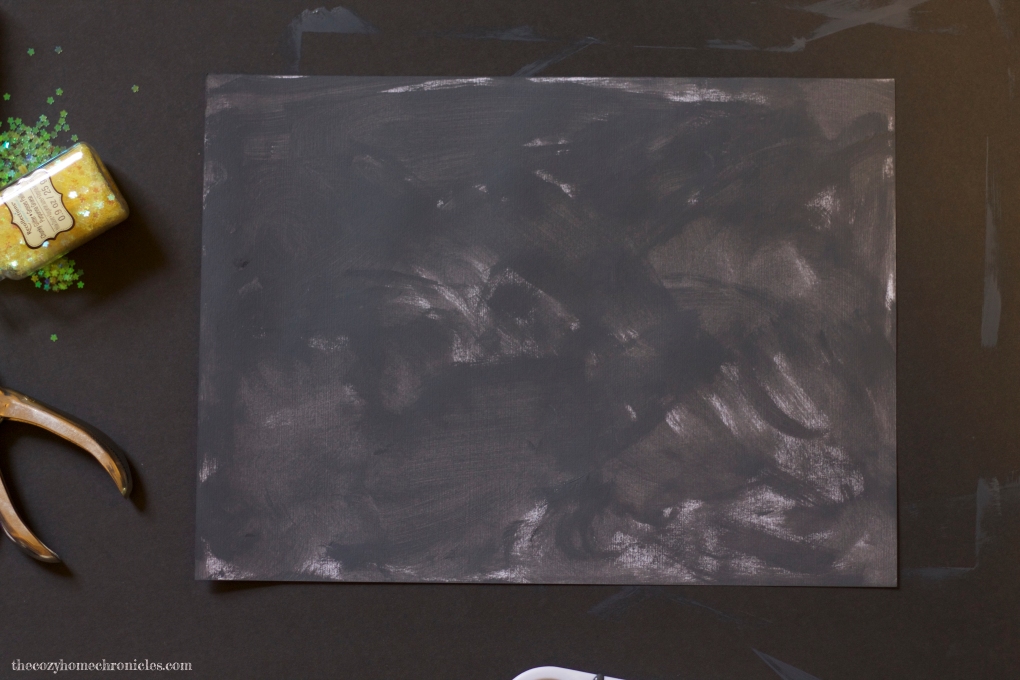
On the textured white paper, paint with the foam brushes beginning with the darkest gray colors and ending with white.

IMG_2091

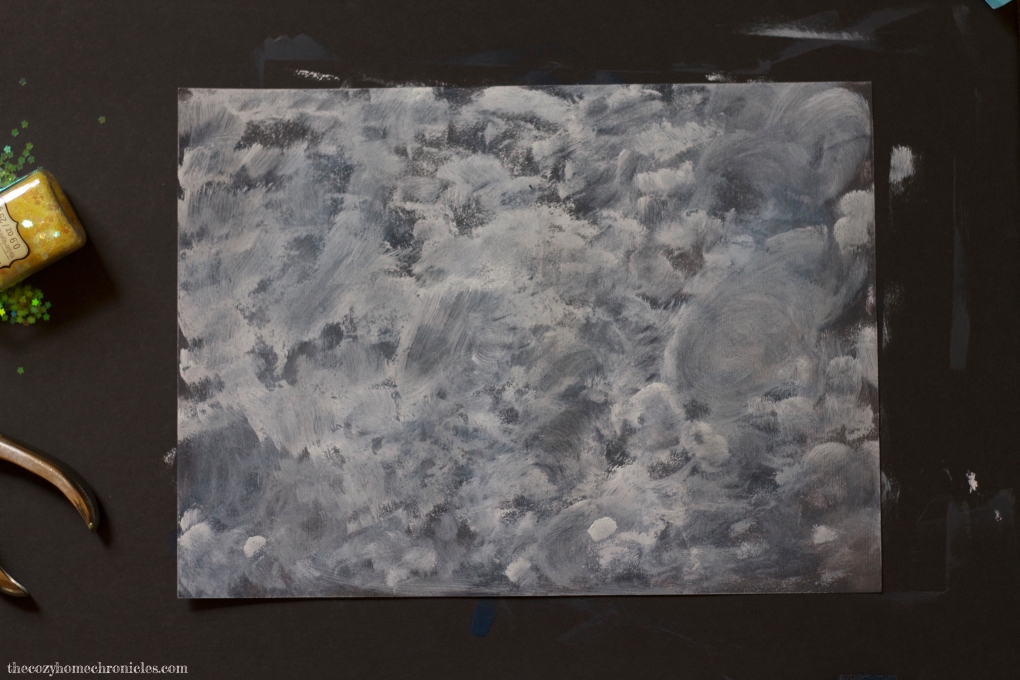
Make sure you let each layer dry before painting the next. By the time you are done, you will have a pattern that resembles the surface of the moon.

IMG_2092

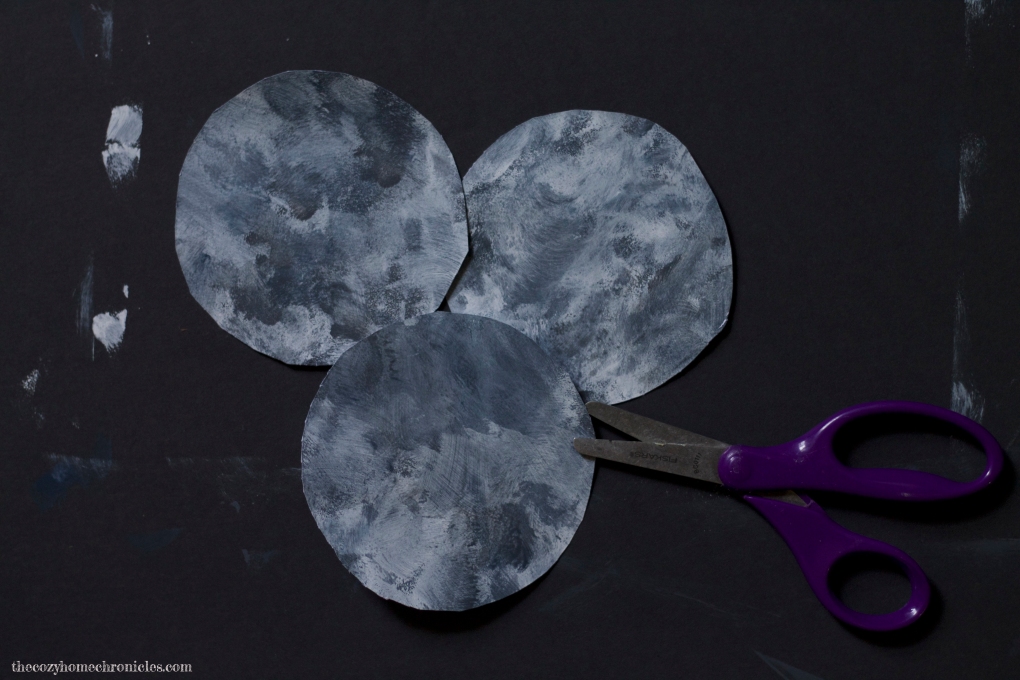
Cut out  6 circles to the size of your liking. You don’t want them too big so the garland doesn’t droop when you hang it. My circles had a radius of about 2 inches.

IMG_2099

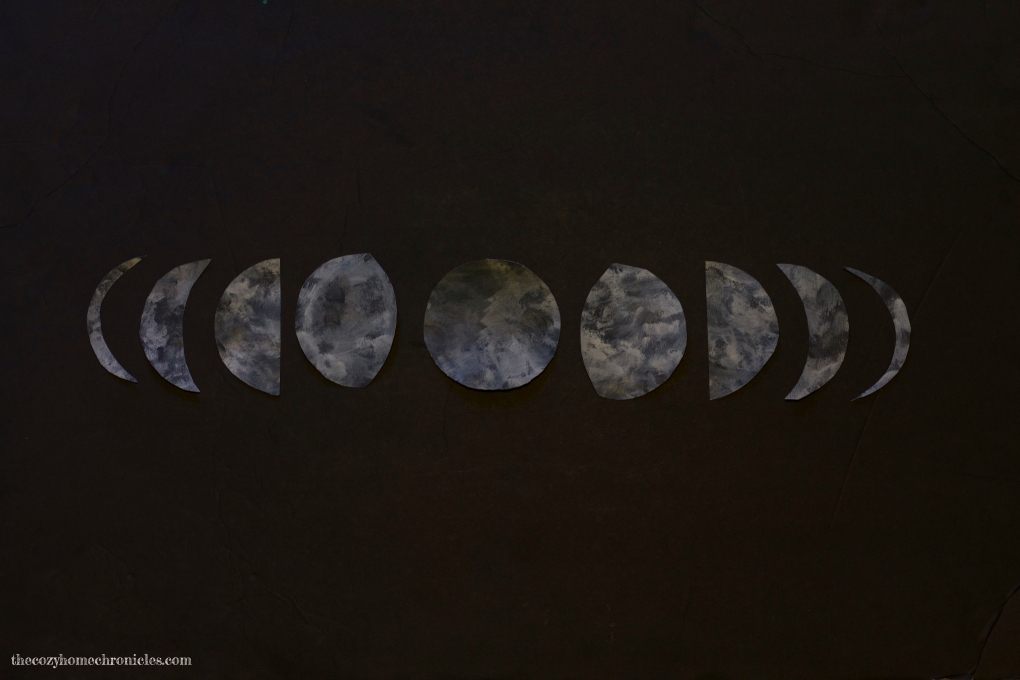
Cut 5 of your 6 circles down until you have the 9 moon phases. These pieces will be arranged just like this on the garland.

IMG_2105

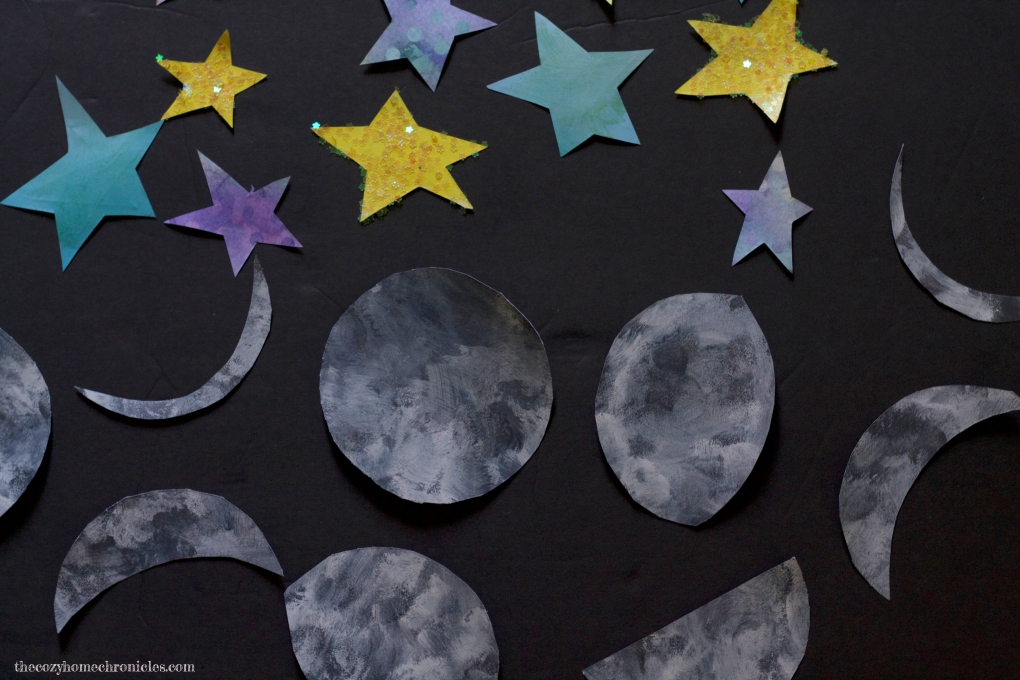
Cut out some rustic looking stars and decorate with glitter (optional) and arrange the pieces for assembly.

IMG_2146

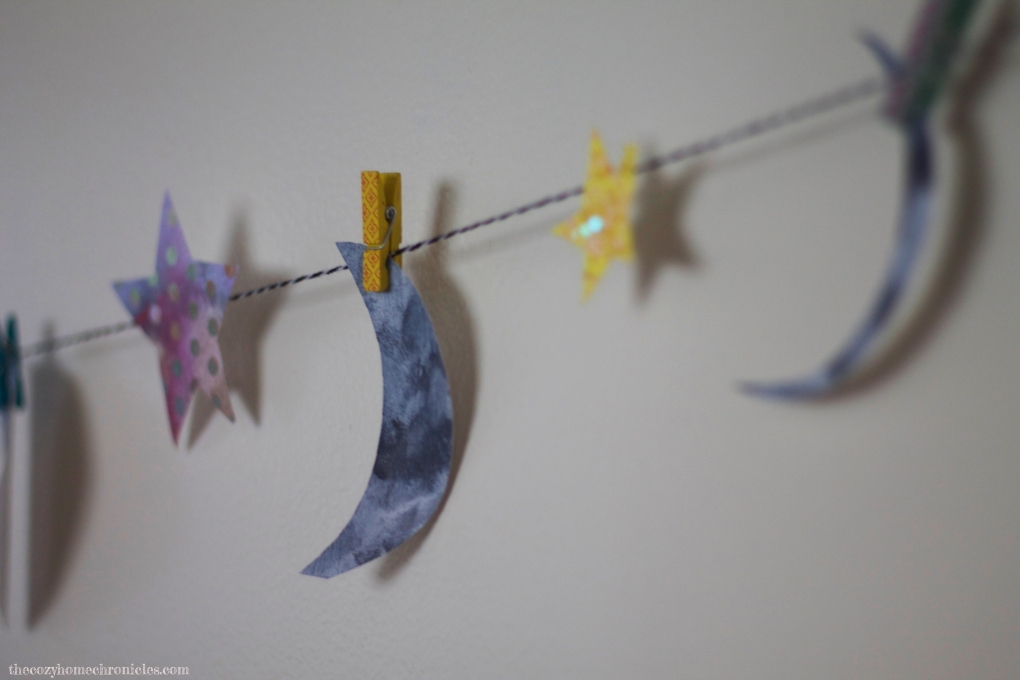
Using glue, tape, clothespins (or a combination of them), assemble your stars and moons on a sturdy piece of string, making sure they are evenly spaced.

IMG_2157

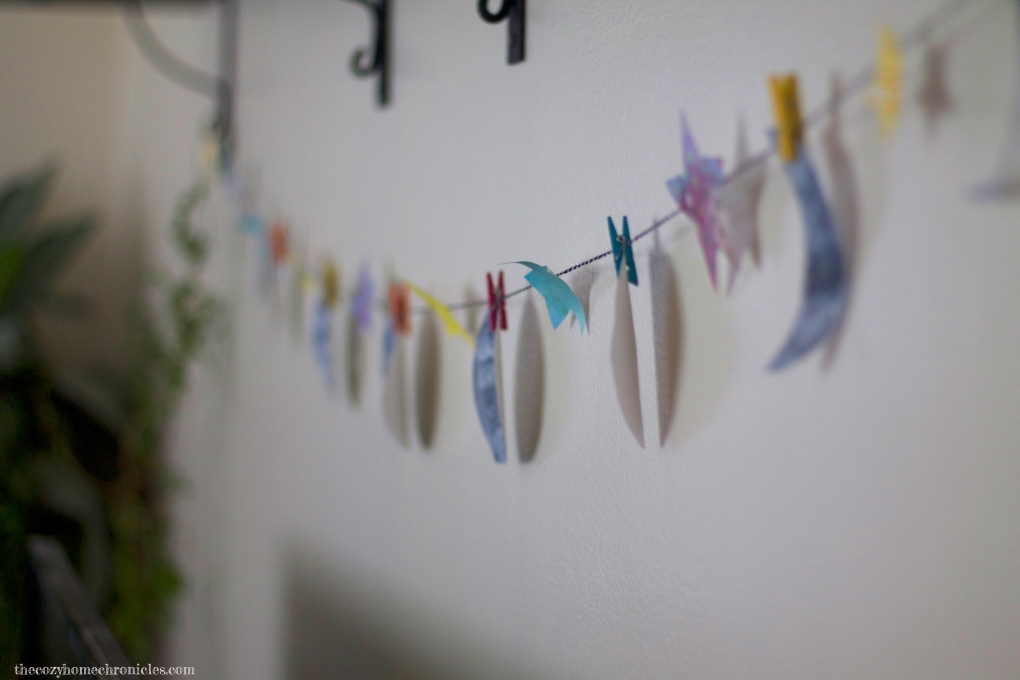
Hang up your beautiful garland prominently in your family room.


IMG_2167.jpg

Enjoy the lovely view!

“Indeed, in the creation of the heavens and the earth and the alternation of the night and the day are signs for those of understanding [3:190].”

If you liked this post please follow us and share!

Instagram


Build your Own Garden Fence

If you read our previous blog post on how to build a raised garden bed on a budget, then you might be wondering how we have kept our harvest safe from unwanted visitors. Initially we went with a cheap fence made of galvanized poultry netting but after many missing tomatoes and half-bitten squash we decided that the next year we would spend a bit more to have a quality fence. We wanted a roomy enclosed space with easy access for us to plant but sturdy and tall enough to keep the demon bunnies out. I soon sketched out a blueprint for my imagined firewall and got to work making it a reality. I will warn you that it is a bit on the pricier side but it’s a sound fence that’s practical and aesthetically pleasing. Shall we get to work?


IMG_20140720_201426

Our sorry excuse of a fence

Supplies for an 12ft x 8ft garden fence
2.5 x 2.5 x 8ft  ($27.79)
24 2 x 4 x 8ft ($80.88)
1/2 x 4ft x 25ft Hardware Cloth ($38.98)
1 box Wood Screws ($6.26)
1 Fence Door Hardware ($15.98)

Tools
Staple Gun
Post Hole Digger
Miter Saw or Hand Saw
Power Drill

Directions

  1. Design a template for your fence because this saves you on both time and money. The desired size of the enclosure will dictate how much wood you will need and in turn how much you will spend. I can’t stress enough how important the planning phase is for any successful project.
  2. Cut the 2.5 x 2.5 x 8ft timber to 7 ft. 5ft of the timber is for the fence sections since the hardware cloth is only 4ft tall and the remaining 2ft is going into the holes you will dig to secure the fence.
  3. Using the post digger, dig seven holes (3 on each side and an extra one for the door) about 2 ft deep. I did not use cement to secure the timber posts because I find it unnecessary but feel free to use cement if you like!
  4. Once you have dug your post holes, insert the timber poles leaving 5ft above the ground. Make sure the poles are level by laying a 2×4 or a longer piece of wood across the posts while placing a level on top of it.
  5. The next step is to assemble the sides of the fence by using the 24 pieces of 2x4in x 8ft pieces to make rectangular frames:
    • Cut a total of four 2 x 4 x 8ft to a height of 5 ft (current they are 8 ft). These will be the vertical sides of your frame. The hardware cloth is 4 ft and that is your height unless you want the hardware cloth to be shorter.
    • Cut a total of four 2 x 4 x 8ft to your desired width. I cut mine to 6 ft because I needed the width of the fence horizontally to be 12ft.
    • Now that you have four 4ft and four 6ft pieces lay them out according to the design in Figure 1.  You must follow that design if you want to keep the fence sturdily joined together. This also keeps the ends from bending.
    • Lay the hardware cloth flat on top of your bottom piece of your boards (see Figure 2 ) and fasten using your staple gun.
    • Proceed by laying the top pieces of your board over the hardware cloth/bottom frame and join the boards together using wood screws (see Figure 3).
    • Flip the completed fence frame gently and screw the other side as well (see Figure 4).
  6. Repeat Step 5 until you have enough sections to enclose your garden. I needed to repeat the  step six times. If you are unsure about your calculations try attaching your fence side to the post first and proceed by building then attaching rather than building all the sides and attaching them at the end.
  7. Now you can attach the completed fence sides to your 5ft timbers posts using a drill and wood screws.
  8. Create a basic door using the leftover 2 x 4 x 8ft by cutting them until you have two 2ft and four 5ft pieces. Align the four 5ft pieces on the ground vertically and make sure the space between them is even. Place the two 2ft pieces one closer to the top and one closer to the the bottom, using wood screws to secure them. Last but not least cut a piece of hardware cloth to the size of your door and install it on the backside of the door. I used basic fence door hardware for the hinges and lock. Installation manual is included in the packing and is very straightforward.
  9. For an overall cleaner look, use mulch, wood chips or small stones between the garden bed(s) and fence.
  10. Enjoy the fruits of your hard labor without bunny or deer bite marks.
    newfence

    Figure 1 – Bottom, Top & Hardware Cloth

    fencedesign2

    Figure 2 (Spacing for visualization)

    fencedesign3

    Figure 3 (w/o spacing)

    fencedesign4

    Figure 4 (w/o spacing)

IMG_20150529_125008IMG_20150529_125016IMG_20150529_125023IMG_20150623_132751

If you liked this post please follow us and share!

Instagram


Build Your Own Raised Garden Bed

Spring is finally in the air here in Michigan and we are getting closer and closer to planting season, one of our favorite times of the year. Gardening for us is just so fun and fulfilling because it connects us to the beauty of nurturing and growth. If this is the year you decided to try your hand at gardening then starting with a raised bed might be the way to go. A custom raised vegetable/fruit/herb garden is not only easy to make but it takes a lot of the hassle out of gardening in terms of weeding and messes. It also makes for a beautiful backyard feature and less back-bending and back-breaking work.

garden bed copy copy

You can go about this project a couple different ways but the instructions I have provided in this post are for store-bought wood from your local Home Depot or Lowe’s. For our garden beds, we upcyled wood panels that we had stored in our garage from our early basement renovation and we personally recommend this route if you have unused wood just lying around. There is something extra rewarding about repurposing items and reducing waste and what better time to do that than during the environmentally conscience activity of gardening. Of course you can always buy a raised garden bed but where’s the fun in that? Not to mention, a store-bought garden bed can run anywhere from $100-$250 depending on the size and material. If you buy the wood yourself, you can have a similar garden bed for half the price and if you go the upcycling route it will cost you nearly nothing.

Costco Garden Bed

Costco – $107.50 / one

Home Depot Garden Bed

Home Depot – $99.19 / one

Lowes Garden Bed

Lowe’s – $118.00 / one


Now that we have you convinced (hopefully) to build your own garden bed, here’s what you’ll need:

Supplies for an 8ft x 8ft garden bed
2in x 6in x 8ft ($60)
2in x 2in x 8ft ($7.50)
Weed Blocker ($9.97)
1 box Wood Screws ($6.58)
Patience ($0.00)
Green Thumb (Priceless)

Note: I did not include the amount and price of soil in the supply list because that will really depend on the size of your bed. If you are unsure, this soil calculator is super helpful!

Tools
Staple Gun
Post Hole Digger
Miter Saw or Hand Saw
Power Drill

Directions

  1. Design the layout of your raised garden bed based on the shape and dimensions you want. Our wood panels were 6 ft long so our garden bed ended up being 6ft x 6ft.
  2. If you chose a rectangular design and want to make cuts to the 2x6x8’s (or any other wood you are using), now would be the time to do so using a miter or hand saw. If you want a square 8ft x 8ft layout then just leave them as is. These pieces will be the side panels of your garden bed.
  3. Cut your 2x2x8s so that you end up with a total of six 2ft pieces (you’ll have some wood leftover). These will be the legs of your garden bed. You may notice that the garden legs are longer than the side panels and that is intended. The extra foot of leg is for planting the garden bed firmly in the ground.
  4. Next, you will attach the side panels of your garden bed to the legs.The first thing you want to do is lay out two 2x6x8 pieces horizontally and parallel to each other so that there are no gaps between them. At equal intervals, starting precisely from the corner, attach the garden bed legs (2x2x2) to the sides using your drill. You will need 6 screws to do this: 1 in each of the two panels for each of the three legs.
  5. Repeat step 4 using two more 2x6x8s and the remaining 3 legs.
  6. Now you can complete the garden bed by connecting the remaining panels perpendicular to the side panels with the legs to form your square or rectangle. Make sure that the legs are on the inside of the garden bed. Once you have put together all the boards, your garden bed should look like the final image in the 3D model below.
  7. Use the post hole digger and dig 6 holes for your legs, making sure you measure the distances accurately between the legs so you won’t have to struggle putting them into the ground.
  8. Now you can go ahead and place the garden bed legs into their corresponding holes.
  9. This is an optional step but one we found helped drastically reduce the weeds. Lay the weed blocker down at the bottom of the garden bed and use a staple gun to fasten it to the sides of the bed. Do the same thing across all sides of the garden bed making sure to cover the entire surface area.
  10. Fill your garden bed with the soil mixture of your choice and you are all set to plant whatever your heart desires 🙂

And for the visual learner…

garden bed 1
garden bed 2
garden bed 3
garden bed 4
garden bed 5
garden bed 6

Snapchat-20140523061353IMG_20140523_184812IMG_20140523_190343Snapchat-20140523012215garden bed copy copy

Now sit back and enjoy the harvest to come.

If you liked this post please follow us and share!

Instagram


Inspirational Wallpaper: May

Firstly, Happy Mother’s Day to all the beautiful and strong women out there that we call mom. Having almost survived our first year of parenthood, we are truly humbled by all the sacrifices you make every single day. I know we are a bit late for our May wallpaper post but hey, better late than never! We were in Vancouver and Seattle when April passed us by so we forgot all about our April post. Oops. To make up for it, the wallpaper I’m sharing for free download is a shot I took in Vancouver’s Stanley Park. The lighting and colors were just too perfect so it didn’t need a quote. Here’s to bright and cheery May days 🙂

Sunlit Japanese Maple

Sunlit Stanley Park


Cinnamon French Toast Granola

IMG_1324

Who doesn’t like french toast? Cinnamon buttery goodness topped with sweet sticky maple syrup. Now imagine that same flavor in the form of a healthy snack. I recently started making my own granola and I just had to share how easy it is. Many recipes I found called for honey but I was craving the deep richness of pure maple syrup, which is how I ended up with a cinnamon french toast flavor (yum!). Quality store-bought granola can set you back anywhere from $6-9 a pound. Homemade granola, however,  is not only simple to make but it’s much more economical too. So here’s to healthy, homemade snacking on a budget!

Cinnamon French Toast Granola

  • Difficulty: Easy
  • Print

Ingredients
4 cups Quick Oats
2 cups raw sunflower seeds
1/2 cup pure maple syrup
1 tablespoon ground cinnamon
1/4 teaspoon ground nutmeg
1/2 teaspoon vanilla extract
1/3 cup vegetable or coconut oil

Directions
Preheat your oven to 325 F. Combine all your ingredients in a mixing bowl and stir well to coat. Spread the mixture evenly on two sheet pans and pop in the oven for approximately 20 minutes until golden brown. While baking, take the pans out every 5 minutes and move the granola around so that they cook evenly and don’t burn. Once the granola is done and cooled, seal in a airtight container and enjoy as a cereal, mid-day nibble, or as a yogurt topper.

IMG_1311

IMG_1321

IMG_1324

IMG_1334

If you liked this post please follow us and share!

Instagram


No-Waste Slow Cooker Vegetable Broth

IMG_1284

We are constantly trying to find new ways to recycle and reduce waste so when I attended a food demonstration at the healthcare system where I work, I was super excited when the cook revealed her secret for making use of unwanted vegetable scraps. Instead of throwing away the peels, ends, and cores of vegetables, she tossed them into a freezer bag until she had a nice collection and then threw them into a pot of boiling water to make vegetable broth. Since then, I have made this practice a habit and I have never needed to buy vegetable stock. All this requires of you is to be mindful during meal prep. Set aside any vegetable scraps you would normally throw away and store them in the freezer until you have a large collection. Once you’ve filled a bag or jar to the brim (over the course of however long it takes), toss the contents of the bag into a slow cooker or stock pot with water and the result will be a beautiful golden broth every single time. This broth is not only simple to make but it packs a ton of flavor, making it the perfect vegetarian substitute for chicken stock. You can use this broth to make soups, stews, rice, or even as a more flavorful substitute for water in your favorite recipe. Nutrient-rich, flavorful food, more savings, less waste. I think we can all agree this is a win-win-win!

Ingredients
1 quart freezer-bag or jar worth of clean frozen vegetable scraps (peppers, onions, garlic, squash, carrots, celery, etc..)
12 cups of water
1/2 teaspoon peppercorns
Sea salt (to taste)
2 Bay leaves

Note: Do not put any moldy, rotting, or bad vegetable scraps in your broth scrap bag. Before I am ready to make my broth, I also do a rundown of the fridge and toss in any parsley that is near expiration.

Directions
Place all your ingredients in a slow cooker, turn on high, and let it simmer for 6 hours while you do other awesome, productive things (Yay!).  If you’re using a stock pot on the stove, I would let it boil for two hours covered on low. Once the broth is done and has cooled, strain it into a larger bowl or pitcher and distribute evenly among your freezer storage of choice: glass jars or freezer bags.  Then, when you’re ready to cook, you’ll have delicious homemade broth ready at hand.

IMG_1285

IMG_1289

IMG_1304

IMG_1310

IMG_1347

What are the ways you try to reduce waste in your homes? We would love to hear from you! And as always, if you liked this post please follow us and share!

Instagram


Urban Jungle Bloggers: Botanical Zoom

Spring is just around the corner and what better time to zoom in on plants than now! Our house plants are very dear to us. So much so that before we had our baby, we talked about our plants as though they were our children. Yes, they were (and still are) that important to us! We didn’t really know anyone that took their plants as seriously as us until we came across the awesomeness that is Urban Jungle Bloggers. Urban Jungle Bloggers, hosted by the inspiring Igor and Judith, is a monthly series inviting bloggers to write and share anything and everything plant-related. Every month there is a different theme and this month is all about zooming into the hidden beauty that is often taken for granted.

So here’s to taking pauses; to setting aside the chaos of daily routines and endless to-do lists. Here’s to being one with the pieces of earth that coexist with us in our homes.

IMG_7108

“Nature will bear the closest inspection. She invites us to lay our eye level with her smallest leaf, and take an insect view of its plain.”
Henry David Thoreau

There is something serenely beautiful about the way the sunlight streams in and filters through our plants. It illuminates the most intricate of details, serving as a reminder that within us lies an unimaginable and incomprehensible vastness. It is truly humbling.

IMG_5999

2016-03-17 09.58.20

2016-03-17 09.57.10

IMG_7105


“Every particular in nature, a leaf, a drop, a crystal, a moment of time is related to the whole, and partakes of the perfection of the whole.”
Ralph Waldo Emerson

2016-03-17 09.59.09

IMG_7104

2016-03-17 10.00.20

“Adopt the pace of nature: her secret is patience.”
Ralph Waldo Emerson

IMG_7106


2016-03-17 09.52.09

2016-03-17 09.53.13 copy

If you liked this post please follow us and share!

Instagram


Lebanese Beef and Potato Stew

IMG_1102

If you live in the Midwest, you know that springtime isn’t all sunshine and butterflies. We have plenty of gray days that can feel like winter and sometimes all we want to do is curl up in a blanket with a hearty bowl of something and pray that 70 degree weather is right around the corner. This recipe is perfect for just those days. It’s personally one of my favorite Lebanese stews (or yakhnis) growing up and it’s super easy to make. However, this isn’t your average beef and potato stew. What makes this stew especially delicious is the flavor profile offered by a paste of fresh garlic and cilantro. This base, which is a feature of most Lebanese stews, makes for a uniquely savory broth that you will just have to try to understand. So if you’re looking to make a stew but want to try something new (ha! I rhymed!) this will not disappoint!

Lebanese Beef and Potato Stew

  • Difficulty: Easy
  • Print

Ingredients:
1.5 pounds of beef stew cubes
1 head of garlic
1 bunch of cilantro (plus some for garnishing)
3 pounds of potatoes
2 teaspoons tomato paste
Salt & Pepper (to taste)
Lemon juice (1 large lemon)
8 cups of water
Vegetable oil

Note: My recipes serve at least  4 people. While we are only 2 and a baby, I make enough of a meal to last a few days. I cannot stress how convenient it is to have a home-cooked meal without having to prep everyday when you’re juggling a million other things.

Directions:

  1. In a stock pot, bring your 8 cups of water to boil. In the meantime, make your garlic-cilantro paste by pulsing the cilantro and peeled garlic head (8-12 cloves) in a food processor. You will use this paste to flavor 3 different components of the stew:the meat, the broth, and the potatoes.
  2. Drizzle a bit of vegetable oil in a large skillet and add in 1/3 of your garlic-cilantro paste. Sauté for 1 minute until you smell the aroma of the cilantro and garlic. Be careful not to burn the paste.
  3. To the sautéed garlic-cilantro paste, add in your beef cubes, some salt and pepper to taste, and let brown on all sides.
  4. By now, your water should be boiling. Toss your browned and flavored beef cubes with another 1/3 the garlic-cilantro paste into the stock pot and allow to simmer on low for 2 hours or until your meat is very tender and the broth is flavorful.
  5. In the meantime, peel, rinse and cube your potatoes.
  6. Repeat step 2 with the remainder of the paste this time adding your cubed potatoes and browning them on all sides but not fully cooking them. Now toss the herbed potatoes into the finished broth and stir well.
  7. Mix in your tomato paste, lemon juice, and any salt and pepper then cover and cook on medium heat until the potatoes are nice and tender. I do this immediately after I add the potatoes in so that I’m not stirring and mushing the potatoes once they are cooked.
  8. Once your potatoes are fully cooked, ladle a generous serving of meat, potato and hearty broth into a bowl, garnish with freshly chopped cilantro and serve with a side of buttery rice, lemon wedges, and crunchy radishes.

Note: I grew up learning to make this stew by deep-frying the potato cubes and then sautéing them with garlic and cilantro. My dad will tell you that if it’s not made this way, it’s not authentic. And while it is super tasty made that way, the stew is just as tasty without frying. Whether you decide to bake, deep-fry, or sauté your potatoes, just make sure to add them in near the end when your meat is tender and your broth is richly flavored. If you add them in too early, they will turn to mush and you don’t want that to happen. Trust me.

2016-03-02 13.54.51

2016-03-02 13.57.28

2016-03-02 14.01.09 copy

2016-03-02 14.06.43

Processed with VSCOcam with m5 preset

2016-03-02 14.52.15

IMG_1098

If you liked this post please follow us and share!

Instagram


Deliciously Spicy Carrot Cake

IMG_0886

I recently kidnapped a juicer from my dad’s house (just kidding, he gave me permission) to juice some carrots and I was surprised by how much carrot pulp was created out of such a small glass of juice! I didn’t want to waste the carrot shavings so I decided I would make a carrot cake out of them. This time, though, I wanted something a bit different than the generic carrot cakes out there. I was craving a deep rich flavor with a little more kick. After several experiments (there was a lot of carrot pulp), I arrived at what I think is the perfect blend of spice and sweetness. Instead of using solely cinnamon as most recipes call for, this recipes makes use of a blend of beautifully aromatic spices including nutmeg, clove, cardamom, and ginger. It’s the perfect springtime cake and your kitchen will thank you for the aroma.

Deliciously Spicy Carrot Cake

  • Difficulty: Easy
  • Print

Ingredients:
2 cups all-purpose flour
1 1/2 cup dark brown sugar
3 eggs (room temperature)
1 teaspoon baking soda
1/2 teaspoon salt
1 tablespoon ground cinnamon
1/4 teaspoon ground cloves
1/2 teaspoon ground nutmeg
1/8 teaspoon ground cardamom
1/8 teaspoon ground ginger
2 cups shredded carrot
1 1/4 cup of vegetable or canola oil

Directions:

1. Preheat your oven to 350F and spray your cake pan with a non-stick spray. Set aside.
2. In a small mixing bowl, measure out and sift your flour, baking soda, salt, and spices. Set aside.
3. In a larger mixing bowl, beat your dark brown sugar, eggs, and shortening until the batter is smooth and a beautiful caramel color.
4. Slowly add in your dry ingredient mixture while beating on low (or whisking).
5. Once the batter is smooth and free of lumps, add in your shredded carrots and mix well.
6. Pour the batter in your sprayed cake pan and bake for 30-35 minutes or until a toothpick inserted in the middle comes out clean.
7. Let your cake cool on a rack and frost with a cream cheese frosting if you like or slice and serve with a cold glass of milk.

Processed with VSCOcam with f2 preset

Measure.

2016-02-27 09.59.13

Mix.

2016-02-27 10.07.43

Bake.

IMG_0848

Cool.

IMG_0852

Frost.

IMG_0885

Enjoy!

If you liked this post please follow us and share!

Instagram


Inspirational Wallpaper: March

IMG_2818

Happy 1st of March and National Reading Month 🙂 To celebrate our love for spring and reading, we have merged some of my photography with our favorite books to present you with some inspirational wallpaper. We hope this Lord of the Rings’ themed printable gives you happy spring vibes that will carry you through the month. Each month we will feature a new wallpaper for you to download and use based on what we find beautiful, inspiring, cozy, and noteworthy.

LOTR Wallpaper

If you liked this post please follow us and share! You can also find us on Instagram, Pinterest, and Twitter.

Instagram