Cozy Kitchen Series Part 2: Demolition

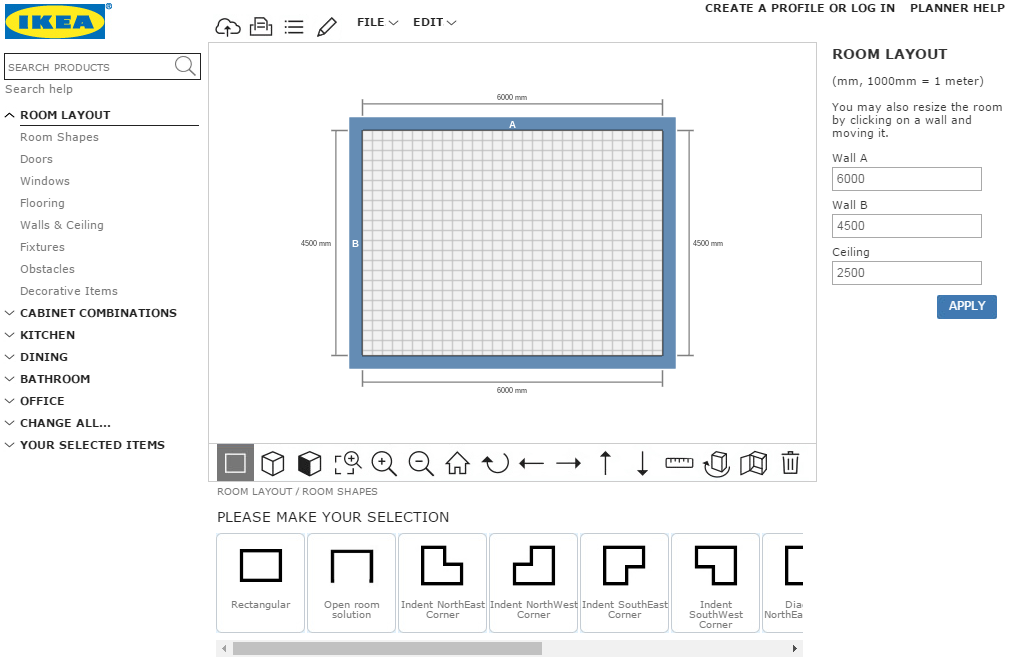
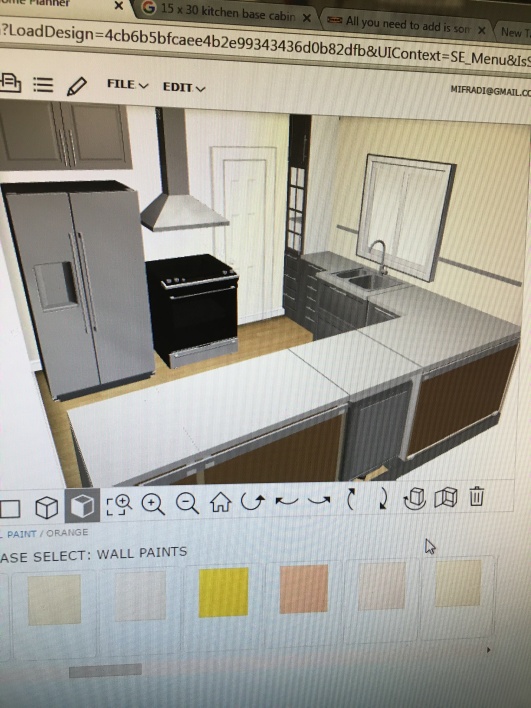
For those of you who read the first entry in our Cozy Kitchen Series, Cozy Kitchen Series Part 1: Planning, things will take an exciting turn in the next posts because we will be putting all that meticulous planning into action. Depending on the type of kitchen renovation you’re envisioning, having a checklist or order of operations will really help you stay organized and on task. Based on our kitchen plans, my checklist looked something like this:

  1. Remove walls
  2. Remove flooring and subflooring below the laminate tiles
  3. Re-wire and/or re-direct electrical wires
  4. Tile installation, grouting,  and sealing
  5. Drywall
  6. Cabinet Installation
  7. Have a countertop template be made
  8. Countertop installation
  9. Drywall mudding and sanding
  10. Priming and painting
  11. Appliance installation
  12. Clean up
  13. Kitchen organization

In this part of the series, I will cover only the demolition portion of our renovation; specifically what it entailed and why I made the choice to hire a contractor. As I mentioned in the last post, it was a no-brainer for us that we needed to tear down a wall or two to achieve the desired kitchen layout. Taking down walls is a great way to achieve an open-concept look and dramatically change the organization and feel of a room. Which might explain why HGTV is always so demolition-happy. “Let’s take down this wall and that wall.” While it’s not hard to complete, it is certainly more involved than these shows let on, which is why I want to lay it all out for you so there are no surprises. Before I get into the details of the demolition, I want to explain why I decided to hire a contractor to oversee this portion of the renovation.

As someone who thoroughly enjoys DIY construction projects and all that they entail, it was definitely hard to give up control of this part of the renovation. But when it comes to the structural integrity of the house and safety, those take priority over anything else and after much research, I realized it was against city ordinance and just not worth the risk. However, that didn’t mean there wasn’t a way to have some hands on experience and save a bit of money. I decided that I would be able to do the demoing myself as long as I did my homework and prepared accordingly. When I called around for quotes, I made sure to say that I would be removing the drywall and cleaning up all the debris so that they were just responsible for removing the beams and reinforcing the structure of the house where needed. Because of this, I saved around $700-1,000 just by doing my own demolition and clean up.

So here’s what you’ll need to do leading up to the demolition:

  1. Hire a reputable contractor
  2. File a city permit to do the construction (every city is different so check online or call and ask)
  3. You either can work with the city engineer for inspection and approval or have your contractor handle all of that and keep you out of it

I got lucky and hired a contractor who did steps 2 and 3 for me. After everything was approved by the city and we paid the appropriate fees, we set a date for the removal of the wall. All I had to do was make sure that the drywall was removed and the electricity was rewired in the adjacent wall before they arrived as well as keep my hands off everything structural when I directed my rage at the walls. My only advice is that if you are uncomfortable or unsure about working with electricity then hire someone. It is very dangerous if you don’t know what you’re doing and don’t follow your city’s code. As an electrician once told me, “you don’t learn wiring after the firetrucks have left.” You have been warned!

Demolition

Now for the fun part! This section is an overview of the tools you will need, the preparation, and the basics of how to knock down a wall. Some say the demolition is the easiest step of remodeling but I beg to differ. It’s not all aimless fun hammering down walls like you see on TV. You have to be cautious and really watch out for electrical, gas, and plumbing which is not difficult but is certainly tedious.

Tools
Ridgid Multi-Tool $79.97
Ridgid Wet-Dry Vac $79.97
Heavy Duty Mask  $39.97
Hammer $29.97
Stud Finder $19.97
Heavy Duty Bags $17.48
Broom $15.98
Plastic Cover $12.98
Retractable Knife $12.97
Pry Bar  $8.87
Heavy Duty Gloves $4.46
Goggles $3.98

Preparation
Before you start removing anything, make sure to prepare the area for the messy aftermath. If you are able to remove furniture or anything in the immediate vicinity to a different room and keep it closed, that would be ideal. If you are not able to do that you can always cover everything to the best of your ability with plastic sheeting commonly used by painters. Cover all air vents and shut off your furnace/AC because it will move the dust around the house and you do not want that. Ideally the demolition should take you a day or two depending on the workload so don’t fret about the chaos.

  1.  Remove furniture/tables to the side
  2. Cover all vents & misc. furniture with plastic or cloth to protect from debris/dust
  3. Rent a dumpster or arrange a way to get rid of the debris & garbage.

Taking down the walls
After you have prepared the space, you can  proceed with the demoing. Make sure you wear a dust mask, goggles, and appropriate clothing/gloves for the work at hand. Start by using a stud finder to find and mark their location on the wall. If you know the walls are hollow and there are no plumbing or gas  lines then go ahead and use the hammer to your heart’s content! I used the pry bar to break bigger pieces of drywall off along with a retractable knife to cut along the corner edges of the walls so I wouldn’t damage what I needed to keep intact. Just be careful not to hurt yourself. I made sure to minimize dust by trying to break larger pieces of drywall at one time. It may seem tedious and time-consuming at first but it will minimize the amount of work later cleaning and transporting debris. My recommendation is to use a combination of the hammer and multi-tool to create holes in which you can then insert the pry bar and break big pieces of the wall off. Clean up the debris regularly by using a broom and dust-pan or if you have a wet-dry Vac, vacuum every 30 minutes and empty it into a heavy duty bag so you don’t have to do it all at once. Once the drywall and debris are removed, your contractor(s) can begin restructuring the space.

All of the above may sound like a gross simplification but essentially that is the work that needs to be done if you’re looking to tear down a wall or two. To summarize, it’s not something you can do completely on your own but you can play a significant part and save yourself some money in the process. My next post will cover the rest of the order of operations and the struggles I faced along the way so don’t forget to check back in.  If you found this post helpful or have any questions, share your thoughts in the comments below and as always, if you liked this post please follow us and share!

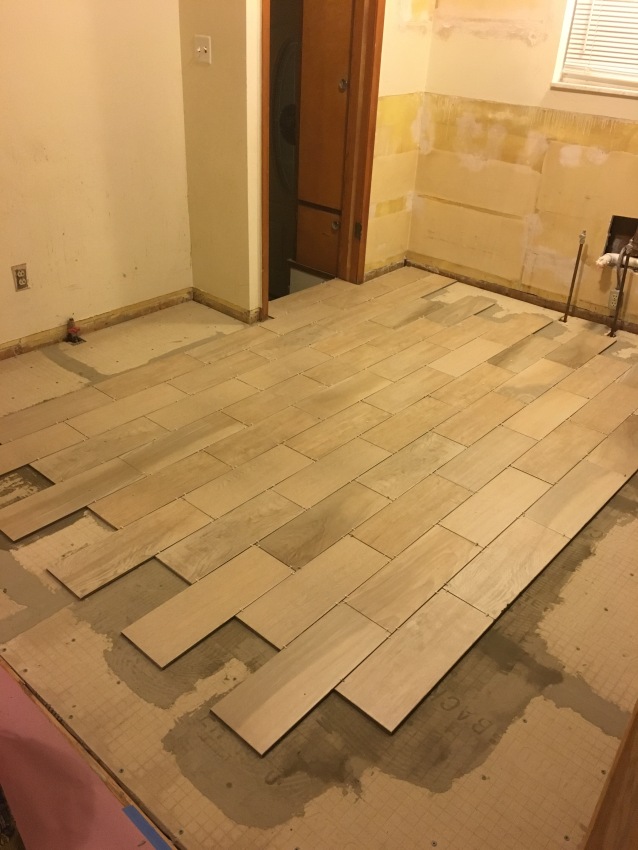
Sneak peek of the next post….


Mexican Rainbow Rice Bowls

IMG_3934

It’s almost the end of September and I’m starting to panic because my due date for baby #2 is less than two months away. I have no name picked out and I’m nowhere near as ready or organized as I need to be. Luckily, I am finding some success with meal planning in the sense that I’m getting better at making our favorite go-to recipes last longer and work better in conjunction with other weekly meals. Hopefully this will come in handy when I’m juggling a rambunctious toddler and newborn come November…but I’m not holding my breath.

My husband LOVES (probably more than me…okay maybe not but almost) Mexican food. I’ll admit, there is definitely something heavenly about the combination of savory beans or meats, fresh garden salsa, creamy avocados, and dairy. We find this combination works best in the form of a rice bowl because it’s easy to both make and assemble especially if you want a meal that will last longer than a day or two. However, I’ve been wanting a rice base that packs a little more punch and nutrition than the usual rice bowls call for. Armed with half of the rainbow in peppers and some fresh cilantro, I concocted this colorful rice that will no doubt take your rice bowl from meh to marvelous. The best part? You’ll never need to go back to Chipotle again.

Mexican Rainbow Rice Bowls

  • Difficulty: Easy
  • Print

Ingredients
2 cups uncooked long-grain rice
1 tablespoon vegetable oil
1 red pepper, diced
1 green pepper, diced
1 orange pepper, diced
1 yellow pepper, diced
1 medium white onion, diced
1 bunch cilantro, finely chopped
1 garlic clove minced
1 cup lime juice
3 1/2 cups water (sub broth)
1 tablespoon tomato paste
1 teaspoon chili powder
1 teaspoon cumin
salt and pepper to taste

Topping Ideas
Spicy Black Beans, shredded chicken, or thinly sliced steak
Avocados or guacamole
Corn
Green onion
Shredded Lettuce
Tomato
Jalapeño
Salsa
Sour Cream
Shredded cheese

Directions
1. Oil a medium, heavy-bottom pot and sauté the diced onion, minced garlic, cilantro, and peppers until tender.
2. Stir in the uncooked rice along with the spices, tomato paste, salt and pepper until fragrant and well-incorporated.
4. Pour in the lime juice and water/broth and bring to a boil.
5. Reduce the heat and let simmer covered until the rice is tender and the liquid is absorbed (approximately 15-20 minutes depending on the type of rice you use).
6. Once the rice cools, scoop into a bowl and load it up with your favorite toppings for a flavor-packed, hearty meal.

IMG_3909

IMG_3921

IMG_3931

What are your favorite rice bowl toppings? We would love to know in the comments below and as always, if you liked this post please follow us and share!


Cozy Kitchen Series Part 1: Planning

This is the first post in a series we will be doing covering our DIY kitchen renovation project that took us around 3 months to complete (working the weekends and some evenings). In this post we will discuss everything planning-related from brainstorming and design to calculating the cost of the finished project. We will also cover the timeline we envisioned for the duration of this renovation and how to realistically plan.

Just to give you an idea of the disaster we were working with, I’ve included some pictures below. My wife had taken some with her DSLR but can’t seem to find them so these fisheye view iPhone photos will have to do.

IMG_8984

IMG_8997

IMG_8996

IMG_8991

As you can see, there is not a lot of counter-space or any space for storage/keeping the kitchen organized. We also did not have a dishwasher which was fine until we had a baby and time became a luxury. The “hood” for the stove (if you can even call it that) was this disgusting hole in the ceiling that looked awful and was completely useless in circulating air. Aside from all that, it was just dimly lit, cramped, and uninspiring. But that was soon to change…

Brainstorming

This step is one I’m sure many of you are familiar with.  If you’ve ever walked through IKEA thinking to yourself, “this would look great in my house!” then you have partaken in the process of brainstorming. This is pretty much what we did for about six months before we began the serious design stage. We looked everywhere for style and layout inspiration including Houzz, Home Depot, Lowes, Pinterest, Instagram, IKEA, etc… The key is to save your ideas somewhere so that when you begin the designing process you have a better idea of what you want and don’t want. Throughout this process, we made sure to pay attention to four things: aesthetics, organization, functionality, and layout. As  I mentioned earlier we had barely any counter-space or storage space. For us, this was a major priority so we knew right away that to achieve the results we wanted, we would need to tear down the wall between the kitchen and dinning room.

Aside from that, we looked to other kitchens and blogs and dissected every minute detail. Here are some kitchens that we shared with each other throughout the brainstorming process. We made sure to tell each other what we liked about each kitchen so that we could begin to narrow things down.

open-white-kitchen

Open shelving was something that kept coming up over and over again in all the kitchens we shared with each other.  We just really loved how it opened up a space and made for easy access to everyday kitchenware. Image credit: House updated

20153_cosk09a_01_PH123795

ikea-traditional-looks-meet-modern-versatility__1364299411904-s4

We also picked up on the fact that most of the kitchens we liked were white with wooden accents. We rarely chose a kitchen that had dark cabinets so we knew right away that wasn’t our style. We wanted clean and bright and cheery. Image credits: IKEA

IMG_20151125_194156

A few months earlier we had stumbled on a kitchen in one of IKEA’s showrooms that we found practical based on our dimensions and layout so we captured some pictures just in case we wanted to make it a reality (hint: we did). We also realized here we liked the idea of grayish flooring with white cabinetry.

White-Granite-Countertops

We really went back and forth on countertops because both light and dark work really nicely with white cabinets. To pull all the elements together including the stainless steel appliances and gray floors, we decided on a light countertop with splashes of gray and black. Image credit: Artszipper

Design

After the brainstorming stage, and once we were ready to put our imaginations onto paper, I measured our kitchen to get a sense of the dimensions we would be working with. I did this as thoroughly as I possibly could to ensure the correct fit for cabinets, shelving, and fixtures. Even if you feel like you’re just getting started and playing around, remember that accurate measurement makes for accurate budgeting.

There are many planning softwares to choose from but I settled on using IKEA’s online Kitchen Planner software which is pretty user-friendly. Once I inputted the measurements for the walls, the windows, doors, ceiling, etc (see Figure 1) I began tinkering with the layout of the kitchen and adding cabinets like a madman. I managed to come up with my first design draft (see Figure 2) in no time and was pretty pumped to print it and review with my wife. Here is where the fun begins! Why, you ask? Because you will most likely change your first draft…many, many times.

ikea kitchen planner

Figure 1


IMG_0366

Figure 2

After many revisions we settled on a design similar to the model kitchen we liked in IKEA’s showroom. We then took our design to IKEA where we talked to one of their kitchen specialists who helped us remove unnecessary items and add cool little features like dampers so the cabinets don’t slam when you shut them. In the end, the final design we purchased was quite different from our initial draft and that’s completely okay. With a bit of number crunching, which I’ll talk about below, I realized it was cheaper to buy certain things externally so our Ikea purchase did not include a countertop, appliances, or flooring. For those looking for detailed information on what IKEA offers, follow this link to their informational PDF.

Budget Breakdown:

As a finance guy, I enjoy crunching numbers and shopping around to get the best possible deal. To be successful in that regard, however, it’s important to start with a clear maximum budget and have a 10% buffer for unexpected expenses that may arise. So for example, if you’re planning on spending 10k, set aside 1,000 for miscellaneous costs. We ended up going slightly over budget because of structural issues our engineer did not account for early on but I saved a lot by doing most of the labor. To give you an idea of where our money went, I’ve included a breakdown below.

1. Kitchen cabinets from IKEA (7 cabinets): $2,700
2. Appliances bundled from Lowes and Sears: $3,800
3. Granite countertop custom ordered from Home Depot with an undermount sink: $2,200
4. Flooring, drywall, paint, and misc. tools from Home Depot: $1,000
5. Outside labor for taking down a wall: $2,500
6. Permits: $900
Approximate Total: $13,100

Timeline

Finally, let’s talk about time. It can be very easy (unless it’s just me) to underestimate how long work takes. Sure, I can tile a kitchen in a day or two but not when I have a day job, a baby, and other endless responsibilities. This doesn’t even include the time for the ordering and delivery of cabinets, appliances, and countertops. On top of that you have to account for any hiccups you may face and be flexible so that you don’t get discouraged or burnt out easily. I know it’s laughable but I’m sharing this unrealistic timeline I had created so you don’t make the same mistake I did. Whether you’re planning on doing the labor yourself or hiring someone, make sure you are clear about your expectations and then ask yourself if you are being realistic. Many contractors don’t just take one job at a time so don’t expect a full kitchen to be up in a week. HGTV is not real life. In my case, I got stuck waiting a week to resolve the structural issues that came up and then another week to replace the subflooring when I attempted to remove the vinyl tile. It also didn’t help that my wife was going through terrible morning sickness so I couldn’t leave the baby with her to work on the kitchen when I got home.

Project Purchase Dates (Home Depot and IKEA): 3/19/2016
Project Start Date: 04/04/2016
Wall Removal: 4/9/2016
Wall Plaster and Cleanup: 4/9 – 4/10/2016
Floor Installation : 4/10-4/11/2016
Base Cabinet Installation: 4/12/2016
Countertop re-measurement: 4/12/2016
Backsplash tiling:4/15-4/16/2016
Shelf installation:4/18-4/20/2016
Appliance delivery: 4/23/2016
Countertop Installation: 4/26/2016
Project End Date: 5/01/2016

In the end, the month I had envisioned became three and I can confidently say it would not have been so stressful if I didn’t start out with ridiculously unrealistic expectations. So take it from me and go easy on yourself. It’s not the end of the world if you don’t finish within your time frame and if you don’t chances are your time frame was the problem, not you.

If you enjoyed this post then stay tuned for more in the Cozy Kitchen Series which will cover the order of operations and the big reveal 🙂 As always, if you liked this post please follow us and shareAnd if you have any questions or comments we would love to hear from you.

IMG_0878

Sneak Peek: Kitchen Tiling

Instagram


Inspirational Wallpaper: September

With labor day weekend behind us and work and a new school year ahead, let us remember to be kind and empathetic to everyone we encounter. It’s difficult to imagine sending my baby off to school, but if today was that day I think I would share these wise words:

“To be yourself in a world that is constantly trying to make you something else is the greatest accomplishment.” -Ralph Waldo Emerson

Life is difficult enough as it is so let’s embrace our uniqueness and allow others to do the same. Happy September! We wish everyone a wonderful, fresh start to autumn 🙂

img_4700

September Wallpaper