Instant Pot Creamy Red Lentil Soup

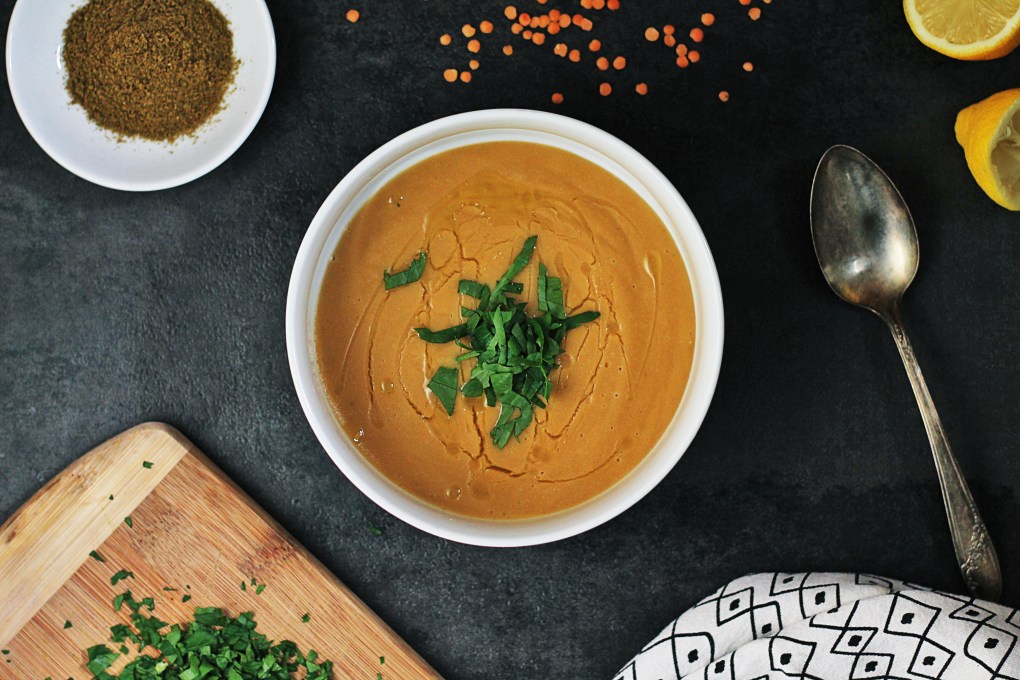
Hello friends! As you may have noticed, it’s been a while since we posted anything on here and that’s because life has been super hectic with both of us in graduate school. That doesn’t mean we haven’t been up to exciting things and now that the stress of last semester is behind us, we really wanted to start blogging again. We just miss it. So without boring you any further, I thought we would dive right in with a new recipe. This soup is a delicious Lebanese staple, nutritious, and very easy to make. You can certainly make it on the stove top if you wish but this almost hands-off version made in the Instant Pot delivers the same flavor while you can run around and check things off your to-do list. Anytime you can have a healthy homemade meal without having to be in the kitchen while it cooks is a win-win in my book.

img_7702

Instant Pot Creamy Red Lentil Soup

  • Difficulty: Easy
  • Print

Ingredients:
2 cups rinsed red lentils
1 medium onion,  diced
3 medium carrots diced
3 celery stalks, diced
2 garlic cloves, minced
1 tablespoon ground cumin
1/2 teaspoon white pepper
1 teaspoon kosher salt (more to taste)
8 cups water/vegetable stock
1/4 cup fresh lemon juice (more for serving)
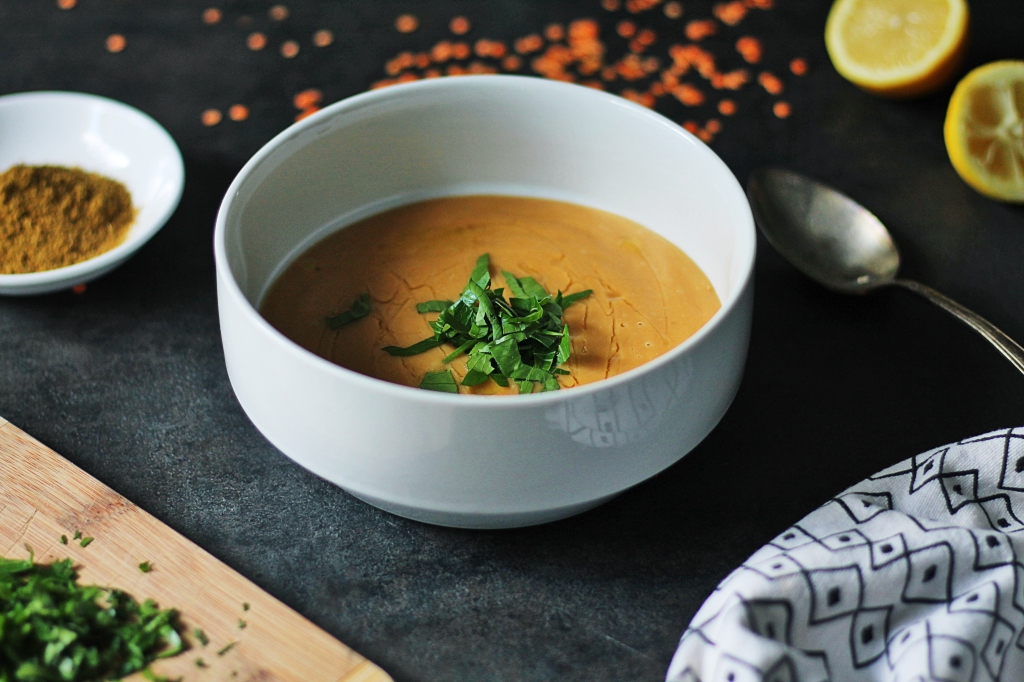
parsley for garnish
olive oil

Directions:

  1. In the instant pot, drizzle a bit of olive oil and put on “Sauté” mode for 10 minutes. Sauté the diced onions, carrots, celery, and minced garlic.
  2. Add in the rinsed red lentils, cumin, salt, pepper, and water/vegetable stock.
  3. Turn the Instant Pot on “Soup” mode for 30 minutes. Once it beeps and the valve is released stir the soup, season to your liking with fresh lemon juice and additional salt if necessary.
  4. Puree the soup using an immersion blender until creamy and smooth.
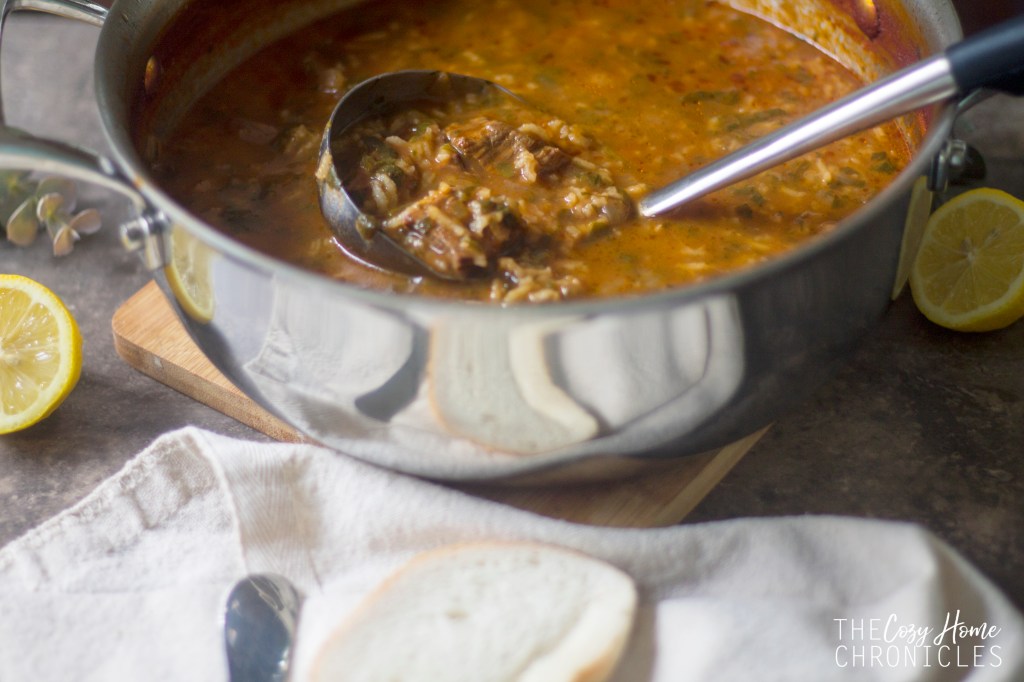
  5. Ladle into bowls, drizzle with quality olive oil, and garnish with parsley. Serve with a side of fresh crusty bread or .

img_7721

If you try this recipe and like it, we would love it if you would share or leave a comment below. For more related content, you can find us on Instagram where we share more of our day-to-day and Pinterest where we share our ideas and inspiration. And as  always…

signature3

Soy Chorizo Vegan Chili

We are so behind on our post schedule it’s not even funny but I figured as long as I’m not posting this recipe in June, we’re cool (your standards change when you’re a parent of two). So March is less than a week away but that means NOTHING here in Michigan because our weather is a wild card of unpredictability (sigh). I’m not totally complaining though because for those really chilly spring days, we have just the recipe to warm up our bones and souls. If you’re in graduate school like us or lead generally busy lives, this is another easy and delicious recipe to add to your meal plan during those really hectic weeks.

IMG_7650

As I’m sure I mentioned before on here, we are always looking for ways to cut down on our meat consumption and a few years ago I stumbled across this pretty stellar soy chorizo at Trader Joe’s for just $1.99. I know, right?! At first we used it in our egg scrambles but one day it hit me that it would make a great meat substitute base for a vegan chili. Spoiler alert: It does! Not only does it have that perfect ground beef texture but it’s so spicy you may find you don’t even need to season your chili at all. You can also cut the preparation time for this recipe by opting for canned beans instead of dried beans but either way, your watch, wallet, and tummy will be satisfied with this hearty bowl of goodness.

IMG_7628

Soy Chorizo Vegan Chili

  • Difficulty: Easy
  • Print

Ingredients
1 large onion, finely chopped
1 cup of finely chopped carrots
1 cup black beans, cooked
1 cup kidney beans, cooked
1 12 oz. package of Soy Chorizo, casing removed and crumbled
1 15 oz. can  of tomato sauce
4 cups water or vegetable stock
2 garlic cloves, minced
Olive Oil
Salt and pepper to taste

Note: *If you prefer your chili to be less thick, you can add more liquid to water it down. *You can also tweak this recipe to your liking and include more vegetables such as bell peppers, tomatoes, and corn. *I find the soy chorizo makes the chili spicy and flavorful enough for our taste, especially with the kids in mind, but if you find the flavor isn’t cutting it for you, you can add the following: 1 teaspoon ground sweet paprika, 1 teaspoon ground cumin, 1 tablespoon chili powder, and 1/4 teaspoon cayenne pepper (optional).

Directions
1. In a deep pot, drizzle a bit of olive oil and sauté your onion, and garlic on medium heat until the onions are soft, about 5 minutes.
2. Next add in the carrots and soy chorizo. Cook for about 2-3 minutes until the ingredients are well incorporated.
3. Finally, add in the water/stock, beans, and tomato sauce. Bring to a boil then let simmer on low until reduced and thickened, about 20-30 minutes.
4. Taste the chili and season to your liking or adjust the thickness.
5. Ladle your chili into bowls and serve with vegan cheese, non-dairy sour cream, and crispy tortilla chips.

IMG_7632

IMG_7652

If you liked this recipe and tried it, we would love it if you would share or leave a comment below. For more related content, you can find us on Instagram where we share more of our day-to-day and Pinterest where we share our ideas and inspiration. And as  always…

signature3

.


Tomato Parsley Rice Soup

IMG_5288

With colder weather finally on the horizon, I thought it would be a perfect time to share one of our favorite soup recipes. I wasn’t much into soup as a kid because I didn’t think it was a legit meal but this one always filled me up. I remember actually being happy coming home to see my dad standing over a large bubbling pot of his famous Tomato Parsley Rice soup. It’s the same look my husband gives when he comes home and sees it simmering on our stovetop. Pure joy. Because who doesn’t love a warm, hearty soup? The wonderful thing about this soup is that it is super easy to make with just a few simple ingredients you probably already have on hand. Although I call this recipe a tomato soup, it’s not so heavy on the tomato; the tomato paste is more for a bit of color. The real flavor lies in the broth; in the sweetness of the onion and richness of the beef. If you’re not into the meat scene, you can easily make this vegan by leaving the meat out and replacing the broth with a vegetable stock or tomato soup. I’ve made this meal countless times with a tomato soup base and it was a perfectly delicious, healthy, and filling alternative.

IMG_5809

Lately, I’ve been experimenting with boiling meat in advance and storing it with its broth in the freezer and I can happily report that it has not changed the quality of the meat. As long as you boil the meat until it’s tender you can have the base of a great stew or soup at the tip of your fingers. Simply defrost and add whatever flavoring, grains, and vegetables you like and you’ll have dinner ready in no time! This has been a huge time saver for me while my husband and I both navigate graduate school and homekeeping.

IMG_5814

Tomato Parsley Rice Soup

  • Difficulty: Easy
  • Print

Ingredients:
1 pound beef stew cubes
1 medium yellow onion, finely diced
1 large bunch parsley, chopped (plus extra for garnish)
1/4 cup uncooked rice ( I prefer long grain like basmati)
2 dry bay leaves
2 tablespoons tomato paste (more if you like it a deeper red)
8 cups water/vegetable/beef stock
2 tablespoons fresh lemon juice (more if you like it tangier)
olive oil
salt and pepper to taste

Directions:

  1. In a large pot, drizzle a bit of olive oil and brown the beef stew cubes and sauté the onions until translucent.
  2. Add your bay leaves and water/vegetable/beef stock and bring to a boil before reducing the heat. Be sure to skim any impurities that rise to the surface. Then cover and cook on a low simmer until the meat is tender (about 2 hours).
  3. Once your meat is tender, fish it out and shred it with a fork.
  4. To the broth, add in your rice, lemon juice, and tomato paste. Give it a quick stir and let it cook until the rice is tender (about 15-20 minutes). Stir in your shredded beef.
  5. Season with salt and pepper to your taste. Take the pot off the heat and add in the parsley, give it a gentle stir and let it sit for a few minutes before serving.
  6. Ladle into bowls, garnish with extra parsley and serve with a side of fresh crusty bread.

IMG_5820

IMG_5356

IMG_5840

If you do give this soup  recipe a try be sure to share with us. We love seeing our recipes on your table 🙂 And as always, if you liked this post please follow us and share!

signature3


Vegan Portobello Shawarmas

IMG_4131

I can’t believe how quickly the summer has ended! Although my husband and I both survived our first few weeks of the semester, we know that life is about to get  much busier and even more challenging. Blogging obviously isn’t going to be a main priority (booo, I know) but it will be nice to share some of our adventures as we trudge along through the rest of the school year. Some of the things that will still remain a priority, however, are eating clean and healthy and working toward a simple, sustainable lifestyle. To do that we will definitely have to become more efficient at organizing, meal planning, and prepping and that will certainly be easier with an arsenal of quick and easy recipes.

If you haven’t noticed, one of the things we’ve been trying to do around here is cut down on red meat. Sure there are many vegan dishes out there, including plenty of Middle Eastern options, but gosh darn it when you’re craving a shawarma, sometimes you really need to have your fix. Luckily, I found a way to have just that without the grease and fatty surprises and without all the baggage that comes with eating red meat. Eating portobellos as a meat substitute isn’t something new for us but incorporating meatless substitutes in very classic Middle Eastern recipes is. Who says you can’t have your cake and eat it too? I should note that this recipe has been tested and approved by my brother who leans toward carnivority (not sure if this is a thing). I won’t pretend that he was completely fooled but he had nothing but good things to say (he’s also a man of few words). I guarantee that you’ll be very pleased with this faux shawarma sandwich; the texture and flavor of the mushrooms combined with all of the vegetables and creamy tahini sauce, tastes pretty darn close to the real thing. Not only is it delicious but it is super easy to make and with minimal ingredients too. But you don’t have to take my word for it, try it yourself!

IMG_4108

IMG_4119

Vegan Portobello Shawarmas

  • Difficulty: Easy
  • Print

Ingredients
2 pounds portobello mushrooms
1 teaspoon shawarma spice (more if you like it spicier)
1/4 cup white vinegar
Olive Oil
Salt (to taste)

For sandwiches:
Pita bread
Tomatoes, diced
Onions, thinly sliced
Parsley, chopped
Pickled cucumbers or turnips, sliced
Sumac
Taratoor (tahini sauce)

Note: This recipe makes between 4-6 sandwiches depending on how stuffed you like them.

Directions

  1. Gently wash your portobello mushrooms and slice very thinly.
  2. In a large pan, drizzle olive oil and add in the mushrooms in batches. Each time the mushrooms start cooking down, add another batch to the pan.
  3. Once all the mushrooms are in the pan, add in the shawarma spice and vinegar, stir well to incorporate.
  4. Cook on medium-high until the liquid cooks off and the mushrooms begin to brown, approximately 10 minutes.
  5. In the meantime, prepare all your sandwich toppings and condiments.
  6. Open your pita bread into halves and layer on the goodness: portobello shawarma, tomato, parlsey, pickles, onions, sumac, and a drizzle of taratoor.
  7. Roll up and enjoy!

IMG_4113

IMG_4125


IMG_4140

If you liked this post please follow us and share!


Instagram


Banana Honey Walnut Toasts

IMG_2240

Although Ramadan ended over a month ago, we are still having a difficult time breaking some of our Ramadan schedule and habits. Not only do we still stay up pretty late (midnight is the norm for me), but we also eat like mice early in the morning because it feels strange to fill up right after we’ve woken up. With all the things we have going on in our life, we certainly can’t afford to skip out on the most important meal of the day so today I’m sharing a simple breakfast idea that’s sweet, crunchy, and filling. Banana sandwiches are something we grew up eating as a treat. My father would make it for us and share stories of his picky-eating days, growing up in Beirut, where all he would eat was bread and sugar to fill up. I guess you can’t really go wrong with bread and banana! Thankfully none of us turned out that picky but that doesn’t mean we can’t celebrate the product of my father’s resourcefulness 🙂

When I got married, I was introduced to a whole different world of foods I had never eaten. One of those things was geimar, a creamy Iraqi spread similar to clotted cream. It’s thick and rich in just the right way and it’s unsweetened which makes it the perfect base for a sandwich like this. We don’t eat it often but when my in-laws are in town we make sure to get our fill of geimar, samoon (Iraqi flatbread), and honey. When I photographed this recipe, I used sourdough toast that I had on hand but you can use any bread you like. If you desire more substance and less bread, you can cut the banana length wise and roll it up in a thin pita bread just like my dad used to do.

Ingredients
Quality artisan bread/toast
Salted butter or clotted cream
Banana
Honey
Walnuts

Note: You can use unsalted butter if you’d like but I find the saltiness works wonderfully with the sweetness of the honey and banana.

IMG_2245

Directions
Toast the bread of your choice and generously lather on some butter while it’s still a bit warm. Layer on banana slices and walnuts and then drizzle on some honey. Serve alongside a nice cup of piping hot tea.

IMG_2251

IMG_2253

If you liked this post please follow us and share!

Instagram


Lebanese Green Bean & Tomato Stew (Loubya Bi Zayt)

IMG_0887

Gardening season is officially in full swing and you know what that means, right?  Fresh, delicious vine-ripened tomatoes hand-picked from your very own backyard. After putting all that hard work into growing your garden, you’ll certainly want to savor the fruits of your labor.  Fresh tomatoes are perfect for salads, salsas, and sauces but why not try something new? Loubya bi Zayt, a Lebanese dish of green beans, onions, and tomatoes cooked in olive oil, is the perfect way to showcase your garden harvest. The tomato and olive oil combination is delightful and if stewed properly, results in a satisfyingly gelatinous texture. My father, whom I learned this recipe from, would cook the green beans with fresh finger peppers or jalapeños for a spicy kick. Since I have two little ones who eat with us, I don’t add any heat during the cooking of this dish but instead top my own plate with red pepper flakes for a nice kick. This dish is delicious on its own served with pita, green peppers, and sweet onions but it can also be treated as a side to a sizzling barbecued steak. In the past when my acid reflux was too much to handle, I would make basmati rice to serve alongside the green beans to break up the acidity of the tomatoes. Whichever way you serve this dish, you will not be disappointed. The best part? It’s super easy to make and requires just 3 main ingredients.

IMG_0863

IMG_0867

Lebanese Green Bean & Tomato Stew (Loubya Bi Zayt)

  • Difficulty: Easy
  • Print

Ingredients:
5 medium tomatoes, ripened
4 white onions, finely diced
2 pounds fresh green beans
2 tablespoons tomato paste diluted in 1 cup of water
1 garlic clove, thinly sliced
1/2 cup of olive oil, plus more
Salt and pepper to taste
Red pepper flakes to taste (optional)

Directions

  1. Clean and trim your green beans, cutting them into 1-2 inch pieces.
  2. Drizzle some olive oil in a large pot and sauté half of your finely diced onions until translucent and light brown. You can sauté all the onions at once to save time but the dish will be on the sweeter side no matter how much salt you add.
  3. While the onions are slowly caramelizing (careful not to burn), blend the ripened tomatoes in a blender with salt and pepper to taste. If you don’t want the tomato seeds or skin then strain before adding to the pot.
  4. To the pot, add in your green beans, garlic, and the rest of your onions and cook for 5-7minutes, stirring gently. You want the green beans to pick up flavor and color but make sure they don’t steam or they will taste rubbery.
  5. Finally, pour in the fresh tomato juice, diluted tomato paste, and 1/2 cup of olive oil and bring to a boil before turning the heat on low. Let it simmer uncovered on low heat for about 30-40 minutes until the green beans are tender and a thick gelatinous texture begins to form.
  6. Serve hot as the main dish or let it cool and serve as a side.

IMG_0879

IMG_0898

If you liked this post please follow us and share!

Instagram


Lebanese Lentil and Rice Pilaf (Mdardara)

img_0090

We know we haven’t posted in a while but we have been a bit busy working on some fun DIY projects around the house as well as an exciting project that we will be announcing next week. Although our lives are busy, we wholeheartedly believe in eating healthy homemade meals. It might seem difficult to strive for but there are plenty of healthy and simple meal options that one can make in a pinch. That’s why today I’m sharing one of our favorite vegetarian meal options that we enjoy almost every other week. I didn’t like this meal much when I was a child but it grew on me to the point that I now crave it as an adult. It’s a pilaf made of rice, onions, and lentils topped with more crispy caramelized onions and served with yogurt, crunchy radishes, and a side salad. It is both nutritious and delicious.

img_0099

To be honest though, there is one downside to making this dish. ONIONS. Your house will smell like onions, you will smell like onions, your car will smell like onions. The smell of onions will permeate your life for days. But I can promise you that it will all be totally worth it! I look back now and laugh but I remember in my early undergraduate days when I’d be getting ready to leave the house for my evening class and my father would start cooking this meal. I would try to race through the kitchen and out the side door but to no avail. That split second in the kitchen was enough to have me reeking. It’s funny to think that now, as a mom, I will be responsible for ensuring my family has their fair share of embarrassing, onion-filled moments. The circle of life. How beautiful 😉

img_0067

Lebanese Lentil and Rice Pilaf (Mdardara)

  • Difficulty: Easy
  • Print

Ingredients
1 cup brown lentils
1 cup white rice
2 medium yellow onions, diced
3 large yellow onions, cut into half rings (optional)
4-5 cups of water*
1 tablespoon extra virgin olive oil
1/4 cup vegetable oil
1 teaspoon salt
1/4 teaspoon black pepper

*Note: I use 2 cups of water to parboil the lentils and 3 cups to cook the onions, lentils, and rice together. Even on the lowest setting our stove gets very hot and cooks very fast. You may find you only need 2 cups of water rather than 3.

Directions

  1. Rinse your lentils under cold water and remove any small debris.
  2. In a small pot, parboil your lentils in 2 cups of water for 10-12 minutes. Drain and set aside for step 5.
  3. Meanwhile in a larger pot, begin caramelizing your finely diced onions in olive oil. This will take time so be patient. Keep the fire on low and stir every so often until you have beautiful golden brown (but not burnt) onions.
  4. Add the remaining 3 cups of water to the onions and bring to a boil. Stir well, reduce the heat, and let simmer for 2 minutes.
  5. Pour the rice, lentils, salt, and pepper into your onion mixture. Stir well, cover, and cook until all the water has been absorbed (about 15-20 minutes).
  6. While your rice and lentils are cooking, heat the vegetable oil in a saucepan and fry your onion rings in batches until crispy and golden brown. Let drain on a paper towel until ready to serve. This part of the recipe is a bit unhealthy and you can skip it though it won’t be the same. Or you can slow caramelize your onions (I have done this many times) but it will take more time and they won’t be as crispy.
  7. Top your mdardara with the crispy fried onions and serve with yogurt (to keep this meal vegan leave the yogurt out), radishes, mint, and a fresh salad.

img_0074

img_0083

img_0097

img_0090

What are some healthy meals you hated growing up but grew to love as adults? Let us know in the comment section below.

If you liked this post please follow us and share!

Instagram


Lebanese Stuffed Eggplants (Sheikh al-Mahshi)

img_7052

Growing up in a Lebanese household meant that eggplant was no stranger to the dinner table. One of my favorite eggplant dishes was (and still is) Sheikh-al Mahshi; a Lebanese casserole made of golden fried eggplants topped with spiced beef or lamb and cooked in a light tomato sauce. My father, who loved to cook for us, would make this dish using large purple eggplant slices for the base, tender filet mignon chunks and Lebanese pine nuts for the topping, and fresh homemade tomato sauce. Delicious is an understatement.

A few months ago, I was at a local market when I came across these large 11-pound boxes of assorted baby eggplant for only $3. It was a total steal and I ended up taking a box home with me to experiment with the other colorful eggplant varieties. Although I ended up blanching and freezing many of them for a rainy day, I decided to recreate my father’s recipe using baby eggplants for dinner one night. I have always found the Lebanese dishes I grew up with simple to make but with graduate school and a household to tend to, any shortcut that doesn’t jeopardize taste is definitely welcome. While I prefer the taste of homemade tomato sauce, having a quality canned sauce on hand can really speed things up. Cooking with ground beef also saves you the hassle of having to prepare and cut your meat. Some of my modifications, however, are not just to save time but to make the recipe a teeny bit healthier. Instead of deep-frying the eggplants to soften them, I blanched them and then browned the skins in a bit of olive oil. The only issue was that I found the skins of the yellow eggplant variety too thick to eat. I personally would not use them again in a recipe like this even though the flesh had a very nice flavor. With that being said, this version was a huge hit with the family and we hope you’ll consider adding this simple, healthy dish to your recipe box.

img_6981

Lebanese Stuffed Eggplants (Sheikh al-Mahshi)

  • Difficulty: Easy
  • Print

Ingredients

10-12 baby eggplant
1 lb lean ground beef
1 medium yellow onion, diced
1/4 cup pine nuts
1 15 oz can of tomato sauce (we use Simple Truth)
1 teaspoon ground cinnamon
1 teaspoon ground all-spice
1/2 cup chopped parsley
Extra virgin olive oil
salt and pepper (to taste)

Directions

  1. Preheat oven to 350F. Rinse the eggplants and trim the stems, leaving the hulls.
  2. Bring a large pot of water to boil and blanche the eggplants whole for 8-10 minutes until tender. In the meantime, toast the pine nuts until golden and set aside.
  3. Once the eggplants have cooled, gently make an incision from the hull to the bottom of the eggplant.
  4. OPTIONAL: Drizzle a bit of oil in a deep pan and brown the blanched eggplants in batches for 2-5 minutes then set aside (see step 7).
  5. Drizzle a bit of oil in a deep pan and sauté the diced onions until translucent.
  6. Add in the ground beef, cinnamon, all-spice, salt, and pepper and cook until meat is well done.
  7. Ladle a few spoons of tomato sauce into the bottom of a glass baking dish and lay the eggplants slit side up.
  8. Spoon the spiced meat mixture into each eggplant and cover with the remaining tomato sauce. Top with half of the toasted pine nuts and half of the chopped parsley.
  9. Cover your baking dish and bake in the oven for 30 minutes until the sauce is simmering.
  10. To serve, garnish with remaining pine nuts and parsley next to a bed of steaming vermicelli rice.

Note: If you end up with extra meat, just spoon the remainder evenly on the top of the sauce before baking.

img_6997

img_6998

img_7009

img_7027

If you liked this post please follow us and share!

Instagram