DIY Hanging Vase

This DIY project is the culmination of 3 very random happenings:

1) One of our New Year’s resolutions for 2016 was to find ways to incorporate more plants in our home. We love the sense of peace and purpose our plants bring to our home and we simply wanted to diversify our jungalow.

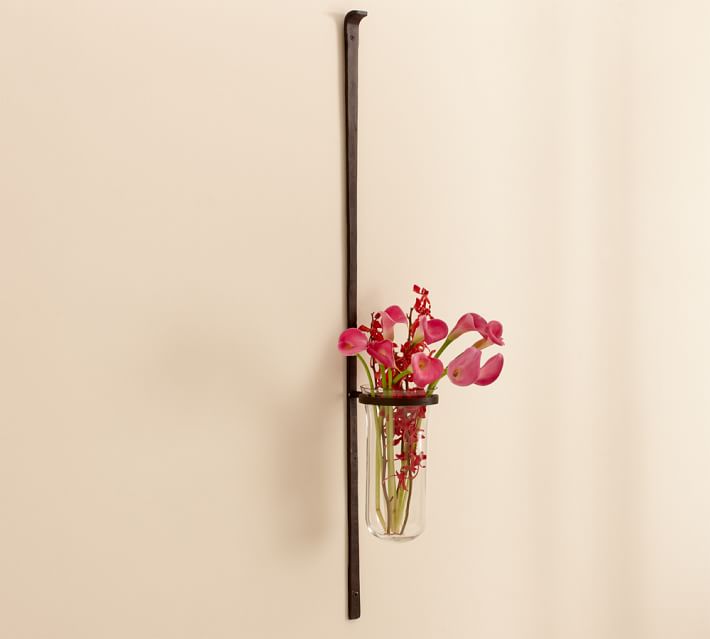
2) I came across these hanging vases while browsing the Pottery Barn website and really liked the concept (just not the price).

artisanal-wall-mount-vase-o

3) We can never resist the dollar section at Michaels and *somehow* ended up with 4 adorable glass test tubes for $1.50 a piece. If you have tubes around in your home (think spice tubes) that you aren’t using, this could be the perfect way to upcycle them 🙂

A few visits to the garage later and we had the perfect design for a hanging vase we had pictured in our mind. The finished product involves 4 hanging glass tubes that, while certainly smaller than the Pottery Barn Wall-Mount Vase, are far more economical ($15 compared to $69) and just as dazzling visually. If you’re looking for a budget-friendly way to incorporate more foliage without cramping your space with pots, this is the perfect solution for you!
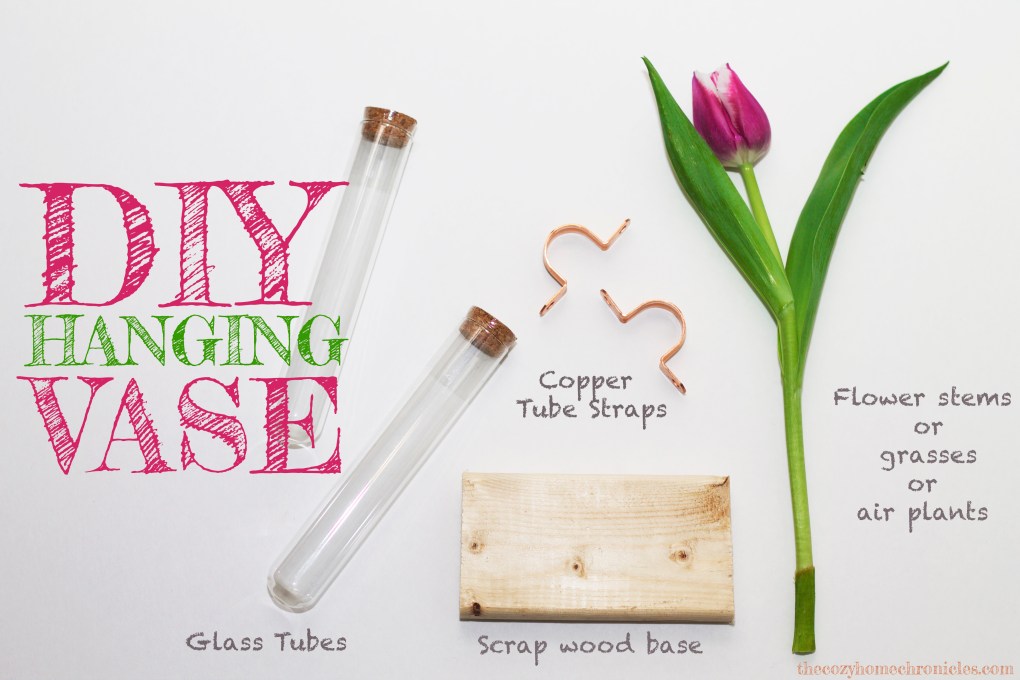
IMG_0680

Supplies
Glass Tubes
Scrap Wood
Copper Tube Straps
Screws
Hanging Kit or Command Hanging Solution

Tools
Drill
Hammer

Note: We did not list the dimensions of the tubes or the tube straps because that will depend entirely on what you find and decide to use. If you have your tubes just take them to Home Depot and you will be able to find the straps that fit them very easily. Also, you are not limited to scrap wood for the base; we just wanted to use what we have. If you’re looking for something less rustic, Michaels has a lot of nice wood pieces that could work. All in all, if you play your cards right, this DIY is very inexpensive and so easy to put together.

Directions
1.  Once you have all your pieces, all you will need to do is drill two holes (corresponding to the the holes in the tube straps) into your base. Make sure that your base is thick enough to withstand the length of the screws.
2. If you are choosing to hang these on your wall the old fashion way, go ahead and nail your hanger to the back of the base.
3. Once complete, drill the tube straps halfway into the base so that the straps are loose enough to adjust.
4. Slip your tube through the tube strap until it is positioned the way you like (we aligned our tubes so that the tube strap was the halfway mark). Once you are happy with the positioning of the tube, tighten the screws until the tube is secure (do this gently so as to not crack the tube).
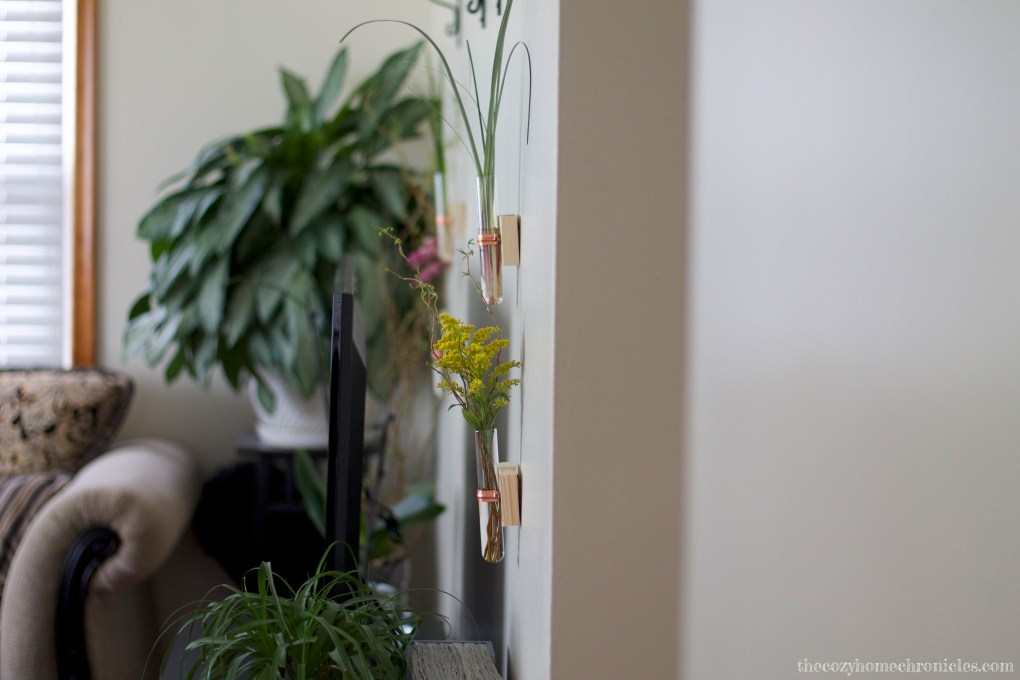
5. Mount your completed vase to the wall and decorate with real or artificial flowers, grasses, or air plants.

Now kick back and enjoy the little pieces of nature bringing your space to life 🙂

IMG_0674

IMG_0955

IMG_0964

IMG_0714

IMG_1053

IMG_1044

IMG_1035

IMG_1063

If you liked this post please follow us and share! You can also find us on Instagram, Pinterest, and Twitter.

Instagram


5 budget-friendly DIYs that can transform your bathroom

We witnessed many horrible bathrooms during our house hunting phase so we were quite grateful about the state of ours. Still, the blue toilet, sink, bathtub, and walls had us grimacing every time we looked. If we focused on the blue it felt like the whole bathroom needed to be gutted and redone but when we focused, instead, on the neutral gray tiles we knew that a few changes and some fresh decor was all this bathroom needed. Here we present 5 budget-friendly DIYs and some bathroom inspiration based on our experience renovating our main bath. If you are a new homeowner and don’t know where to start, this post is for you. If your bathroom tile is in great condition, some fresh paint on the walls and these simple DIY projects can dramatically transform your bathroom and make it look brand spanking new!

Untitled-2

Untitled-1

  1. Why pay at least $200 to replace your tub when you can paint it for $25? If there are no major problems with it (mold, cracks, dents, etc.), some fresh white paint can really make a difference, especially when you step into the tub for your first shower as a new homeowner 🙂
  2. Replacing an old, worn-out toilet can not only brighten the appearance of a bathroom but is great for the plumbing and conservation of water if that is important to you (we hope it is).
  3. A new vanity can really set the tone of the space; serving as a nice focal point and adding some much needed storage if your bathroom is on the smaller side. It really doesn’t take much to install one either.
  4. If you are changing your vanity and sink, might as well pick out a new faucet to go with it. Goodbye leaky, mildewy faucet and hello pretty shiny metal!
  5. Not to make a lightbulb joke here but it really doesn’t take a seasoned DIYer to change the lighting. Choosing something that adds bright light to the room and accentuates the overall look can go a long way.

This is certainly not a comprehensive list of all the changes you can make but it does cover the largest and often most expensive features in a bathroom renovation. With any renovation, there will always be cheaper and more expensive options so what we have included here are the best of both worlds: good quality at a reasonable price. Not all of these changes are necessary either, as it will depend on the state of your bathroom and budget. Once you have completed any of these major DIYs, you can begin with the fun part of the renovation…decorating!

For instance, you could really add a cozy, rustic feel to the space by installing recycled wood for open wall shelves above the toilet.

REISBATHROOM9_R3A1432

Image via Jayadores

Top with pretty trinkets, baskets, plants, and natural stones to bring the walls to life.

geode-bookends-set-of-2-o

Image via Pottery Barn

Images via Ikea

Don’t forget some inexpensive Ikea wall art and mirrors to make the room look more expansive.

erikslund-picture__0290565_PE424883_S4ekne-mirror__0380427_PE555348_S4Last but not least, throw down some plush bath rugs and a pretty shower curtain for a splash of color and pattern.

And voila!

BATH AFTER

If you liked this post please follow us and share!

Instagram


Swedish Beetroot Salad (Rodbetssallad)

IMG_0653

As you will come to see, the menu here is very much international. We both come from different cultural backgrounds and have experienced different parts of the world. And because we strive to eat healthy (mostly), homemade meals and a variety of colors, tastes, and textures, I end up experimenting in the kitchen to recreate our beloved childhood meals, vacation eats, and random cravings. I will never forget the first time I had Rodbetsallad while visiting my husband’s family in Sweden. I had eaten beets before but never like this and never on top of a hot dog. Seriously, you must try it (and let us know if you do). With a new sense of appreciation for this beautiful root, I decided this was the perfect way to get more beet in our diet. A few attempts later and my husband will agree that this is pretty darn close to the real thing.

Swedish Beetroot Salad (Rodbetssallad)

  • Difficulty: Easy
  • Print

Ingredients

3 small-medium pickled or freshly boiled tender beets
1 small white onion
1//2 cup of Mayonnaise (Trader Joe’s Vegan Mayo works nicely too)
1 tablespoon yellow mustard
Salt and pepper to taste

Directions

  1. Dice the onion very finely and place in a mixing bowl along with mayo and mustard.
  2. On a cutting board, slice the beets into thin rounds and then shred the rounds into fine ribbons (see images below).
  3. Add the beets to the bowl and mix well, adding salt and pepper to taste. Make sure the beets are cool before you add to the mix as hot beets melt the mayo and alter the consistency of the salad.
  4. Transfer to a pretty serving bowl and chill for 1 hour or more in the refrigerator.
  5. Serve with Knäckebröd (Swedish crispbread) for a scrumptious afternoon snack or generously spoon over grilled hotdogs for sweet creamy deliciousness.


2016-02-11 16.05.45

Processed with VSCOcam with c1 preset

Processed with VSCOcam with c1 preset

IMG_0643

IMG_0658

Beetroot salad, dill potatoes, crunchy vegetables, and crispbread make a hearty Smörgåsbord.


If you liked this post please follow us and share!

Instagram